Master the Method
The use of overlapping, multidirectional strokes in the correct sequence is key to successful instrumentation of deep periodontal pockets.
The use of overlapping strokes in different directions is critical to achieve complete removal of biofilm, calculus, and contaminants from root surfaces. Comprehensive scaling, root planing, and debridement are best accomplished by activating a systematic combination of overlapping vertical, oblique, and horizontal strokes, which are often described as crosshatching or multidirectional strokes (Figure 1).1,2 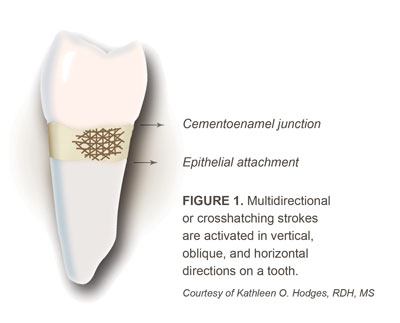
Treating patients with moderate to advanced periodontitis can be challenging, and developing expertise in the application of multidirectional strokes is essential to successful outcomes. As the topic of instrumenting difficult areas of root anatomy is often not covered sufficiently during formal dental hygiene instruction, most clinicians will need to expand their knowledge and skills through experience.
The successful treatment of periodontal patients depends on the skilled and systematic utilization of multidirectional strokes.
RATIONALE
Biofilm sustains colonies of periodontal pathogens on every surface of the root in deep periodontal pockets. When biofilm and calculus remain undetected and are not removed, attachment loss is likely. Deliberate mechanical disruption and elimination of biofilm, calculus, and root surface contaminants are required to treat and arrest periodontal diseases.3–5 During initial scaling and root planing or debridement for periodontal maintenance, every square millimeter of root surface must be accessed to eliminate biofilm and deposits from deep periodontal pockets and root anatomy. Without thorough removal of deposits, periodontal breakdown will persist and the gingival tissue will not heal.5–7
MULTIDIRECTIONAL STROKES
Vertical strokes are activated parallel to the long axis of the tooth, and are initiated at a right angle to the horizontal rings of calculus. These strokes are most useful for mesial and distal surfaces of both posterior and anterior teeth. The movements of oblique strokes are diagonal to the long axis of the root, similar to vertical strokes. These strokes can be activated in oblique channels on all surfaces to effectively remove horizontal ledges of calculus.7 Horizontal strokes are achieved by moving the instrument perpendicular to the long axis of the tooth. They are usually applied to facial and lingual surfaces of both anterior and posterior teeth, but can be used for deep pockets on any surface, on line angles, or against long, thin pieces of calculus.8
Selection and application of stroke direction are determined by the goal of the procedure. A clinician must evaluate whether the patient requires initial therapy or routine periodontal maintenance. The type, quantity, and location of the deposits7 influence instrument selection and sequence, clinician and patient positioning, fulcrum placement, stroke direction, and stroke pressure. Once treatment needs are identified, it is critical to synchronize these elements to activate effective working strokes.
When treating patients with deep pockets and heavy calculus during initial therapy, multidirectional strokes are essential because the entire root surface must be prepared for healing. Periodontal maintenance patients with deep pockets, light calculus, and tight tissue tone require a combination of strokes. Additionally, periodontal maintenance patients with shallow, bleeding pockets with light calculus and biofilm may need multidirectional strokes.
The use of a specific sequence for various directional strokes is crucial. A systematic method and sequence of multidirectional strokes is described below to accomplish thorough and efficient elimination of deposits in deep periodontal pockets.
RECOMMENDED SEQUENCE
Step 1. If deposits are heavy, start by using multidirectional strokes with an ultrasonic scaler. Begin with a large or thin ultrasonic insert/tip designed for use on high power. Utilizing medium high to high power, activate multidirectional strokes, beginning with vertical, probe-like strokes to break up the ledges of calculus, followed by oblique and horizontal strokes to remove as much deposit as possible (Figure 2). If ultrasonic scaling is contraindicated or the calculus is not tenacious, clinicians may skip step 1.
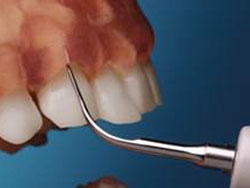
FIGURE 2. A thin ultrasonic tip is adapted to the facial surface of a maxillary canine for a vertical or horizontal stroke on medium or high power. Courtesy of Hu-Friedy Mfg Co LLC
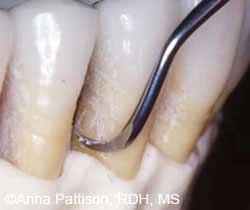
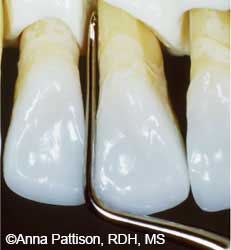
FIGURE 3. A rigid 204SD sickle scaler is adapted for vertical strokes on the distal surface of a mandibular premolar.
Step 2. Use vertical or oblique strokes with sickle scalers or large universal curets because of their efficiency in removing heavy deposits. With firm pressure, these strokes engage the apical edge of the deposit at right angles. For patients with heavy supragingival and subgingival deposits just below the gingival margin, sickle scalers may be used to fracture rings of calculus during initial therapy. Large universal curets are more effective in deep pockets where sickle scalers cannot be safely adapted. Scaling methodically in 1 mm to 2 mm channels in a coronal direction systematically breaks the calculus off in small pieces. Scaling first with sickle scalers or universal curets removes moderate or heavy calculus prior to using Gracey curets (Figure 3).
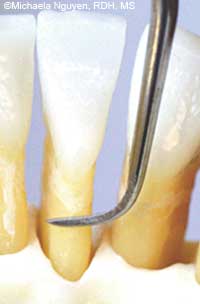
FIGURE 4. A Gracey 1/2 or 5/6 blade is too large to adapt for a deep vertical stroke on a mandibular incisor.
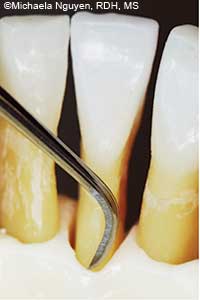
FIGURE 5A. The blade of this Gracey 1/2 curet is inserted deeply for a horizontal stroke.
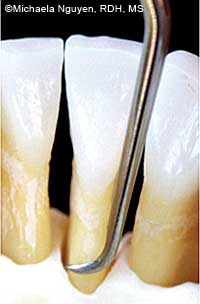
FIGURE 5B. The mini Gracey 1/2 curet adapts better for a vertical stroke on the same mandibular incisor as seen in Figure 5A.
Step 3. Use vertical or oblique strokes with standard or extended Gracey curets to remove residual pieces of subgingival calculus. Gracey curets are designed with an offset blade (approximate 70° angle to the shank) to scale and root plane with correct angulation when the lower shank is parallel to the surface being treated. The rounded back and toe of a standard or extended shank Gracey curet enable its deep insertion into a periodontal pocket without traumatizing the epithelial wall of the pocket.9
Step 4. Use horizontal strokes with Gracey or universal curets on any root surface when residual moderate calculus cannot be accessed with vertical or oblique strokes. Horizontal strokes are critical for successful calculus removal in deep pockets because a standard curet blade positioned for a vertical or oblique stroke is often too large to adapt to root curvatures or for deep insertion in the pocket, especially in narrow pockets or areas with tight tissue tone (Figure 4).10 Insert the blade subgingivally with the toe directed apically, and use a gentle, exploratory, vertical probing stroke to feel for the base of the pocket. This placement allows the full length of the blade to extend to the junctional epithelium and adapt to the curvatures of the root (Figure 5A). Activate short, controlled, overlapping horizontal strokes to avoid trauma to the epithelial attachment and to prevent laceration of the gingiva. Carefully adapt and apply pressure to the lower third of the blade and use precise strokes to scale from an area with no calculus to an area with calculus.
Scale from the coronal edge of the calculus and work apically toward the base of the pocket. Use this technique with a Gracey 7/8, Gracey 13/14, or universal curet to access deep pockets, line angles, concavities, or developmental grooves (Figure 6A and Figure 6B).
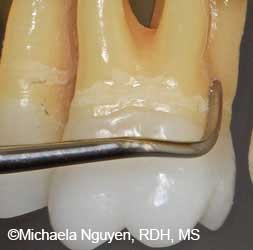
FIGURE 6A. A Gracey 13/14 curet with the toe directed apically is used for horizontal strokes on the distal line angle of a maxillary molar.

FIGURE 6B. Here, the Gracey 13/14 curet is ready to perform horizontal strokes on the distal line angle of a mandibular molar.
Step 5. Use vertical, oblique, or horizontal strokes with mini-bladed Gracey curets. With mini-bladed Gracey curets, vertical strokes can be used to access deep, narrow pockets with tight tissue tone (Figure 5B). Mini-bladed curets are shorter and thinner than standard designs, allowing for better insertion and adaptation to root morphology while minimizing distention and trauma.11,12 Vertical strokes using a mini or micro-mini Gracey curet are especially effective on all surfaces (Figure 7A). The Gracey Curvette Sub-0 curet adapts precisely to the pronounced root curvatures on all anterior teeth (Figure 7B). Mini-bladed Gracey curets may also be used with horizontal strokes; however, if the tissue is tight, their use is limited to the cementoenamel junction or developmental depressions just below the gingival margin because these strokes might not extend far enough subgingivally.12,13 If the tissue is loose, they may be used with oblique and horizontal strokes for root concavities in deeper pockets.
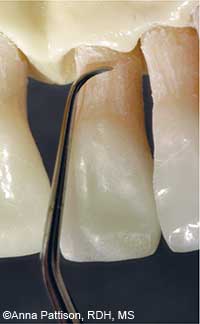
FIGURE 7A. The blade of this micromini 1/2 curet is positioned for vertical strokes on the palatal surface of a maxillary incisor.
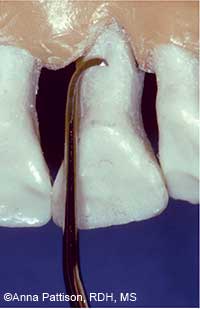
FIGURE 7B. Here, a Gracey Curvette Sub-0 curet is positioned for vertical strokes on the palatal surface of a maxillary incisor.
Step 6. Apply vertical or oblique strokes with Hirschfeld files when instrumenting residual sheets of tenacious, burnished calculus. The small multiple cutting edges on these instruments are able to fracture the surface of the burnished calculus, making it easier to remove with subsequent instrumentation (Figure 8).14 Some clinicians use Hirschfeld files to initially break up calculus, while others apply them at the end of the sequence to facilitate complete calculus removal.
CONCLUSION
The use of multidirectional, overlapping strokes in a sequenced pattern for all areas of the mouth is necessary to disrupt biofilm and calculus deposits. If left alone, healing of gingival tissue and periodontal pockets will not be achieved. Therefore, mastering multidirectional strokes is a necessary skill that should be implemented in clinical practice.
REFERENCES
- Hodges K. A close-up look at explorers. Dimensions of Dental Hygiene. 2013;11(9):34–38.
- Darby ML, Walsh MM. Implementation. In: Dental Hygiene Theory and Practice. 3rd ed. St. Louis: Saunders; 2010:444.
- Perry DA, Takei HH, Phase I Periodontal Therapy. In: Newman MG, Takei HH, Klokkevold PR, Carranza FA, eds. Carranza’s Clinical Periodontology. 11th ed. St. Louis: Elsevier; 2012:448-451.
- Slots J. Low-cost periodontal therapy. Periodontol 2000. 2012;;60:110–137.
- Matsuda S, Wilkins EM. Nonsurgical periodontal instrumentation. In: Wilkins EM, ed. Clinical Practice of the Dental Hygienist. 11th ed. Philadelphia: Lippincott, Williams and Wilkins; 2012:608–613.
- Lowenguth RA, Greenstein G. Clinical and microbiological response to nonsurgical mechanical periodontal therapy. J Periodontol 2000. 1995;9:14-22.
- Shiloah, J, Patters, M. Repopulation of periodontal pockets by microbial pathogens in the absence of supportive therapy. J Periodontol. 1996;67:130-139.
- Hodges K. Channeling for success. Dimensions of Dental Hygiene. 2013;11:34–37.
- Wilkins EM. Instruments and principles for instrumentation. In: Wilkins EM, ed. Clinical Practice of the Dental Hygienist. 11th ed. Philadelphia: Lippincott, Williams and Wilkins; 2012:583.
- Pattison AM, Pattison GL. Periodontal Instrumentation. 2nd ed. Norwalk, Conn: Appleton and Lange; 1992:170.
- Long B. The mini revolution. Dimensions of Dental Hygiene. 2003;1(3):28–31.
- Pattison AM, Matsuda SA. Technique focus: mini-bladed Gracey curets. Dimensions of Dental Hygiene. 2006;4(2):28–30.
- Pattison AM. Keys to Effective Calculus Removal. Dimensions of Dental Hygiene. 2011;9(10):50-53.
- Pattison AM. Using periodontal files. Dimensions of Dental Hygiene. 2008;6(12):42.
From Dimensions of Dental Hygiene. November 2013;11(11):36,38–40.
