Removing Burnished Calculus
Calculus location, instrument selection, and indications for use are considerations for removal of these tenacious deposits.
Removal of burnished calculus is challenging yet extremely important to create root surfaces that are biologically compatible with the periodontium and to reduce inflammation. Endoscopy has shown that calculus is strongly associated with inflammation in the pocket wall.1,2 Subsequently, the incomplete removal of calculus leaves a niche for irritants to promote inflammation, contributing to reinfection and disease recurrence.3 Burnished calculus is the smoothing of deposits by instrumentation, creating a hard and dense structure. Burnishing is inadvertent and results from inadequate instrumentation due to technique and time.
Assessment
Bleeding on probing is a key indicator of burnished calculus.4 Inflammation adjacent to burnished deposits is not easily determined. In fact, gingiva often appears pink, taut, and fibrotic. Therefore, the gingiva should be assessed with periodontal probing for bleeding points, pocket depth, and clinical attachment level. Radiographs are important also to evaluate root topography and bone loss.

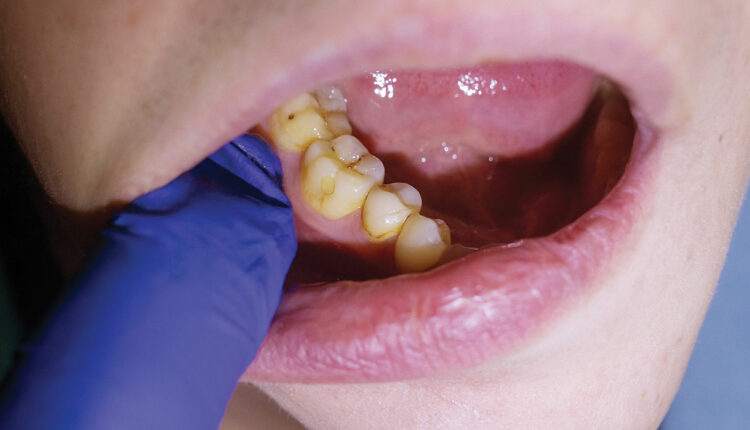
Exploring the root surface and not feeling normal root anatomy nor an apical and coronal border of a deposit are other ways to identify burnished calculus (Figure 1). Compressed air aids in detection by evaluating root surfaces near the cementoenamel junction and in the periodontal pocket, should the gingiva be inflamed.
Initial Instrumentation
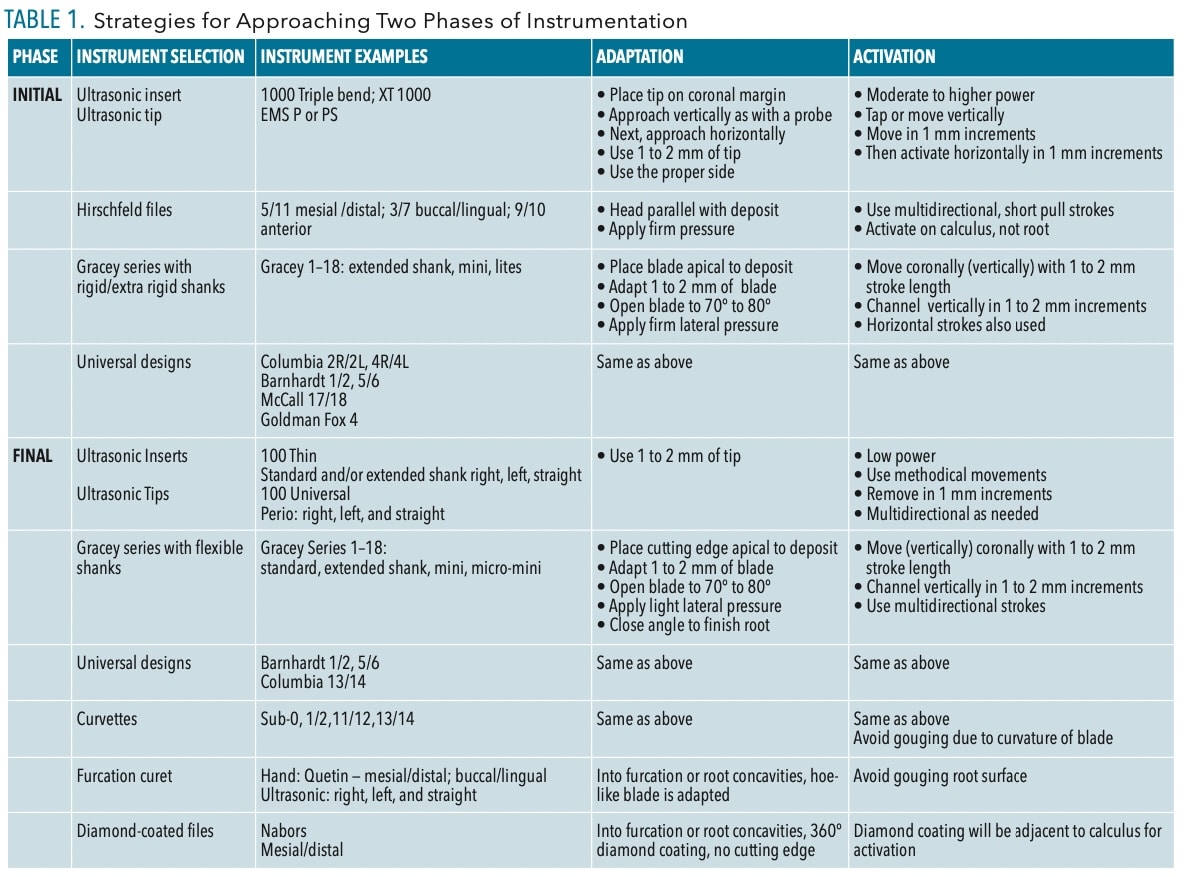
Initial instrumentation is critical as the start of the process determines the outcome of calculus removal (Table 1, page 20).
Instrument Selection. Explorers are needed to detect calculus and evaluate instrumentation. Consider the extended shank 11/12, standard 11/12, 3A, or a 2 with a long working end and shank. An explorer is important because rigid curets and files do not have the same tactile properties as instruments with flexible shanks, such as an explorer.
Initially, files are ideal to fracture tenacious calculus deposits. Hirschfeld files, while small, are sturdy with rigid shanks. Because of the flat and round working end, Hirschfeld files adapt well to all surfaces and deposits in shallow or deep pocket depth. Orban files might also be useful if the gingiva is inflamed and elastic.5,6A tanged file is used to sharpen files.
Ultrasonic instrumentation is an option provided the correct tip design and technique are employed. Tips should have wide shanks, be round, have edges or bends, and be indicated for use on higher power. Tip designs that are thin and fine will not adapt well or promote enough power to fracture deposits.7
Second, sharp instruments with rigid or extra rigid shanks are needed due to the tenacity of deposits. Examples include Gracey instruments with rigid or extra rigid shanks, and universal curets with moderate or rigid shanks and long working ends (Table 1). Gracey instruments with standard shanks will be too flexible to remove this type of calculus.

When selecting instruments, consider deposit size, deposit location, and pocket shape. Also, root anatomy is critical to evaluate. Burnished calculus can be large, moderate, or fine and can be located in shallow (4 or 5 mm) or deep pocket depth (more than 6 mm) within wide or narrow pockets (Figure 2).
Choosing the length of an instrument’s shank is determined by the pocket depth: extended shanks are for depths greater than 5 mm. The shape of the pocket is critical when evaluating the blade width and length. A narrow pocket needs a Gracey extended shank mini or micro mini, or lites for effective treatment. Also, narrow pockets on the palate of the maxilla justify short and thin blades. Wide pockets are instrumented with rigid Graceys with longer and wider working ends as well as universal designs.


Technique. Files are adapted with the working end or head placed parallel to the deposit (Figure 3, page 20). The file head should be adapted on the calculus and not on the root surface. The file is engaged with pressure and pulled with short 1 to 2 mm strokes to fracture the dense structure. Working strokes are used in varied directions to crush calculus.5,6
With ultrasonic technology, approach the calculus from the coronal to the apical portion. Use vertical strokes, as with probing (Figure 3 and 4, page 20), particularly if using a round tip, and progress to horizontal strokes on the sides and top edge of the deposit. Approaching tenacious calculus from the bottom or middle of the deposit might burnish.
Adapt only 1 to 2 mm of the tip in an oblique (tangential) direction after the initial removal (Figure 5). Adapt the proper side of the tip according to the technology: magnetostrictive or piezoelectric. Activate ultrasonic instrumentation using moderate to higher power; low power will enhance burnishing. Strokes should be slow to methodically remove deposits in 1 to 2 mm overlapping channels.6

Correct adaptation with sharp curets starts with a light grasp and fulcrum that is firmer when deposit is removed. The fulcrum, grasp, and instrument create a tripod support needed to apply moderate lateral pressure. Curets are adapted at the apical portion of the deposit with 1 to 2 mm of the blade contacting the root (Figure 5).
Apply key principles of activation, such as use of a sharp curet with a rigid or extra rigid shank and a blade that negotiates the pocket shape. Removal occurs in 1 to 2 mm segments in width and depth. This channeling is more effective then shaving deposits from the outside surface to the surface adjacent to the root.
Again, slow and methodical overlapping strokes are recommended. Fast working strokes tend to not engage deposits of this type. In between the short overlapping working strokes, relax the grasp and fulcrum and then tighten in a balanced form when reactivating.
Final Instrumentation
Do not attempt to remove small, fine deposits with an appropriate instrument until large and heavy deposits are removed. Doing so will create additional burnishing. In the first phase, adapt and activate instruments repetitively until the remaining deposit is fine before for the final phase of the process (Table 1).
Instrument Selection. Ultrasonic tips and inserts with thinner diameter shanks and varying working end lengths are options for this phase of calculus removal. The deposit density and size should be removable with flexible shank curets such as Gracey designs, with or without extended shanks, and universal designs. Curvettes and furcation curets are also options for final instrumentation. Hand-activated diamond coated files are indicated for fine, light deposits in furcation areas and root depressions.

Technique. At this point routine instrumentation techniques can be used for adapting and activating; the bulk of the deposit is removed (Figure 6). Activate appropriate working strokes with ultrasonic technology and hand-activated instruments until the root surface is deemed smooth and prepared for healing (Table 1).
Reevaluation
Instrumentation for burnished deposits is tedious and time consuming. Inflammation and hemorrhage will interfere with removal; therefore, reevaluation at 4 to 6 weeks is critical. At this time, reductions should occur in gingival inflammation and pocket depth. Healing will be evaluated and root surfaces explored with less bleeding and pocket depth. Reinstrumentation of remaining areas will occur.
Conclusions
Calculus location, preferred and available instruments, and instrument indications are considerations for burnished calculus removal.
Highlights for removal are:
- Select appropriate instruments for the deposit size and location as well as pocket topography and depth.
- Schedule sufficient appointment time to successfully remove burnished deposits.
- Adapt and activate instruments correctly, which differs from nonburnished deposits.
The use of a dental endoscope would enhance outcomes at any stage of instrumentation.
References
- Wilson TG, Carnio J, Schenk R, Myers G. Absence of histologic signs of chronic inflammation following closed subgingival scaling and root planing using the dental endoscope: human biopsies — a pilot study. J Periodontol. 2008;79:2036-2041.
- Wilson TG, Harrel SK, Nunn ME, Francis B, Webb K. The relationship between the presence of tooth-borne subgingival deposits and inflammation found with a dental endoscope. J Periodontol. 2008;79:2029–35.
- Cobb CM, Sottosanti JS. A reevaluation of scaling and root planing. J Periodontol. 2021:92:1370-1378.
- Checchi L, Montvecchi M, Checchi V, Zappulla F. The relationship between bleeding on probing and subgingival deposits. an endoscopical evaluation. Open Dent J. 2009;3:154-160.
- Hodges KO. Using files in periodontal therapy. Dimensions of Dental Hygiene. 2004;2(11):16–20.
- Pattison AM. Tips on technique: using periodontal files. Dimensions of Dental Hygiene. 2008;6(12):42.
- Hodges KO. Negotiating Deep Pockets with Ultrasonics. Dimensions of Dental Hygiene. 2019;17(1):16–21.
From Dimensions in Dental Hygiene. September 2023; 21(8):18-21.
