 MICHAELA NGUYEN, RDH, BSDH, MS
Anatomy of Instrument Design and Selection
Choosing the best instrument for the task at hand requires knowledge of the available armamentarium.
While the use of ultrasonic scalers in periodontal therapy has grown in popularity, manual subgingival scaling continues to be the gold standard when treating inflammatory periodontitis and periodontal pockets deeper than 6 mm.1,2 The importance of hand-activated instrumentation has also been highlighted due to the risks posed by ultrasonic-generated aerosols, particularly during the global pandemic.3
In order to best utilize manual instrumentation in periodontal therapy, strong knowledge of instrument design characteristics to assist in instrument selection is key. Using a variety of instrument designs to adequately address each task at hand will improve the therapy’s likelihood of success.
Handles
A variety of options are available regarding an instrument’s shape, material, texture, diameter, and weight. Whether an instrument handle is angular, straight, or round (ergonomically designed) may impact the amount of pressure or pinch force needed to hold the instrument.
Different types of material are used to create instrument handles including stainless steel, plastic/resin, and silicone. The material from which the handle is made also impacts the amount of pressure needed to generate enough force to travel from the clinician’s hand to the tooth surface. For example, a stainless steel handle may cause the clinician to use more force, thus increasing fatigue.4,5
The texture of the handle also plays a role in the amount of force that is applied. A smooth handle—especially with excessive amounts of saliva or blood between the handle and fingertips of the gloves—can hinder a secure grasp, causing slippage and possible trauma. A textured handle supports a clinician’s grip, allowing him or her to use more force.
A thick diameter handle (10 mm) may be more comfortable to grasp and reduces repetitive motion injury.5,6 With limited maximum opening of the mouth, however, the large diameter may interfere with the clinician’s ability to extend the instrument to the posterior teeth, especially as periodontal pockets become deeper.
The weight and internal structure of a hollow vs solid handle are also considerations. A hollow handle may increase tactile sensitivity compared to a heavy handle. However, hollow-handled instruments vibrate more significantly than heavy handles.7
Shank
The shank is the extension from the handle to the working end. The functional shank varies in length and angle. The terminal shank runs from the blade to the first bend in the shank. Terminal shank length affects the clinician’s ability to reach deep pockets and determines where the instrument will be utilized. Parallel positioning of the terminal shank provides a visual cue to the base of the pocket.
An extended shank is more beneficial in patients with deep periodontal pockets and/or clinical attachment loss. A shorter shank is best for patients with shallow pockets, little to no attachment loss, and supragingival calculus.7
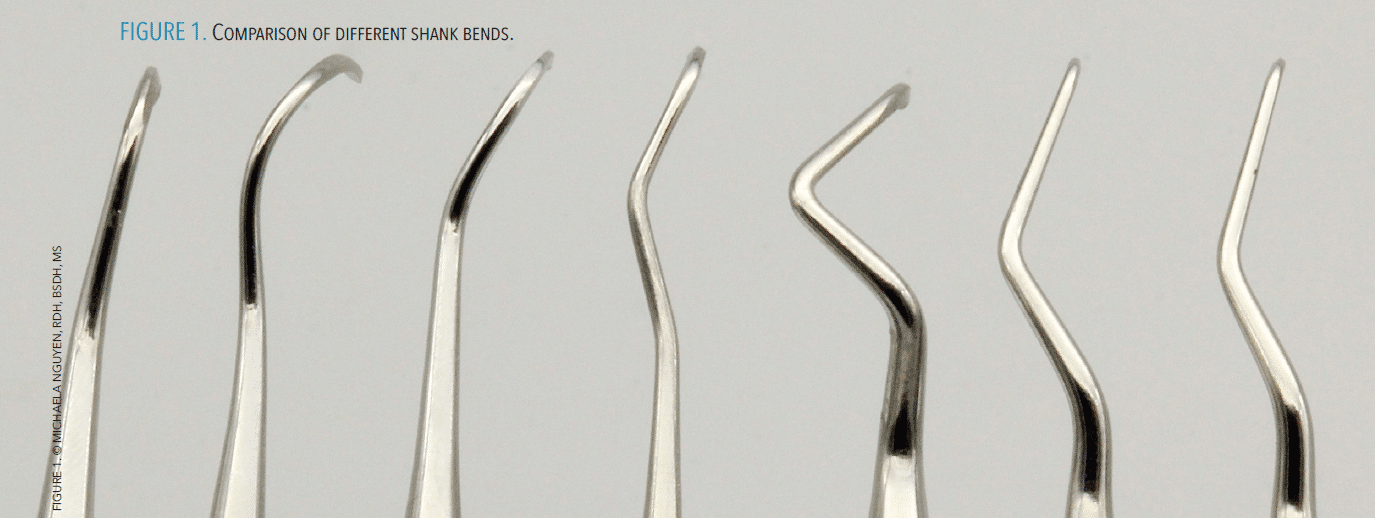
The angle of the terminal shank will determine the position of the blade and its adaptability to the surface being scaled. The more acute the angle, the more posterior an instrument can reach with proper angulation (Figure 1).
 Another aspect of shank design is the thickness or flexibility of the instrument. Shanks range from flexible, moderately flexible, rigid, and extra rigid. The thicker the shank, the stronger the instrument. The rigidity of the shank will determine how much force can be exerted on the instrument. For example, when treating a patient with heavy, tenacious calculus, either rigid or extra rigid is best because the clinician may need to apply more lateral pressure. A flexible shank will bend and reduce applied forces on the tooth surface, resulting in burnished calculus deposits or calculus left behind. A clinician should also recognize that with an increase in rigidity, tactile sensitivity may decrease.
Working End
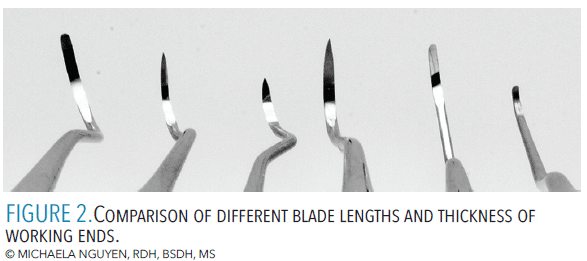
The working end, also known as the blade, consists of the face, cutting edge(s), lateral surface(s), and the back. Blades will vary in length and thickness. The blade can range from long to short (standard, mini, and micro mini-bladed). A standard blade length can be used for most cases, especially during the initial debridement of a periodontally involved patient (Figure 2).5
 When the difficulty of the case includes more difficult presentations such as furcations, depressions/concavities, and/or narrow, deep, or isolated pockets, a miniature-size blade (eg, mini or micro mini-bladed Gracey curet) is the best choice. When used with vertical strokes, the short blade can easily negotiate more confined pockets and adapt to the anatomy of the tooth surface.
Longer blades can efficiently break and remove large amounts of calculus on a surface with vertical and horizontal strokes. As accessing periodontal pockets requires overlapping, cross-hatching strokes, the use of horizontal strokes with a longer blade (eg, standard Gracey curet) directed toward the base of a pocket is helpful.
Blade thickness or width will also impact how well an instrument can enter the tissue and adapt to the tooth surface. Instruments with a thick blade will be advantageous in patients with heavier amounts of calculus and loose, easily retractable tissue. Thinner blades work best in patients whose tissue is healthy, firm, and tight with few calculus deposits.
Curets typically have parallel, rounded toes while sickle scalers offer narrow to pointed tips. The blade of a sickle scaler can enter tight or confined areas with less tissue distension than a wider curet blade, unless the blade has been sharpened down from the sides (Figure 3).
The sharpness of the working end is also important. Working with dull instruments may cause fatigue, tissue trauma, and burnished calculus.8 Using sharp instruments with proper adaptation and angulation will efficiently remove calculus and reduce the risk of burnished calculus.9
![]() Instrument Selection
Instrument Selection

Instruments with short, compact shanks and standard-length blades are ideal for treating tissue with no attachment loss. If the marginal tissue is firm or the papilla fills the interproximal spaces, a narrow, thin blade is better. As attachment loss increases, a long shank is preferred for improved access to the base of the pocket.
When approaching anterior teeth, a straight and short shank design is typically employed for normal healthy gingiva with minimal to no clinical attachment loss. From the facial aspect, a short blade will allow better adaptability (SHG 6/7 or 204S sickle scaler; 1/2 or 5/6 standard, micro, or mini-bladed Gracey curet) and access along the angles and base of the sulcus while the clinician progresses into the proximal surfaces.
For the lingual aspect, an instrument with a wide shank (curved, contra-angle, or angled shank such as SH 6/7 or Montana Jack sickle scaler and 7/8 or 13/14 standard, micro, or mini-bladed Gracey curet) will remove the biofilm and calculus as the working end advances from the straight lingual surfaces to the proximal surfaces.
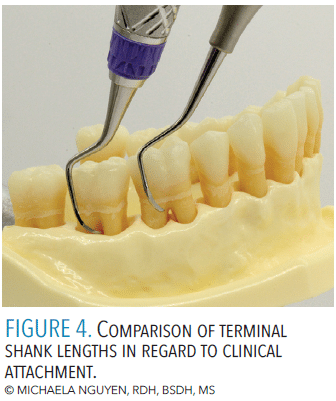
For cases with moderate to severe clinical attachment loss or lingual version, a long shank with an acute contra-angle or shank bend is used for additional extension (Figure 4). This concept also applies to wide and/or long tooth anatomy. Horizontal strokes require a long blade and straight-angled or curved shank. If vertical strokes are used, standard or short blade length can be used depending on the complexity of the tissue consistency, root anatomy, and topography of the bone level.
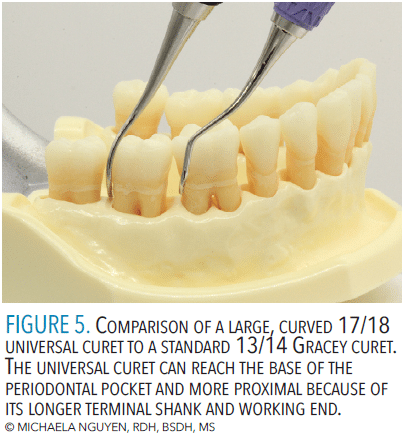
 To approach posterior teeth, the degree and contour of the shank angle are crucial for accessing varying tooth contours and tooth position. The more posterior in the oral cavity, the more curved the shank should be. As the periodontal pocket deepens, the longer the lower shank needs to be in order to reach the base of a pocket (Figure 5).
How much lateral pressure is needed depends on the angle of the shank. The more acute the angle, power is lost, requiring more lateral pressure. The more curved or angled shank bend with a longer blade is preferred from the lingual aspect compared to the buccal aspect.
If the shank of an instrument is obstructed by the proximal contacts and cannot advance toward the midline of the proximal surfaces, a long working end is necessary. By redirecting the handle away from the tooth, the blade can cross beyond the midline for more coverage. The toe or tip of the working end, however, will point away from the base of pocket and toward the contact, so adapting the placement of the working end must be deliberate.
Fulcrum placement and clinician position play an important role in instrument selection. Clinicians need to decide which instrument will help them reach the base of the pocket and remove soft and hard deposits without burnishing.
 When instrumenting posterior teeth with the same-arch fulcrum, the shank should have a bend to gain proper angulation. If a straight shank is engaged with a same-arch fulcrum that is not closely adjacent to the surface being scaled, then the blade angle will be open for the mesial surfaces or closed for the distal surfaces.
If a straight shank is needed for stroke power in posterior teeth, an opposite-arch fulcrum is recommended because of its ability to change fulcrum placement in order to stay parallel to the area being scaled. For example, when scaling the mandibular arch, a clinician can stand at the 1 o’clock (intraoral, opposite-arch fulcrum) or 3 o’clock to 5 o’clock (extraoral, opposite-arch fulcrum on the zygoma) position, using vertical strokes with a 5/6 or 7/8 Gracey curet. When instrumenting maxillary posterior teeth, extraoral fulcrums allow easier extension and proper angulation to the base of the pocket compared to an intraoral fulcrum.
Clinicians tend to work with the same few instruments, which limits the effectiveness of hand-activated instrumentation. By learning more about different instrument characteristics, clinicians can decisively determine the most appropriate instruments for the task at hand.
References
- Zhang X, Hu Z, Zhu X, Li W, Chen J. Treating periodontitis-A systematic review and meta-analysis comparing ultrasonic and manual subgingival scaling at different probing pocket depths. BMC Oral Health. 2020;20:176.
- Drisko CL. Periodontal debridement: still the treatment of choice. J Evid Based Dent Pract. 2014;14:e1.
- Brian Z, Weintraub JA. Oral health and COVID-19: increasing the need for prevention and access. Prev Chronic Dis. 2020;17:E82.
- Hayes MJ. The effect of stainless steel and silicone instruments on hand comfort and strength: a pilot study. J Dent Hyg. 2017;91:40–44.
- Suedbeck JR, Ludwig EA. Pinch force generation during scaling by dental professionals: a systematic review. Int J Dent Hyg. December 15, 2022. Epub ahead of print.
- Dong H, Loomer P, Barr A, Laroche C, Young E, Rempel D. The effect of tool handle shape on hand muscle load and pinch force in a simulated dental scaling task. Appl Ergon. 2007;38:525–531.
- Sumi J, Nguyen M. Hand-activated instrumention. In: Darby and Walsh’s Dental Hygiene: Theory and Practice. 5th ed. Philadelphia: Elsevier; 2020:414–455.
- Boyd LD, Mallonee LF, Wyche CJ, Halaris JF. Wilkins’ Clinical Practice of the Dental Hygienist. 13th ed. Burlington, Massachusetts: Jones & Bartlett Learning; 2021.
- Hessheimer HM, Payne JB, Shaw LE, Spanyers EM, Beatty MW. A comparison of efficiency and material wear of diamond-plated versus ceramic sharpening stones. J Dent Hyg. 2017;91:64–67.
From Dimensions of Dental Hygiene. May 2023; 21(5):21-23.
