 KIRILL4MULA/ISTOCK/GETTY IMAGES PLUS
Adapting Site-Specific Ultrasonic Inserts/Tips
These instruments can increase access to difficult-to-reach areas and may help to improve periodontal therapy outcomes.
Part 1 of a Two-Part Series: Part two will discuss the recommended technique for furcations, concavities, and depressions and will appear in a future issue of Dimensions of Dental Hygiene.
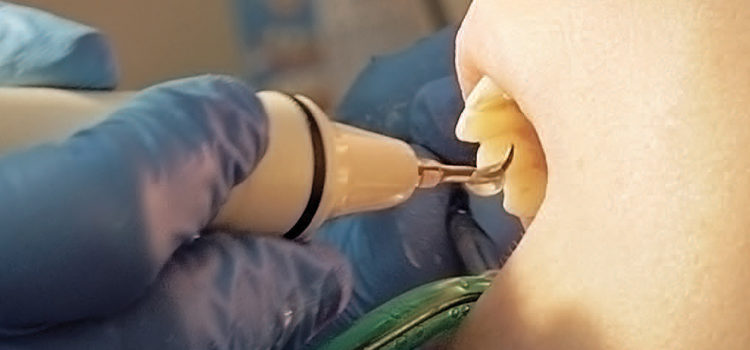
During nonsurgical periodontal therapy (NSPT), a blended approach with hand and powered instrumentation is optimal to achieve full mouth debridement.1 A standard straight ultrasonic insert/tip (UIT) is most commonly used for initial moderate to heavy deposit removal. As probing depth increases, however, the ability to reach the base of the pocket is compromised due to this UIT’s design limitations.1
Deep posterior periodontal pockets or shallow pockets in the presence of attachment loss require a thin UIT to effectively remove light to moderate or residual calculus deposits with oral biofilm.2 Standard or thin straight UITs are best used on anterior teeth with supragingival calculus and deep or changing pocket topography; however, proximal surfaces of posterior teeth are more difficult to access.1,3 Right- and left-curved UITs can improve access to such areas because they can adapt to root structures found in posterior teeth, such as deep periodontal pockets, furcations, concavities, and depressions.
Current research demonstrates the clinical benefits of using site-specific UITs to improve the outcomes of NSPT by accessing those areas unreachable with standard or thin straight UITs.2 Site-specific UITs are thin, precision thin, or micro-precision thin, and they offer a probe-like design with a slim working end. They are available in three types: straight, right-curved, or left-curved. Thin straight UITs are slightly thinner than their right- and left-curved counterparts. Despite the clinical benefits of right- and left-curved UITs, only a small percentage of dental hygiene programs provide clinical experience with these site-specific instruments, resulting in their underutilization.2,4 Understanding the design types and correct application of the right- and left-curved UITs may increase their usage and their effectiveness in NSPT.
Right- and left-curved UITs provide an efficacious and effective addition to NSPT. The misconception that ultrasonic instrumentation decreases the amount of time and precision needed to perform subgingival debridement, however, remains. The idea that the side of the tip is actively and quickly removing a significant amount of contaminants is misleading. In actuality, the length of an ultrasonic stroke is 1 mm—not 2 mm to 3 mm—when it contacts the root.
Although a UIT appears to contact the whole surface, the track of the stroke indicates otherwise. A combination of stroke and adaptation must be executed in a methodical and strategic manner to thoroughly debride a surface.5 Accuracy and deliberate root coverage require as much time and precision as hand instrumentation. Successful ultrasonic instrumentation requires appropriate power, UIT selection (size and metal mass), variety of fulcrums, and multidirectional strokes.5
DESIGN CHARACTERISTICS
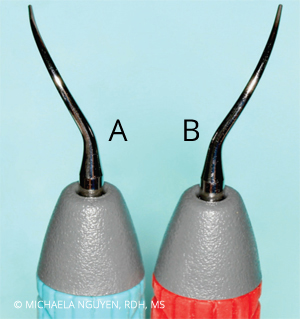
Thin magnetostrictive and piezoelectric right- and left-curved UITs simulate the size and shape of a periodontal probe (Figure 1). This design enables consistent access and adaptation to root anatomy, and allows the clinician to reach the base of a pocket beyond depths greater than 4 mm compared with standard straight UITs.1,4,6 The curvature of right- and left-curved UITs is unique, permitting access to specific tooth surfaces. These site-specific UITs are used with low to medium power; however, low power is sufficient for biofilm removal only, not calculus. At medium power, light and nontenacious calculus deposits are likely to be eliminated, while moderate or tenacious calculus remnants are burnished. A left-curved UIT is adapted for use on the buccal surfaces of the right maxilla and left mandible, and lingual of the left maxilla and right mandible. A right-curved UIT is adapted for use on the buccal of the left maxilla and right mandible, and lingual of the right maxilla and left mandible.7
When employing the right- or left-curved UIT, the size or diameter of the UITs should be considered with certain case types. Some UITs may be too thick to fit into healthy and tight tissue, impeding the ability to insert subgingivally. Other right- and left-curved UITs are thinner and can be inserted subgingivally, permitting the tip to extend under the contact point. Ultimately, clinicians need to assess and evaluate if the right- and left-curved UITs selected can be effectively inserted and adapted into the gingival tissue and thoroughly debride the base of the pocket.
SELECTION AND SEQUENCE
At initial therapy, patients may present with periodontal pockets 5 mm or greater with moderate to heavy supra- and subgingival soft and hard deposits. In such cases, administering local anesthesia with block injections or infiltrations is necessary for pain control. Gross debridement is most commonly performed with a standard straight UIT at medium to high power with multidirectional strokes to fracture large pieces of calculus throughout sections of the oral cavity. After a majority of the calculus has been removed, thin straight and right- and left-curved UITs should be used at low to medium power to eliminate remaining deposits. If the right- and left-curved UITs are too thick, and/or if the tissue is too tight and does not permit access, consider using a thin, straight UIT instead. Although a thin straight UIT is not ideal, it may be the only option to maneuver into tight tissue. During follow-up appointments, if no bleeding on probing is present, supragingival biofilm and periodontal pockets can be deplaqued with thin hand instruments using light strokes or with a thin UIT on low power.5
In cases of routine prophylaxis and periodontal maintenance therapy, patients may present with a range of minimal or localized attachment loss with light to moderate supra- and subgingival biofilm and calculus. A standard straight UIT can first be used to remove localized moderate to heavy supragingival hard deposits, which are commonly found on surfaces such as the lower anterior teeth. Most dental practitioners will then continue with the rest of the areas using a thin straight UIT alone, when a combination of thin straight and right- and left-curved UITs is more effective for accessing deep posterior pockets, furcations, and concavities. Right- and left-curved UITs may be used alone to complete all surfaces throughout the mouth. Care should to be taken, however, when using thin UITs on low power due to the risk of burnishing calculus. Covering the entire root surface with controlled, overlapping strokes may help reduce the likelihood of burnished calculus.5 Residual calculus or definitive root planing should be completed with hand-activated instrumentation for all nonsurgical periodontal procedures.
DEEP PERIODONTAL POCKETS ON PROXIMAL SURFACES OF POSTERIOR TEETH
When approaching proximal surfaces with deep periodontal pockets, access is limited when using a standard or thin straight UIT.1,3 While a straight UIT can be used on proximal surfaces of posterior teeth, it cannot fully reach the root surface adjacent to the col. The straight UIT is also not able to maintain the best adaptation and angulation to eliminate biofilm and calculus without the risk of tissue distension.
To fracture heavy calculus, a vertical tip orientation can be initially implemented by directing the point of the UIT toward the apex. Navigate the UIT from the margin and slowly proceed to the junctional epithelium. An oblique tip orientation followed by transverse tip orientation into the proximal surface can be performed similarly to a universal curet where the lateral surfaces are in a “crosswise” orientation along the axis of the tooth. The curve of the UIT allows the tip to reach biofilm and calculus located proximally, as well as the base of the pocket. This prevents the curved shank from being obstructed by the contact of the teeth and impinging the tissue. With both right- and left-curved UITs in the vertical orientation, proper adaptation is achieved when instrumenting supragingivally. As the tip of the UIT is negotiated further subgingivally into a deep periodontal pocket, the correct UIT will adapt well throughout the pocket, while the incorrect UIT may damage the root.
Recommended Technique: Lower Right Posterior Teeth/Proximal Surfaces
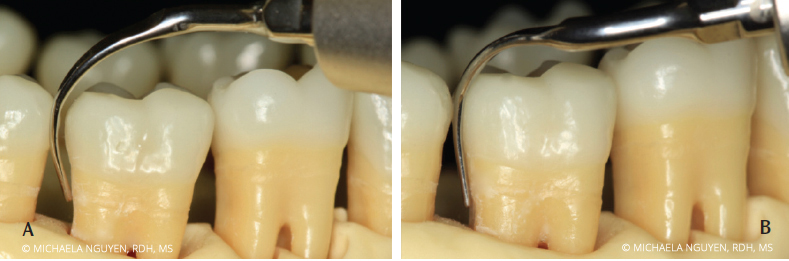
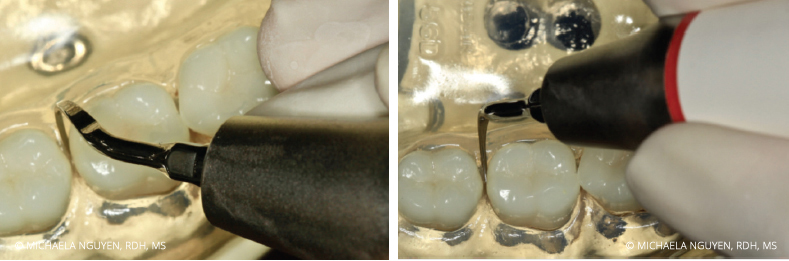
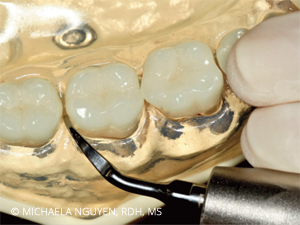
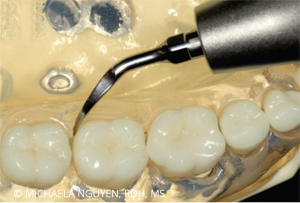
Start by positioning the patient in a semi-supine position. Sit at the 8 o’clock to 9 o’clock position with an intraoral, same-arch fulcrum. Begin with the right-curved UIT at the distobuccal or mesiobuccal with a vertical orientation, starting with probe-like strokes, and swing the handle away from the tooth to negotiate the tip across the proximal surfaces. Activate horizontal strokes for complete coverage of the distobuccal or mesiobuccal posterior teeth (Figure 2). In using the right-curved UIT instead of the left-curved UIT, the 2 mm to 4 mm side of the tip is constantly adapted to the tooth surface. If the left-curved UIT is used, the point of the tip is against the tooth and can cause iatrogenic damage (Figure 3). The same right-curved UIT can then be used in the oblique and transverse orientation on the distolingual or mesiolingual surfaces of the lower right posterior teeth (Figure 4). When switching from using the right-curved UIT to the left-curved UIT, the vertical orientation is used for the distolingual or mesiolingual surfaces, followed by the transverse orientation on the distobuccal or mesiobuccal surfaces to complete the distal proximal surface (Figure 5 and Figure 6).
CONCLUSION

UIT selection ultimately depends on clinicians ascertaining their own strengths and limitations, while considering patient-specific factors. When used with proper knowledge and skill, right- and left-curved UITs can be successfully integrated into the process of care to improve periodontal treatment outcomes.
REFERENCES
- Hodges KO. Ultrasonic instrumentation. In: Dental Hygiene Theory and Practice. 4th ed. St. Louis: Saunders/Elsevier; 2015.
- Hinchman SS, Funk A, DeBiase C, Frere C. Ultrasonic instrumentation instruction in dental hygiene programs in the United States. J Dent Hyg. 2016;90:135–142.
- Bryan LB. Root morphology and instrumentation implications. In: Dental Hygiene Theory and Practice. 4th ed. St. Louis: Saunders/Elsevier; 2015.
- Asadoorian J, Botbyl D, Goulding MJ. Dental hygienists’ perception of preparation and use for ultrasonic instrumentation. Int J Dent Hyg. 2015;13:30–41.
- Pattison AM. The right stuff. Dimensions of Dental Hygiene. 2015;13(1):31–37.
- Dragoo MR. A clinical evaluation of hand instruments and ultrasonic instruments on subgingival debridement. I. With unmodified and modified ultrasonic inserts. Int J Periodontics Restorative Dent. 1992;12:310–323.
- Hanson C. Making the most out of magnetostrictive ultrasonic tips. Dimensions of Dental Hygiene. 2009;7(10):44–48.
From Dimensions of Dental Hygiene. April 2017;15(4):18,21-22.
