The Missing Link
Teaching patients how to perform an intra-oral self-examination to detect oral cancer is key to reducing the morbidity rates of this disease.
The American Cancer Society estimates that 35,310 Americans will be diagnosed with oral and pharyngeal cancer in 2008.1 One person dies every hour of every day from oral cancer and these statistics have not changed in more than 35 years.2 The problem is greater worldwide with 400,000 new cases predicted to be diagnosed in 2008.3 The literature is replete with articles on early cancer detection, the intra- and extra-oral examination, and how to perform these examinations. Continuing education courses are offered on the subject and dental and dental hygiene students are taught procedures on how to perform oral cancer screenings in their curriculum and still statistics have not improved. What is the missing link in the chain of prevention? The patient. Educating the patient on how to perform an intra-oral self-examination is crucial to the early detection of oral cancer. The dental hygienist is poised to make a significant difference in the morbidity rates of oral cancer by teaching patients how to do a self-examination.
TABLE 1. RISK FACTORS
- Tobacco and alcohol use together (increases risk by 30 times)
- All forms of tobacco use alone
- 40 years of age
- Human papillomavirus (HPV)-16 through direct contact
- Male gender
- Sexually active teens
- Individuals with multiple sex partners
THE FIRST STEP
Step one is to review the risk factors for oral cancer with patients, emphasizing the fact that it is no longer only the 60- to 70-year-old man who smokes and drinks alcohol who gets oral cancer. Risks have changed. See Table 1 for a list of risk factors. Second, teach patients to recognize a healthy mouth. Once patients can recognize healthy tissues, it will be easier for them to identify abnormalities. Self-screenings may help oral cancer be diagnosed in its earliest stage. Then, carefully review the signs and symptoms of oral cancer or other pathologies where early detection or treatment is critical. Table 2 provides a list of oral cancer symptoms. Although the focus here is intra-oral signs and symptoms, reviewing the extra-oral areas on patients by teaching them to identify normal is also wise. If the patient is educated and aware—lumps, bumps, and changes that may involve the thyroid and lymph nodes can also be identified early. The Oral Cancer Foundation reports that “60% of the American population sees a dentist once a year. Currently, less than 15% of those who visit a dentist regularly report having an oral cancer screening.”4 With so few receiving consistent dental care, patient self-examination can mean the difference between early detection and advanced disease—basically life or death.
FOR PATIENTS—THE SELF EXAMINATION
You need to be aware of what’s normal when examining the intra-oral structures. Then you can identify the abnormal or variants of normal and bring these to the attention of your oral health care professional. Reviewing this examination with your oral health care professional will help establish a baseline for normal. Your self-examination should begin with a visual examination of the lips, tongue, floor of the mouth, cheeks, throat, tonsillar area, and gums. Use a good light source to clearly see these areas. You may also need to use your fingers to help you see each part. You should have white 2×2 gauze pads and a tongue blade to perform the intraoral examination. Pay special attention to the tongue and floor of the mouth because these are the most common locations for oral cancer.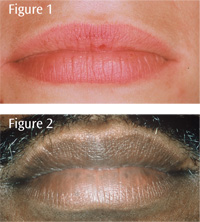
LIPS
- Observe lips with the mouth closed.
- Look for color, texture, shape, contour, and symmetry.
- Now open your mouth. Beginning with the left corner, place your thumb inside the upper lip and the index finger on top of the upper lip opposite your thumb. Move from left to right covering the upper lip one finger over the other. In the right corner of the mouth, place the index finger inside the corner and the thumb on the outside. Move these fingers at the same time over the lower lip to the left corner about one finger width at a time—feel for lumps, bumps, soreness, or ulcerations. Figures 1 and 2 provide examples of normal lips.
TABLE 2. SYMPTOMS OF ORAL CANCER
- Any lump, sore, or ulcer that appears on any area in the mouth that DOES NOT HEAL IN 2 WEEKS.
- A sore that bleeds easily and does not heal within 2 weeks.
- Red or white patches on any of the oral structures.
- Pain anywhere in the mouth that does not resolve in 2 weeks.
- Ear pain.
- External neck mass or enlargement (particularly the thyroid and lymph nodes).
- Difficulty chewing or swallowing.
- Hoarseness.
- Sore throat that does not get better in 2 weeks.
- Numbness, tingling, or burning sensation in any area of the mouth (lips, tongue, and floor in particular).
- Difficulty extending the tongue and any swelling of the tongue.
- Skin rashes or conditions that suddenly appear.
TONGUE
- Keep your tongue in its relaxed position behind the lower teeth and open wide.
- You have normal structures that are called papillae on the dorsal (top) surface of the tongue. Sometimes these papillae may be discolored and your tongue becomes coated and appears white or black/brown in color. This condition could be a variant of normal. Your oral health care professional will explain it to you. Gentle brushing without toothpaste will help the coating resolve.
- Check for any lumps, bumps, ulcers, sores, or white or red patches.
- With a piece of 2×2 white gauze pad, extend your tongue forward and move it from left to right.
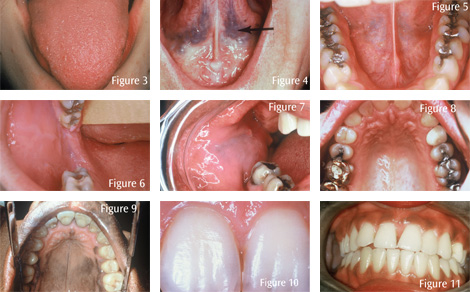
The tongue should move easily from left to right without any restriction. Carefully examine the sides or lateral boarders of the tongue from the tip all the way to the back. While holding the tip of the tongue with gauze with the index finger and thumb from one hand, use the other index finger and thumb to feel the tongue on the right side (one finger over the other) from tip to the back of the tongue. Feel for lumps, bumps, sores, ulcers, or any changes from normal. The lateral sides of the tongue are a common location for oral cancer. Finally, with your mouth open, stick your tongue out and then touch the roof of the mouth or palate with the tip of your tongue so that you can see the underside or ventral surface of the tongue. Normal is soft, pink smooth soft tissue or mucosa. Look for any changes. Prominent varices like varicose veins may be present on the tongue. They are considered variants of normal. Figure 3 shows a normal top view or dorsal side. Figure 4 shows the underside of the tongue or ventral side with prominent lingual varices. This is a variant of normal.
FLOOR OF THE MOUTH
The floor of the mouth is the surface completely under the tongue; it’s not really part of the tongue. It is protected by the tongue so you shouldn’t see lumps, bumps, ulcers, white patches, or red patches. Your salivary ducts are also under the tongue. Sometimes the salivary ducts are traumatized or blocked, which you may be able to observe or feel on one side of the floor of the mouth. You should bring any deviations from normal to the attention of your oral health care professional for appropriate diagnosis. The floor of the mouth is usually soft, pink, and palpable. The best way to examine this area is to use the index and possibly middle finger from one hand on the outside, under the chin, and the index and middle finger of the other hand in the mouth, under the tongue. Press them opposite each other, throughout the floor of the mouth, front to back. Figure 5 shows a normal floor of the mouth.
CHEEKS
The buccal mucosa or cheeks are soft and pink. Sometimes in dark skinned individuals, there is an increase in melanin pigmentation (brown coloring). Pull your cheek outward with your index finger or a tongue blade so you can see the space between the cheeks and the teeth. Use your index finger and thumb to feel the entire cheek surface, front to back, for any lumps, bumps, masses, sores, or ulcers. Opposite the upper second molar on both sides on the cheeks, there is a small, soft, pink protrusion. This normal anatomy is called the papilla of Stenson’s duct, which is a salivary duct from the parotid gland. You may see clear fluid coming from this area. Also look for any white or red patches that have been there for 2 weeks and have not resolved. Figures 6 and 7 show normal cheek tissue.
PALATE
The hard palate is the anterior roof of your mouth. It is often an area that gets irritated from hot foods (pizza) or crusty breads. Any sore that is there for more that 2 weeks must be seen and further evaluated by a dental professional. Additionally, you may find a bony hard structure in the midline of the hard palate. This is called torus palatinus. It is genetic and has been there for quite some time. It is a variant of normal. If you have this bony area, your oral health care professional will show it to you. The soft palate is further back and meets the most posterior part of the hard palate. As you look into your throat area, you will see a soft pink fleshy area hanging down from the middle of the most posterior part of the soft palate. This normal anatomic structure is called a uvula. Figures 8 and 9 show normal palates. Figure 9 is a palate with melanin pigmentation.
POSTERIOR PHARYNGEAL WALL AND TONSILS
The posterior pharyngeal wall is straight back behind the soft palate. The palatal tonsils are seen on both sides of that posterior area. Examine the area with good lighting and use a tongue blade to depress the middle area of the tongue to get a better look. Say ahh—it helps! Look for any lumps, outgrowths of tissue, ulcerations, or white or red patches in the area. Although this is a more difficult area to examine, since the incidence of oral cancer has increased in this area, it is worth the effort to get a good look.
GUMS
Although the gingiva (gums) is not a common site for oral cancer, it is an indicator for many other systemic conditions like diabetes, anemia, and periodontal disease, which has been indicated as a possible contributing factor to low birth-weight babies. Healthy gingiva is maintained by good oral health care habits, including brushing, flossing, and visiting your dental professional for dental scaling and polishing every 3 to 4 months. Figures 10 and 11 show normal gingiva.
IF/WHEN YOU IDENTIFY SOMETHING THAT HAS NOT BEEN THERE BEFORE
- Remember what normal looks and feels like in your mouth.
- Describe what you see and the location. For example, red spot on the right side of the tongue, anterior, middle, or posterior third. Be as specific as you can regarding size and location.
- Write it down.
- Wait and watch the area for 2 weeks, identifying any changes. Does it get larger, smaller, ulcerate, bleed?
- If changes are significant during the 2 weeks, call to speak directly with your dentist, not the receptionist.
- If the area has been traumatized or irritated, it should get better in 2 weeks.
- If the area does not resolve or get better in 2 weeks, SEE your dentist.
- Additionally, you can consult with an oral surgeon—a specialist who may perform a biopsy to make a diagnosis.
- Do not wait and watch something that has not resolved in a 2-week period.
- If an oral health care professional looks at the area, and tells you to watch it, ask what is the next step, and when does he/she want to see you again for further evaluation, diagnosis, and treatment. This should not be at your next cleaning appointment; it should be within a week!
- If a dentist treats the problem and it does not heal or get better, seek a second opinion.
- If the condition remains and does not resolve, seek a second opinion.
- If the condition worsens, go even faster for that second opinion.
- Denial does not resolve any problem.
- If you ignore oral cancer, it will not just go away.
- Early detection of oral cancer can save your life and ensure the quality of your life.
Remember this from the Oral Cancer Foundation: “Any condition that has existed 14 days or more without resolution should be considered suspect and worthy of fuller diagnostic procedures or referral.”
REFERENCES
- What Are The Key Statistics About Oral Cavity and Oropharyngeal Cancers?. Available at: www.cancer.org/docroot/CRI/content/CRI_2_4_1X_What_are_the_key_statistics_for_oral_cavity_and_oropharyngeal_cancer_60.asp. Accessed October 29, 2008.
- The Oral Cancer Foundation. Available at: www.oralcancerfoundation.org. Accessed October 28, 2008.
- Oral Cancer Facts. Available at: oralcancerfoundation.org/facts/index.htm. Accessed October 28, 2008.
- Dental issues. Available at: oralcancerfoundation.org/dental/index.html. Accessed October 28, 2008.
From Dimensions of Dental Hygiene. November 2008; 6(11): 22, 24, 26.
