Simple Sterilization Strategies
Boost efficiency and safety by incorporating instrument cassettes into your infection control protocol.
Dental hygienists and other oral health care workers are at risk of exposure to blood and other infectious materials during their day-to-day work. The necessary task of instrument processing is the cause of many sharps injuries, which expose clinicians to bloodborne diseases, such as hepatitis B or human immunodeficiency virus (HIV).3
 The Centers for Disease Control and Prevention (CDC) and the Occupational Safety and Health Administration (OSHA), a federal regulatory agency that sets standards to protect the health and safety of workers in all fields, have published guidelines to protect health care workers who may be exposed to blood. The CDC developed the Guidelines for Infection Control in Dental Health-Care Settings in 2003, which are the latest and most comprehensive guidelines that workers should adhere to for the safe provision of dental treatment.1 OSHA has published the Bloodborne Pathogens Standard and other related guidelines, such as the Needlestick Safety Standard, and there are significant penalties if OSHA standards are not met.1,2 The CDC does not have any regulatory authority, however, OSHA incorporates many of the CDC’s guidelines into its standards. All dental offices should have policies and procedures that promote compliance with OSHA standards and the CDC guidelines to ensure both clinician and patient safety.
FIRST STEPS
Dental instruments and tools have a variety of functions, therefore their cleaning requirements vary as well. Sterilization refers to a process that kills all living microorganisms, including bacterial spores by one of three methods: heat, gas, or chemical.4 Dental instruments fall into three categories of sterilization: critical, semicritical, and noncritical.1 Critical instruments (curets or burs) penetrate soft tissue or contact bone or the bloodstream and therefore must be sterilized. Semicritical instruments (mouth mirror, radiographic film/sensor holders, or handpieces) contact mucous membranes but do not penetrate soft tissues, however, they should also be sterilized. The CDC recommends that all heat tolerant items be sterilized. Noncritical items (blood pressure cuffs or stethoscopes) only contact the skin and thus can be disinfected. Disinfection (with a spray or a wipe) is a process that kills many microorganisms, but not all bacterial spores.4
Oral health care workers should use heavy duty, puncture-resistant utility gloves when handling contaminated instruments to prevent percutaneous injuries.1,5-8 Contaminated instruments should also be handled as little as possible and masks, protective eyewear, and lab coats should be worn during clean-up procedures to protect mucous membranes from exposure to contaminants via splashes to the nose, mouth, eyes, and skin.1,2 5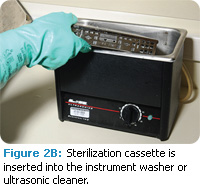
THE PROCESS
Instrument processing begins in the operatory with the removal of used items. The remainder of the instrument processing cycle occurs outside the treatment operatory to minimize cross contamination.1 Figure 1 provides an example of an instrument processing workflow. Contaminated instruments should be placed in a solid leak-proof container and transported to a central sterilization area.1,5,9 There must be a clear distinction between clean and dirty areas in the sterilization area.6 The instrument processing area should be divided into four distinct zones:
1. Receiving,cleaning, and decontamination of instruments
2. Preparation and packaging of instruments
3. Sterilization of instruments
4. Storage of instruments1
 Instruments must be cleaned prior to sterilization to remove any debris that would hinder the sterilization process.1 Two methods are available for initial instrument cleaning: automated (ie, ultrasonic cleaning or the use of instrument washers or washer/disinfectors), and manual scrubbing.1-2,4-6 Automated methods are preferred to manual scrubbing because the less contact the operator has with contaminated instruments, the lower the risk of sharps injuries. Automated methods also improve the efficacy of instrument cleaning.1-2,4-6
Instrument washers or washer/ disinfectors use hot water and/ or chemical disinfectants to clean instruments prior to sterilization.4 They have been used in hospitals for many years and are now gaining popularity in dentistry.2,4,8 Instrument washers or washer disinfectors come in various sizes (table top, floor unit, and large models); are considered medical devices; and are regulated by the Food and Drug Administration (FDA).2,4,8 These devices withstand very rigorous testing of their compliance with safety and efficacy standards, as determined by the FDA.4,8 Household dishwashers are not acceptable for use in instrument cleaning because they are not FDA-approved for this purpose.2,4,8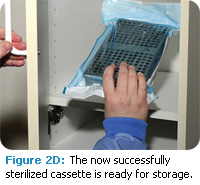
INSTRUMENT CASSETTES
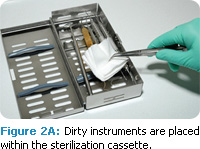
Instrument cassettes play an important role in safety during the instrument processing cycle. Instrument cassettes are perforated metal or plastic locking containers designed to keep instruments organized during the entire processing cycle from chairside patient care through sterilization and storage4-6,9 (Figure 2A-D). Not only do cassettes keep items organized, they significantly reduce the chance of sharps injuries with their “no touch” system.3,7 Cassettes come in a variety of sizes and materials and can be placed directly into ultrasonic cleaners or instrument washers.2,4-5,7 They can withstand heat and chemicals used in the sterilization process.4,6 Perforations or holes in the cassette allow heat or chemicals to penetrate and sterilize the instruments inside.2-3,9
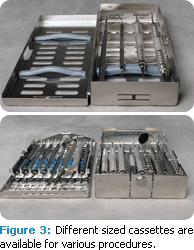
The size of the cassette is an important factor.2,4,7,9 Cassettes must be compatible with the ultrasonic unit or instrument washer, sterilizer, and instrument storage area available in the practice.2,4,7,9 A variety of cassette sizes for different procedures are commonly used. Operative cassettes will generally be larger than cassettes for dental hygiene procedures (Figure3).
 Safety and efficiency are increased by limiting the amount of time contaminated instruments are directly handled.2-8 Cassettes keep complete sets of instruments and unit-dose supplies together securely, which reduces instrument loss or damage, limits sorting and handling of contaminated instruments, and decreases time needed for set up and clean up.2-4,6-8 Cassettes accommodate a certain number of instruments so steam or chemicals can freely circulate, consequently, overloading can jeopardize complete asepsis.1
Instrument cassettes can be purchased with customized or enhanced safety features, such as built-in needle recapping devices and soft rubber rails to prevent instrument scratching and damage.3,7,9 Cassettes with these features reduce the likelihood of sharps injuries and serve as both an engineering control and a work practice control.3,7
The cassette is used at chairside for organization during patient care. During clean up, waste and sharps are properly disposed of, and the cassette is then transported to the sterilization area in a solid leak-proof container.1 The entire cassette is placed into the ultrasonic bath or instrument washer for initial cleaning. After cleaning, the cassette is thoroughly rinsed and dried, then unit-dosed dry supplies needed during the dental hygiene appointment (gauze, cotton rolls, or cotton tipped applicators) are added, along with an internal chemical indicator.1 Once complete, the cassette is packaged for sterilization.
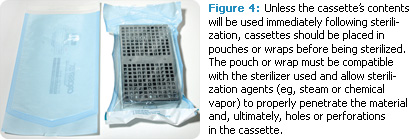
Packaging materials must be compatible with the sterilizer and are considered FDA medical devices.1,4 They must allow penetration of the sterilizing agent (steam or chemical vapor) and keep instruments sterile for up to 6 months.1,4 Perforated cassettes must be packaged in order to keep the contents sterile during storage; otherwise they could be contaminated by air, dust, and other contaminants.1,7 Packaging materials can include self-sealing pouches (Figure 4) or wrapping (see sidebar). Sterilizers can only accommodate a certain number of cassettes because overloading impedes the sterilization process.9 Cassettes should be loaded sideways in the sterilizer to allow for maximum penetration of sterilizing agents.7
 Instrument cassettes should remain in the sterilizer until cool and dry to avoid wicking.1,4,7 Wicking is a process of drawing in or absorbing moisture or bacteria from hands through the packaging, which contaminates the contents.1,4,7 Handling wet packaging also increases the risk for tearing, which may result in contamination.4,7
Sterile instruments must be stored in clean, dry, closed areas to avoid contamination.1,4,7
IN SUMMARY
Instrument cassettes are gaining popularity and are used in almost all dental and dental hygiene schools.7 They can save time and money and are an excellent tool to promote safe, efficient, and effective work practices. The use of instrument cassettes simplifies the instrument processing cycle from chairside to storage, while minimizing clinicians’ risk of injury.
REFERENCES
- Kohn WG, Collins AS, Cleveland JL, et al. Guidelines for infection control in dental healthcare settings—2003. MMWR Recomm Rep. 2003;52:1-61.
- Molinari JA, Harte JA. Cottone’s Practical Infection Control in Dentistry. 3rd ed. Baltimore, Md: Lippincott, Williams, & Wilkins; 2010.
- Molinari JA. Instrument cassettes: a reasonable and effective approach. Dental Economics. 2009;99:1.
- Miller CH, Palenik CJ. Infection Control and Management of Hazardous Materials for the Dental Team. 4th ed. St. Louis: Mosby, Elsevier: 2010.
- OSHA and CDC Guidelines: Combining Safety with Infection Control for Dentistry. Annapolis, Md: Organization for Safety, Asepsis and Prevention; 2008.
- From Policies To Practice: OSAP’s Guide to the Guidelines: Workbook. Annapolis, Md: Organization for Safety, Asepsis and Prevention; 2004.
- Harte JA, Molinari JA. Instruments cassettes for office safety and infection control. Compend Contin Educ Dent. 2007;28:596-600.
- Cuny E, Bednarsh H. Instrument sterilization in dentistry. RDH Magazine. 2007;27(4):67-73.
- Kelsch NB. Lost socks and instrument cassettes. RDH Magazine. 2010;30(4):70.
From Dimensions of Dental Hygiene. January 2011; 9(1): 30, 32,34-35.
