Mastering Apical Orientation of the Tip
Incorporating this technique into practice may help dental hygienists access deposits that may otherwise be missed.

The basic concepts of fulcrum and grasp, activation, angulation, and adaptation are taught during the first year of dental hygiene school, but becoming skilled in these areas can take years of practice. Using the proper grasp and fulcrum allows the operator to maneuver intraorally without injuring the patient and, if done properly, can help prevent repetitive strain injury.
Grasp and fulcrum provide the foundation for activation, angulation, and adaptation. Activation is the movement of the instrument’s cutting edge against the tooth.1,2 Angulation refers to the angle between the face of the instrument blade and the surface of the tooth being instrumented.1,2 Adaptation ensures that the last few millimeters of the instrument’s working end is in contact with the tooth.1 Mastery of these skills provides a foundation for safe and effective patient treatment. Once a strong foundation has been achieved in fulcrum, grasp, and activation, dental hygienists can expand their technique to include apically orienting the tip of the instrument (meaning the tip of both sickled instruments and curets, which have a rounded end or “toe”). This technique requires the operator to get up on the fulcrum to get the tip down in order to access difficult-to-reach deposits.
FULCRUM
Esther M. Wilkins, BS, RDH, DMD, defines a fulcrum as “the support, or point of rest, on which a lever turns in a moving body” in the 11th edition of her seminal textbook Clinical Practice of the Dental Hygienist.1 The ring finger is used as the fulcrum finger for intraoral fulcrums while more advanced fulcrums use the back of the fingers or the palm of the hand. Fulcrums can be intraoral, including “built-up” and reinforced, or extraoral.3

INSTRUMENT GRASP
The pen grasp is a basic skill that is learned and developed in early childhood. Children are taught to hold a pencil between the thumb and index finger. When grasping a pencil, the thumb and index finger are touching and the pencil rides on the side of the knuckle of the middle finger. The modified pen grasp, as taught in dental hygiene education, moves the thumb and index finger apart on the opposite sides of the instrument so they do not touch. The middle finger is advanced so the side of the pad is contacting the instrument instead of the side of the knuckle.4 These three fingers form a triangle or tripod of stabilization. The ring finger is extended and becomes the fulcrum finger, staying in contact with the side of the third finger (no split fulcrums). The little finger stays in contact with the ring finger in a relaxed position and the handle stays on the bony parts of the hand.1,2 When the grasp and fulcrum are used correctly, the hand works as a unit to maneuver the instrument intraorally.(Figure 1).
ACTIVATION OF THE WORKING STROKE
Activation is the movement of the instrument’s cutting edge against the tooth. A working stroke is activated by increasing the pressure on the fulcrum, the grasp, and laterally against the tooth. The muscles of the forearm combine with the triceps and biceps of the upper arm to activate the stroke. The muscles of the arm are stabilized by the core muscles of the torso. The action is not just a simple pull stroke. The hand pivots on the fulcrum “similar to the action of turning a doorknob,”2 and there is a slight twist to keep the cutting edge engaged on the tooth surface. The twist is a subtle, almost indistinguishable roll of the instrument against the middle finger, toward the tip. The instrument blade moves coronally and obliquely toward the tip to remove the calculus while keeping the instrument face at a 45° to 90° angle to the surface being instrumented.5
APICAL ORIENTATION OF THE TIP TO IMPROVE ACCESS TO DIFFICULT-TO-REACH DEPOSITS
The removal of biofilm and calculus is paramount to tissue health and is one of the main goals of dental hygiene treatment.6 Deposit removal, however, can be hindered by many factors. One of these impediments is the inability to reach the most apical portion of the deposit. Instrumentation of proximal surfaces is especially difficult when the epithelial attachment has migrated apically and a deposit is found in the dip of the cemento-enamel junction (CEJ), where the cementum and enamel meet. This area is highly susceptible to infection. In disease, apical migration causes this pocket to become deeper—making access more problematic.

Apical orientation of the tip allows the operator to access deposits that otherwise might be missed. The technique involves the relationship of the terminal shank to the surface being instrumented. When instrumenting subgingivally, the working end is hidden but can be verified by observing the terminal shank’s relationship to the surface of the tooth being instrumented.
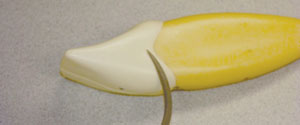
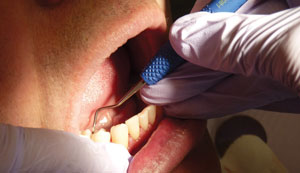
Apical orientation is achieved by bringing the terminal shank in close approximation to the tooth by getting up on the fulcrum. The last few millimeters of the lateral edge of the working end reaches and engages the deposit, and activation, combined with proper angulation and lateral pressure, removes the deposit. If the terminal shank is not kept lined up with the surface of the tooth being scaled/root planed, the back of the working end will come into contact with the deposit or the epithelial attachment before the tip can access it. By inserting the instrument tip first, or more apically, the instrument tip can reach the deposit for removal (Figure 2 and Figure 3).
PUTTING IT INTO PRACTICE
To accomplish this technique on the lower anterior teeth surfaces, away from the dominant hand, the operator must establish chair position, grasp, and fulcrum. Dental hygienists have several options depending on the periodontal status of the tissues and what instruments are available. Instrumentation expert and Dimensions of Dental Hygiene’s Editor in Chief Emerita Anna M. Pattison, RDH, MS, suggests using Hu-Friedy’s G6/G7, Nevi 1, Nevi 3, or Nevi 4; the Hartzell 204SD; or Paradise Dental’s Montana Jack. A variety of instruments should always be available so treatment can be customized.

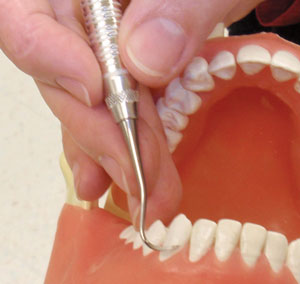
Sitting at the 12:00 position, the dental hygienist is ready to instrument the mesials of teeth #27 to #25 and the distals of #24 to #22. Hold the instrument in a modified pen grasp. Establish an intraoral fulcrum with the ring finger on the occlusals of teeth #28 or #29. Place the first 1 mm to 2 mm of the working end on the facial of tooth #27. Notice the handle is not parallel to the tooth surface being instrumented and the tip is pointing incisally (Figure 4). To overcome this obstacle, the grasp can be modified to enable the hand to be flattened, closer to the patient’s face. This allows the operator to get up on the fulcrum, bringing the terminal shank parallel with the tooth surface being scaled/ root planed, which in turn, allows the tip to enter the sulcus first (Figure 5). The operator must be mindful of proper ergonomics and may wish to move to the 1:00 or 2:00 position if space in the operatory allows. The terminal shank is in close proximity to the tooth by being up on the fulcrum on the mandibular teeth. The handle should not be allowed to go up into the soft fleshy part or the “V” of the hand because control and power may be lost.
Figure 6 and Figure 7 compare the orientation of the terminal shank in relationship to the tooth. Notice how the terminal shank in Figure 7 is more parallel to the tooth being instrumented than the terminal shank in Figure 6. Figure 8 shows the terminal shank near a posterior tooth using a posterior scaler. At this point, the operator uses the tripod of the grasp (thumb, index finger, and middle finger) and pressure on the fulcrum to activate a working stroke.
CONCLUSION
Apical orientation of the working end provides dental hygienists with better access to deposits. Because periodontal tissues will not heal in the presence of residual calculus and biofilm, it is imperative that dental hygienists remove all deposits. By adapting the basic skills learned in dental hygiene school, clinicians should be well poised to provide thorough and effective scaling and root planing.
REFERENCES
- Wilkins EM. Instruments and principles of instrumentation. In: ClinicalPractice of the Dental Hygienist. 11th ed. Baltimore: Lippincott Williams &Wilkins; 2012:592–594.
- Nield-Gehrig JS. Fundamentals of Periodontal Instrumentation andAdvanced Root Instrumentation. 7th ed. Baltimore: Lippincott Williams &Wilkins; 2012:71–75,209,215,237,318.
- Drummer L. Ergonomics. In: Darby ML, Walsh MM, eds. Dental HygieneTheory and Practice. 2nd ed. St Louis: Elsevier Science; 2003:126–128.
- Matsuda SA. Technique—proper grasp. Dimensions of Dental Hygiene.2005;3(9):26–28.
- Tsutsui PT. Instruments and instrumentation theory. In: Darby ML, WalshMM, eds. Dental Hygiene Theory and Practice. 2nd ed. St Louis: ElsevierScience; 2003:392–396.
- Matsuda S, Wilkins EM. Nonsurgical periodontal instrumentation. In:Wilkins EM, ed. Clinical Practice of the Dental Hygienist. 11th ed. Baltimore:Lippincott Williams & Wilkins; 2009:609.
From Dimensions of Dental Hygiene. February 2013; 11(2): 38–39, 43–44.
