Key to Effective Calculus Removal
Follow these strategies to remove tenacious deposits.
Periodontal diseases remain the leading cause of tooth loss among Americans. As dental hygienists, we know that periodontal health cannot be maintained without the removal of both supragingival and subgingival calculus. As much calculus as possible must be removed during scaling and root planing because persistent inflammation will remain next to any residual calculus left behind.1-3 Despite the dedication of dental hygienists to thorough periodontal therapy, research shows that approximately 17% to 64% of calculus still remains after scaling and root planing, and 7% to 24% remains after surgical intervention.4
Removal of tenacious calculus is no small task, even with the addition of innovative ultrasonic inserts/tips (UITs) and hand instruments to the dental hygiene armamentarium over the past several years.
INSTRUMENTING THE CEJ
Removing calculus from the cemento enamel junction (CEJ) is particularly difficult. When scaling or exploring along the CEJ, clinicians must distinguish between the calculus deposit and the normal CEJ anatomy, and then try to carefully remove the calculus from this concave area. Burnished calculus along the CEJ is often so smooth that it is almost impossible to detect with the tip of an explorer or probe. If you rotate the tip of an explorer and feel up and down with the point, you can sometimes detect a grainy texture. If the CEJ feels rough but the adjacent tissue is healthy with no bleeding, there is no need to scale this area. However, if there is bleeding on probing with roughness along the CEJ, burnished calculus may be present.
On mesial surfaces of maxillary anterior teeth, the curvature ranges from 2.5 mm to 3.5 mm; on distal surfaces, it ranges from 1.5 mm to 2.5 mm. The curvature ranges from 2.5 mm to 3 mm on mesial surfaces of mandibular anterior teeth, and from 1 mm to 2 mm on distal surfaces. The cementum overlaps enamel in 60% to 65% of teeth and the dentin is exposed 5% to 10% of the time. Thus, the CEJ will only feel smooth about one-third of the time.5,6
ADDITIONAL CHALLENGES
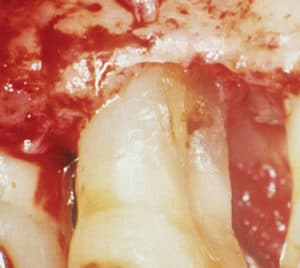
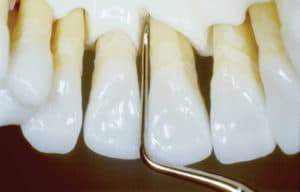
Patients may also present with very hard calculus deposits due to previous instrumentation with inadequate technique or insufficient power. In these cases, root surfaces may still harbor residual or embedded calculus (Figure 1). Worse, a burnished veneer of calculus may cover entire portions of the root.
Burnished calculus can occur when a deposit is smoothed before it can be removed.1-3,7 If the blade-to-tooth angle is too closed (less than 70º) or if the blade is dull, deposits can be easily smoothed instead of removed. Burnishing can also happen when too little lateral pressure is used on the working stroke. While viewing root surfaces with the periodontal endoscope, I have seen that the use of UITs on low power can burnish calculus into sheets—especially in developmental depressions, CEJs, and furcations.3,8 Medium to higher power is more effective, but any UIT that is smooth and round in cross section can burnish because it tends to remove tenacious calculus incrementally layer by layer—especially if it is obliquely stroked across the thickest part of the calculus. Try to dislodge the calculus from the edge using the UIT point in a probe-like stroke that is parallel to the root surface, or use a series of very short, overlapping horizontal strokes starting from the top or the side edge of the deposit. Clinicians must remain mindful of the UIT’s pattern of movement across the surface while it is activated, keeping strokes slow and methodical—not haphazard. Thin UITs are not ideal for heavy or tenacious calculus removal unless they are designed for use at increased power levels and can break calculus cleanly away from the root.
Tenacious calculus deposits are difficult to detect. Using an explorer throughout scaling and root planing can aid in the discovery of these deposits. Once calculus becomes burnished, its removal requires skilled, precise hand instrumentation or a combination of ultrasonic scaling with a beveled or higherpowered UIT and hand instrumentation.9
CALCULUS REMOVAL WITH ULTRASONIC INSERTS/TIPS
New magnetostrictive inserts have been designed for use at higher power levels, and are thus more effective at removing subgingival calculus. These magnetostrictive inserts include: the SlimLine® 1000 insert (DENTSPLY Professional); Swivel XT™ Ultrasonic Insert (Hu-Friedy Mfg Co Inc); and the Burnett Power Tip™ (Parkell). These new inserts or any thin piezoelectric tip that has an edge can remove moderate to heavy subgingival calculus from interproximal and subgingival areas when used on medium to higher power levels using a deliberate, moderately paced technique.
Piezoelectric thin tips that can be used at increased power settings have been available for many years. The majority of clinicians in Europe and Asia use piezoelectric scalers for removal of tenacious calculus. EMS Electro Medical Systems, American Eagle Instruments, Hu-Friedy Mfg Co Inc, SATELEC, Vista Dental Products, Parkell, Brasseler NSK, Zila, and PDT all offer excellent piezoelectric thin tips designed for tenacious, subgingival calculus removal in deeper pockets.
Short (1 mm to 2mm), overlapping strokes should be applied in various directions. These methodical strokes must contact every square millimeter of the root surface to ensure thorough calculus removal. Rapid, circular, wavy strokes that move too quickly over the surface tend to burnish calculus into a sheet that can no longer be detected.
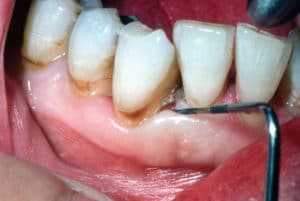
When using UITs on higher power, the tip must be kept parallel to the tooth surface to prevent root damage. Before beginning removal of burnished calculus, locate an area where the tissue is loose enough that marginal gingiva can be distended and the edge of the dark calculus sheet can be seen (Figure 2).10 The UIT should actually crack the calculus away from the root surface with the focused energy of the tip. The UIT should be working over the surface in constant, careful motion. A deliberate tapping action should be implemented with the point of the UIT parallel to the root surface. Back and forth horizontal strokes should be used, starting at the coronal edge of the calculus working apically into the pocket. The power must be focused on the calculus to create tiny microfractures in the deposits from the mechanical vibratory action. Only the last millimeters of the UIT should be used. A common error when using ultrasonic instrumentation is to work in the middle of the UIT. The most energy is available when only the last millimeters are used.11 Use faster, low-powered strokes to cover the entire root surface and flush out debris, but be careful to avoid burnishing any residual calculus.
The use of UITs on medium to higher power requires sufficient pain control—either through local anesthetic block injections or infiltrations.12
MANUAL TECHNIQUE
Rigid Gracey curets and mini-bladed Gracey curets can be used to remove deep subgingival deposits of calculus because of their superior access and adaptation of their blades to anatomical contours. Micro mini-bladed Gracey curets are the latest modification of mini-bladed Gracey curets. They are 20% smaller than mini-bladed Gracey curets, and thus facilitate access to furcations and tight, narrow pockets.
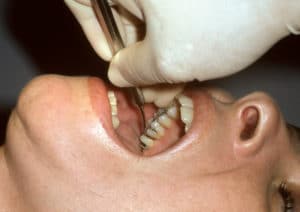
Rigid mini-bladed Gracey curets are well designed for calculus removal. Intraoral finger rests are indicated when close to the working area. For deep pockets on the maxillary arch, try moving in the range of 1 o’clock to 5 o’clock on the left side of the chair. Recline the back of the chair so the patient’s head is as far back as possible, and then ask the patient to lift his or her chin and open wide. From this position, intraoral fulcrums can be used to scale deep pockets on the maxillary posterior teeth with the same techniques indicated for the mandibular teeth (Figure 3).13 Horizontal strokes with universal or Gracey curets are very effective with this approach. Horizontal strokes with mini-bladed Gracey curets are most appropriate when limited to use along the CEJ or in developmental depressions just below the CEJ.13
Hirschfeld files are effective for tenacious calculus removal because they fracture the surface of the burnished calculus, making it easier to remove with subsequent ultrasonic or hand instrumentation (Figure 4).14
CLOSING THOUGHTS
Thorough and efficacious scaling and root planing are paramount to achieving and maintaining periodontal health in our patients. This type of therapy requires skill, patience, and dedication to exemplary technique. There is no shortcut for successful therapy—whether an ultrasonic scaler, hand instruments, or a combination of the two are used.
References
- Pattison AM, Matsuda S. Making the right choice. Dimensions of Dental Hygiene. 2003;1(8)(Suppl):4-10.
- Matsuda S. Instrumentation of biofilm. Dimensions of Dental Hygiene. 2003;1(1):26-30.
- Pattison AM, Pattison GL. Periodontal instrumentation transformed. Dimensions of Dental Hygiene. 2003;1(2):18-22.
- Drisko CL, Killoy WJ. Scaling and root planing: removal of calculus and subgingival organisms. Curr Opin Dent. 1991;1:74-80.
- Fiorellini JP, Kim DM, Ishikawa SO. The tooth supporting structures. In: Newman MG, Takei HH, Klokkevold PR, Carranza FA. Carranza’s Clinical Periodontology. 10th ed. St Louis: Saunders; 2006:76.
- Hodges K. Revisiting instrumentation in anterior segments. Dimensions of Dental Hygiene. 2007;5(2):30-33.
- Hodges K. Using files in periodontal therapy. Dimensions of Dental Hygiene. 2004;2(11):16-20.
- Checchi L, Montevecchi M, Checchi V, Zappulla F. The relationship between bleeding on probing and subgingival deposits. An endoscopical evaluation. Open Dent J. 2009;28:154-160.
- Pattison AM. The necessity of hand instrumentation. Dimensions of Dental Hygiene. 2010;8(4):66.
- Pattison AM. Ultrasonics unveiled. Dimensions of Dental Hygiene. 2010;8(4):38-45.
- Stach D. Back to basics. Dimensions of Dental Hygiene. 2007;5(4):26-29.
- Pattison AM. New thin tips for high power. Dimensions of Dental Hygiene. 2011;9(2):74.
- Pattison AM, Matsuda SA. Technique focus: mini-bladed Gracey curets. Dimensions of Dental Hygiene. 2006;4(2):28-30.
- Pattison AM. Using periodontal files. Dimensions of Dental Hygiene. 2008;6(12):42.
From Dimensions of Dental Hygiene. October 2011; 9(10): 50-53.
