Tips for Instrumenting First Molar Teeth
Applying advanced principles of periodontal instrumentation to enhance mechanical debridement is key to meeting the goals of nonsurgical periodontal therapy.
Part 2 of a two-part series that focuses on the hand instrumentation of first molar teeth. Part 1, which discussed anatomy and instrument selection, appears in our May 2018 issue, which is available at: dimensionsofdentalhygiene.com.
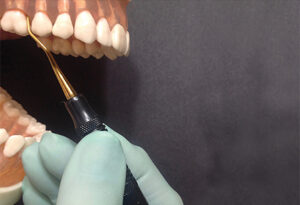
first molar. Palm up orientation with
opposite arch fulcrum placement.
Successful scaling and root planing is key to improving outcomes for patients with periodontitis. Periodontal instrumentation can be highly challenging in patients with advanced periodontitis, especially when debriding first molar teeth.
While this article will focus on technique, two of the first considerations for hand-activated instrumentation for first molar teeth are the suspected anatomy of the root and appropriate instrument selection. These topics were covered in “Hand Instrumentation of First Molar Teeth,” published in the May 2018 issue of Dimensions of Dental Hygiene.1
FULCRUM PLACEMENT AND MIDLINE EFFECTIVENESS
Alternative fulcrums, such as opposite arch, extraoral, finger-on-finger, and reinforced fulcrums, are critical in periodontal instrumentation. Also, extraoral options might help in reaching the base of deep pockets found on first molars. Fulcrum orientation—such as palm up, palm oblique, or palm down—will also be manipulated for leverage and strength with periodontal instrumentation.
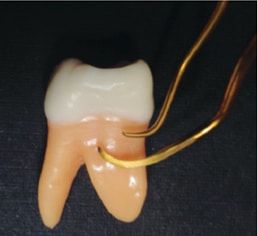
Comparison of a universal and area specific
curet for midline effectiveness.
One approach for ideal fulcrum orientation and placement is to position the instrument’s working end at the epithelial attachment, move your grasp up the instrument handle, and place your fulcrum on an adjacent tooth or oral facial tissue to meet the need of the instrument placement.2 An opposite arch fulcrum with a palm up orientation is particularly useful for maxillary molars (Figure 1).
Extension to the midline is vitally important for healing of the periodontium. The proximal surface(s) is one area where calculus often remains after periodontal instrumentation. Consider curets with long shanks and blades, as well as the manner in which the curet is extended to the midline. A long-ended universal curet is likely to extend 5 mm or more toward the midline. A short-ended Gracey curet, however, adapted with the terminal shank parallel to the proximal surface, is not likely to extend to the midline (Figure 2).
FURCATION INVOLVEMENT
Research shows that teeth with furcation involvement have a greater than 90% survival rate following periodontal therapy after 5 years to 9 years, and the degree of furcation involvement was shown to be maintained by nonsurgical mechanical debridement.3 In fact, compliant subjects who completed a periodontal maintenance visit at least once per year lost significantly less bone in furcation-involved mandibular molars compared with noncompliant subjects.4 Conversely, about 18.3% of molars with furcation involvement were lost when patients did not have regular periodontal therapy.5 As furcation involvement degree increases, so do the risk and percent of molars lost over time.5,6
Often the concavity leading into a buccal or lingual mandibular first molar furcation is exposed through apical migration of the epithelial attachment due to disease and/or recession (Figure 3). In these instances, it is paramount to thoroughly debride this concavity to arrest the progression of periodontitis. To do so, isolate this area and treat it with strokes going in three directions—vertical, oblique, and horizontal—or “crosshatching.”
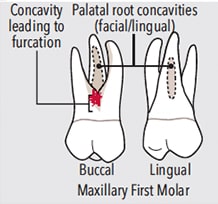
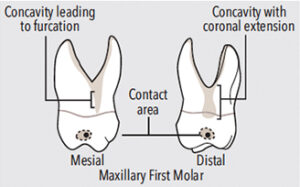
The same furcation anatomy occurs adjacent to the furcation entrances on the buccal, mesial, and distal surfaces of the maxillary first molars (Figure 4 and Figure 5). Therefore, crosshatching in the widest aspect of the concavity adjacent to the furcation entrance is indicated (Figure 4). The challenge in these locations is the length and shape of the concavity leading to the furcation entrance, as it is irregular in shape and the furcation entrance is located further apically than on the mandibular first molars.
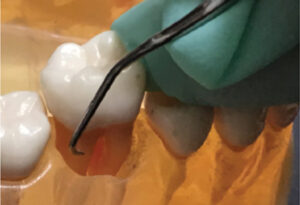
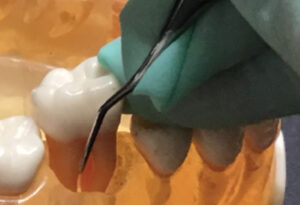
To effectively instrument a furcation involvement from the buccal or lingual aspects, divide the first molar tooth into two teeth, one being the distal root and one being the mesial root. Further divide the two teeth into three sections each. First, treat section one, the distal, with curets adapting to distal surfaces (Figure 6). Next, treat section two, the buccal, with curets designed for buccal and mesial surfaces (Figure 7). Lastly, complete section three, the mesial, with curets designed for mesial surfaces (Figure 8). Activating the instrument in a logical pattern with a combination of strokes within each section aids in complete root coverage.
For root morphology within the furcation involvement, consider the round shape of the diamond-coated files and the small ends of the mini- or micro-bladed curets and furcation curets. These instruments can adapt well in the furcation roof and sides of the roots within the furcations. Of course, access to buccal and lingual furcation involvements is easier than access to furcations on proximal surfaces.
CONCAVITIES AND DEPRESSIONS
Clinicians desire a smooth root to promote healing. To achieve this smoothness, crosshatching is beneficial (Figure 3 and Figure 4). After the area of root roughness is identified, mini- or micro-curet or diamond-coated instruments could be used to reach the desired smoothness. This outcome is based on the clinician’s professional judgment to avoid purposefully removing cementum for the sake of smoothness, as research no longer supports this practice.7 Crosshatching is advantageous in achieving smoothness in deep pockets where the root width has narrowed, for furcation roofs and adjacent concavities as described above, and for small vertical grooves and concavities.
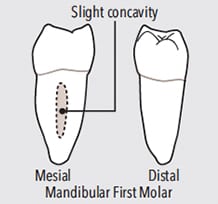
Mesial surface concavity.
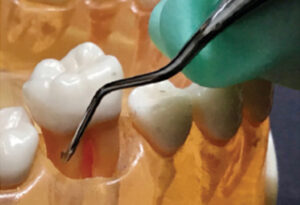
A long, subtle vertical concavity is located on the mesial surface of mandibular first molars (Figure 9). This anatomy requires significant rolling of a curet from the buccal to mesial surface to reach into the approximately 1 mm depth of the concave surface to effectively debride the root (Figure 10). Reaching the depth of this concavity, or other concavities, can be problematic if too much of the blade’s length is adapted to the mesial, causing the clinician to miss the interior of the narrow concavity. In this case, the middle one-third of the blade is adapted over the concavity, which prevents the blade from instrumenting within the concavity.
A vertical concavity is located on the lingual surface of maxillary first molars (Figure 4). It starts in the middle one-third of the root and extends apically; therefore, it will be treated only when the clinical attachment loss exposes this concavity. Mini-bladed Gracey curets are excellent choices for these concave areas.
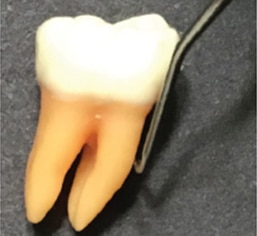
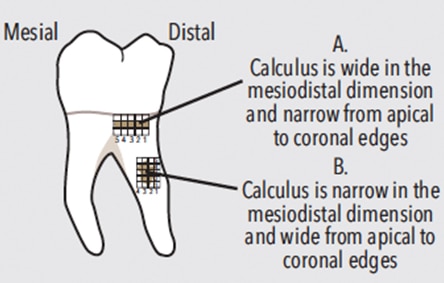
Consistently apply the terminal 2 mm of the curet blade at an 80° blade-to-root angle to effectively channel firmly attached calculus in 1 m to 2 mm segments (Figure 11). Channeling ensures small pieces of deposit are engaged and, therefore, effectively and efficiently removed. Ineffective and inefficient removal results if larger pieces of deposit are engaged with too much of a curet blade (eg, 3 mm or more). Attempting to remove calculus in larger pieces or in one or two heavy working strokes promotes heavy handedness, gingival and root trauma, incomplete removal, and burnishing.
Channeling enables lateral pressure to be modulated. As the curet blade is adapted below the deposit the lateral pressure is very light. Upon engaging the curet blade on the apical border of the deposit and moving coronally, the lateral pressure is increased to moderate or firm, depending on calculus tenaciousness. Upon reaching the top of the deposit in the “channel,” the lateral pressure is released and the curet blade is replaced below the deposit for another channel working stroke. Channeling can be used with any stroke direction: vertical, oblique, or horizontal. Most often, however, it will occur with vertical or oblique strokes, as these directions are how calculus is initially removed in small pieces in an organized fashion.
After calculus is removed, longer working strokes can be applied with a more closed blade (around 60°). These strokes serve to smooth the root and/or remove plaque biofilm.
CONCLUSION
First molar teeth provide isolated challenges in instrumentation due to the complex root anatomy. Memorizing the potential anatomy and applying it to the clinical findings during hand-activated instrumentation are key elements in promoting healing of the periodontal structures and maintaining health. Develop a robust hand-activated instrument armamentarium and apply advanced principles of periodontal instrumentation to enhance mechanical debridement to effectively meet the goals of nonsurgical periodontal therapy.
REFERENCES
- Hodges KO. Hand instrumentation of first molar teeth. Dimensions of Dental Hygiene. 2018;16(5):16–18.
- Pattison AM, Pattison GL. Periodontal Instrumentation. 2nd ed. Norwalk, Connecticut: Appleton and Lange; 1992.
- Huynh-Ba G, Kuonen P, Hofer D, et al. The effect of periodontal therapy on the survival rate and incidence of complications of multirooted teeth with furcation involvement after an observation period of at least 5 years: a systematic review. J Clin Periodontol. 2009;36;164–176.
- Kim CS, Rich SK. Bone loss in furcation-involved mandibular molars: a retrospective analysis. J Dent Hyg. 2017;91:54–61.
- Nibali L, Krajewski A, Donos N, et al. The effect of furcation involvement on tooth loss in a population without regular periodontal therapy. J Clin Periodontol. 2017;44:813–821.
- Johansson KJ, Johansson CS, Ravald N. The prevalence and alterations of furcation involvement 13 to 16 years after periodontal treatment. Swed Dent J. 2013;37:87–96.
- Heitz-Mayfield LJ, Lang NP. Surgical and nonsurgical periodontal therapy. Learned and unlearned concepts. Periodontol 2000. 2013;62:218–231.
From Dimensions of Dental Hygiene. February 2019;17(2):16, 18, 21.


