Control the Aerosol Risk
Precautions must be taken to ensure both clinician and patient safety during ultrasonic instrumentation.
The use of ultrasonic scalers for instrumentation and debridement has steadily increased since the technology was first introduced in 1955.1 More clinicians have adopted the use of ultrasonic instrumentation—both magnetostrictive and piezoelectric—due to the push for improved ergonomics in the clinical setting. Ultrasonic use may reduce workplace-related repetitive stress injuries experienced during manual instrumentation, thereby increasing career longevity.2,3
This focus on improving ergonomics in the clinical environment, however, may have introduced oral health professionals to a new risk—aerosols created by the ultrasonic handpiece. Aerosols generated by ultrasonic scalers become contaminated from the patient’s saliva and blood and/or from dental unit waterlines. When using ultrasonic instrumentation for patient therapy, there are many precautions that should be taken to protect clinicians and patients from these risks.4–6
Ultrasonic therapy, whether utilized everyday or periodically, necessitates that clinicians protect themselves and the surrounding dental environment to prevent the spread of potentially infectious diseases.
DENTAL OFFICE AEROSOLS
Dental aerosols and spatter, which arise from the dental burs on high-speed handpieces and ultrasonic scalers, are contaminated with saliva, blood, bacteria, viruses, and fungi. Microorganisms associated with tuberculosis, hepatitis, herpes, and conjunctivitis have been isolated from dental aerosols.7 Spatter is described as a visible mixture of air, water, and/or solid substances that contains particles larger than 50 microns.7,8 Dental aerosols are defined as liquid and solid particles less than 50 microns in diameter. These particles can remain suspended in the air for as long as 30 minutes.9,10 Aerosols mix with the air in a confined space, and this air is breathed by the dental team (dental hygienist, dentist, and dental assistant) and their patients throughout the day. Air contaminants pose an increased risk for acquiring respiratory infections by dental personnel.9,10 To protect clinicians and their patients—and to prevent transmission of infectious diseases when using ultrasonic instrumentation—oral health professionals should use personal protective equipment (PPE), ask patients to use a preprocedural mouthrinse, and utilize a high-volume evacuator (HVE) while performing the therapy.9,10
PROTECTING CLINICIANS
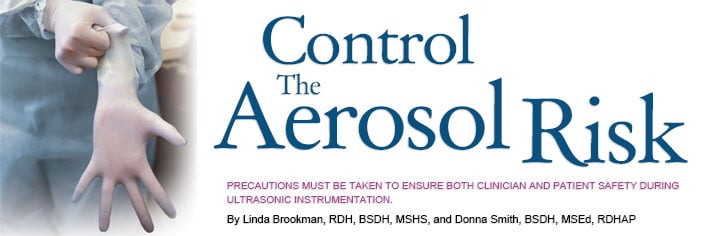
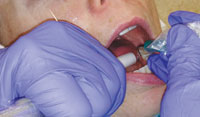
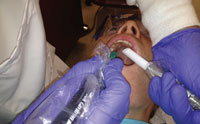
The first step in protecting clinicians is to create a barrier by donning the correct PPE, as recommended by the Occupational Safety and Health Administration and United States Centers for Disease Control and Prevention (CDC).9 When using an ultrasonic scaler, clinicians should wear a cuffed, long-sleeved, water-resistant gown over their scrubs; a mask to prevent aerosol inhalation; protective goggles; and a face shield to prevent mask saturation (as recommended by the CDC).9,10 A disposable surgical cap may be worn to prevent debris and contaminated aerosol from settling in the hair (Figure 1).
PREPROCEDURAL MOUTHRINSE
The second step to maximizing safety in the dental operatory is to control the aerosols in the clinical setting. Studies show that when a patient swishes with an antimicrobial mouthrinse for at least 30 seconds prior to treatment, the number of microorganisms in saliva and on the teeth is significantly reduced.11,12
When using a preprocedural mouthrinse, ask patients to swish the antimicrobial rinse around the entire oral cavity for at least 30 seconds.11 Clinicians have several choices when it comes to selecting an antimicrobial prerinse solution. A mild bleach solution of 8 ml bleach to 250 ml of water (or 2 tsp of bleach to 8 oz of water) can be used. This solution must be made on a daily basis, with the unused portion discarded at the end of the day.12
The use of over-the-counter antiseptic mouthrinses, such as products containing essential oils or cetylpyridinium chloride, may be easier to implement because most offices already have these rinses on hand. Another option is to have the patient use 15 ml (1 tbsp) of a broad-spectrum antimicrobial prescription mouthrinse, such as 0.12% chlorhexidine. The most important aspect of the preprocedural mouthrinse is that patients use the antimicrobial for the correct length of time, and immediately prior to the start of treatment.
HIGH-VOLUME EVACUATOR
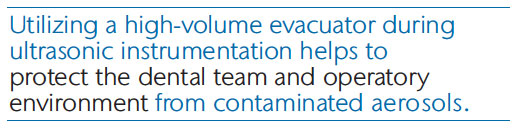
The third precaution for oral health professionals is the proper use of the HVE during ultrasonic scaling. Using the HVE is recommended because employing the saliva ejector alone is not enough to effectively remove dental aerosols—although it may be used in conjunction with the HVE.8 Utilizing an HVE during ultrasonic instrumentation helps to protect the dental team and operatory environment from contaminated aerosols.4,8,9
During ultrasonic instrumentation, the HVE may be used manually or hands-free. When a manual HVE is used, the ideal clinical scenario is to have a dental assistant help control the aerosol. Most dental practices, however, do not have the luxury of staffing each operatory with both a dental assistant and a dental hygienist. When delivering treatment solo, clinicians may wish to use a hands-free system—with the current market offering a variety of options. Clinicians should carefully evaluate each system, as many hands-free HVE devices require a special attachment that must be professionally installed on the dental unit prior to use. If a hands-free device is not available, the clinician must use a handheld HVE.
 PROPER HVE TECHNIQUE
The proper technique for utilizing the manual HVE requires practice but is necessary to ensure its effective use. Choosing a half-length HVE tip, as opposed to a full-length HVE tip, will ease manipulation and retraction during calculus and biofilm removal.
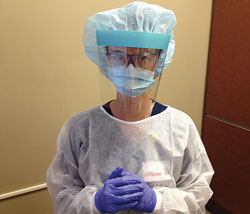
HVE tips may be purchased in short, half-length, or standard full-length versions, or clinicians may cut a standard tip in half. Shorter tips allow clinicians to use the tip as a retractor while still maintaining proper body ergonomics. The saliva ejector should be placed in the patient’s mouth at the beginning of the procedure. The use of a precurved mandibular saliva ejector may help to keep the ejector positioned in the lower corner of the patient’s mouth. A conventional saliva ejector can be shaped to hug the patient’s cheek so it will not move during the procedure. Recommended for patient comfort, the primary function of the saliva ejector is to remove water that falls to the back of the patient’s throat, while the HVE removes aerosolized water generated by the ultrasonic device.
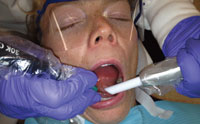
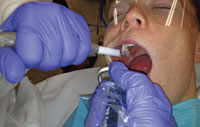
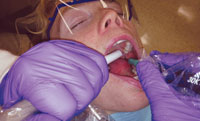
Oral health professionals should always hold the HVE in their nondominant hand with a palm grasp (Figure 2). This type of grasp allows the dental hygienist to maintain a straight wrist while retracting the tissue. Placing the tip so the bevel faces the teeth will prevent trapping the patient’s buccal mucosa with the HVE. The end of the HVE should gently push back on the buccal mucosa with a cupping motion and be guided toward the most distal tooth in the area being scaled. Figure 3 illustrates how the placed at the distal-most area and not rest on the gingiva.
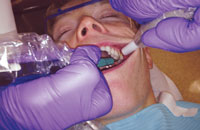
The HVE can be stabilized when working on the lingual aspect by resting it on the corner of the mouth. Clinicians should be aware of their body ergonomics through out the appointment, and be willing to move from the 9 o’clock to the 12 o’clock seated position to prevent strain or twisting of their spine. Figure 4 through Figure 7 show the proper positioning of the HVE in awkward areas of the mouth. As with any new technique, continued practice will help to make the HVE a practical addition to the ultrasonic scaling process.
CONCLUSION
In summary, oral health professionals should take steps to protect themselves, their patients, and the dental environment during ultrasonic instrumentation. Protection protocol includes donning proper PPE, asking patients to use a preprocedural mouthrinse, and using an HVE. The HVE is most effectively utilized with the help of a dental assistant or by implementing a hands-free version. If these options are not available, then clinicians should use ergonomically correct body and hand positioning while holding the HVE in their nondominant hand. Oral health professionals, whether using ultrasonic scalers on every patient or periodically, can protect themselves and their patients from potentially harmful bacteria found in the clinical setting by following these infection control protocols.
REFERENCES
- Paramashivaiah R, Prabhuji MLV. Review article. Ultrasonic scaling:associated risks. Journal of Dentistry and Oral Biosciences. 2011:2(2):40–44.
- Parker ME. Preserve your arm and hand health. Dimensions of DentalHygiene. 2003;1(6):32–38.
- Lalumandier JA, McPhee SD. Prevalence and risk factors of handproblems and carpal tunnel syndrome among dental hygienists. J DentHyg. 2001;75:130–134.
- Harrel SK. Are ultrasonic aerosols an infection control risk? Dimensionsof Dental Hygiene. 2008;6(6):20–26.
- Mills SE. Are your waterlines safe? Dimensions of Dental Hygiene.2007;5(6):28–30.
- Harrel SK. Contaminated dental aerosols. Dimensions of Dental Hygiene.2003;1(6):16–20.
- Harrel SK, Molinari J. Aerosols and splatter in dentistry: a brief review ofthe literature and infection control implications. J Am Dent Assoc.2004;135:429–437.
- Szyma?ska J. Dental bioaerosol as an occupational hazard in a dentist’sworkplace. Ann Agric Environ Med. 2007;14:203–207.
- Centers for Disease Control and Prevention. Bloodborne pathogens andaerosols. Available at: www.cdc.gov/oralhealth/infectioncontrol/faq/aerosols.htm. Accessed September 10, 2013.
- Jacks M. Protecting yourself. Dimensions of Dental Hygiene.2011;9(8):26–29.
- King TB, Muzzin KB, Berry CW, Anders LM. The effectiveness of anaerosol reduction device for ultrasonic scalers. J Periodontol. 1997;68:45–49.
- Slots J. Low-cost periodontal therapy. Periodontol 2000. 2012:60;110–137.
From Dimensions of Dental Hygiene. October 2013;11(10):32,34,36,38.
