
The Bane of Burnished Calculus
Complete removal of all subgingival deposits is a challenge, but leaving burnished calculus behind threatens periodontal health.
One of the more challenging aspects of closed periodontal therapy is complete removal of subgingival calculus. According to Carranza, the composition of subgingival calculus is 70% to 90% inorganic components that originate from the plasma.1 Two-thirds of the inorganic components are crystalline in structure. Subgingival deposits attach to the root surfaces in different ways and may affect the ease or difficulty encountered when trying to remove the deposit. Subgingival calculus may mechanically lock into root surface irregularities or it may attach to unaltered cementum surfaces.1
The nature and attachment of subgingival calculus can lead to incomplete removal or burnishing of deposits. Despite dental hygienists’ dedication to thorough periodontal therapy, research shows that approximately 17% to 64% of calculus remains after scaling and root planing, and 7% to 24% remains after surgical intervention.2
By definition, burnished calculus is a deposit that has had its outermost layer removed, so the surface is smooth. Burnished calculus becomes difficult to remove because the cutting edge of the instrument tends to slip over the smooth surface of the deposit.1Burnishing of calculus may lead to delayed healing of the periodontal tissue and possible periodontal abscesses.3
Dental hygienists may frequently encounter patients whose oral hygiene seems proficient with minimal visible plaque, but areas of the gingiva continue to bleed on probing and are dark red to bluish-purple, shiny, and smooth. The frustration of closed periodontal instrumentation is knowing there must be a reason for the ongoing inflammatory tissue response, but not being able to detect the offending deposit. When these areas are examined during flap surgery or with a dental endoscope, burnished calculus is usually discovered.
CAUSES OF BURNISHED CALCULUS
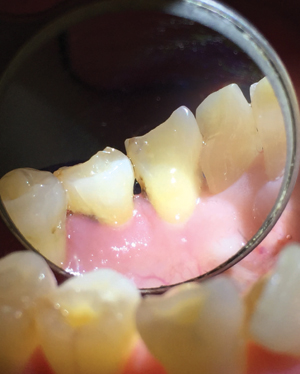
Burnished calculus is more likely to be found in areas on the root surface with developmental grooves, depressions, furcations, and at the cementoenamel junctions (Figure 1).2–5 Dull instruments are a significant cause of burnished calculus. If a hand instrument is somewhat sharp at the onset of removing the calculus, it will remove the first few millimeters of the deposit. When continued scaling without resharpening occurs, the blade becomes dull and begins to smooth the calculus without removing the rest of the deposit.5
Another principle for effective calculus removal is to ensure that the blade-to-tooth angle is correct. If the terminal shank of the instrument is not parallel to the surface being scaled, then the angulation is either too open (greater than 70°) or too closed (less than 70°).6 To aid in correct angulation, a visual cue is used to ensure the terminal shank of the instrument is parallel to the surface being scaled.
There are numerous considerations when choosing an instrument to remove subgingival calculus from the root. Is the instrument strong enough to remove the calculus? If the instrument is too flexible, the terminal shank will flex and only remove the top layer of biofilm on the calculus—even if the blade is sharp. The blade will be unable to “bite” into the surface of the deposit, so removal will be ineffective and a burnishing of the surface will occur. Switching to a more rigid instrument will prevent this problem. If the blade has been sharpened down over time, it may break if too much lateral pressure is applied.
An incorrect grasp can cause a lack of enough lateral pressure to ensure that the sharpened blade grabs onto the calculus. With the modified-pen grasp, either the thumb or the boney side of the middle finger should be pushing in the direction of the root surface being scaled, depending on where in the mouth or what surface is being scaled.5
After an area has been scaled, exploring the area with an 11/12 or 3A explorer is required to check for residual calculus. Proper technique includes using enough lateral pressure as exploring occurs. Moderate to firm pressure using the explorer in a multidirectional pattern is recommended in the detection of burnished calculus.7 Using the first 1 mm to 2 mm of the tip of the explorer in an apical direction with firm pressure also helps in the detection of burnished calculus.8
Clinicians have turned to power scalers to aid in the efficiency of instrumentation. These instruments are of great value when used appropriately to remove heavy calculus deposits. However, they may also rapidly burnish calculus if used with inappropriate technique. Figure 2 depicts an area of burnished calculus caused by the incorrect use of an ultrasonic instrument. The clinician should evaluate the tenacity and volume of the calculus when deciding which ultrasonic insert/tip (UIT) to use and also assess the correct power setting. Many clinicians incorrectly use long quick strokes that do not effectively remove calculus deposits.
The type of deposit that is to be removed should be assessed. If heavy ledges are present, the clinician should start with a high power setting. If the calculus ledge is not breaking, then the clinician needs to increase the power setting to one that will remove the deposit. Once the ledge has been broken, the clinician can then lower the power to continue to remove the thin sheets of calculus while preventing damage to the root surface.4,9

The length and direction of the stroke are important to remove the ledge of the deposit. The tip of the UIT should be pointed down to touch the top of the calculus ledge. This stroke will resemble a probing-like action where the tip of the UIT is gently guided to break the ledge from the top down toward the base of the deposit. Care should be used not to engage with the epithelial attachment so the tissue is not damaged during this process. The clinician should “walk” the UIT along the ledge in 1 mm steps. This technique allows the ledge of calculus to weaken and may break it off from the root surface. Once the calculus ledge has been broken, the clinician can use the more traditional side to side, overlapping stroke to remove small pieces of calculus. When a piezoelectric unit is used, the calculus may be pulverized instead of fracturing off. Long swiping strokes that do not overlap may lead to “voids” of instrumentation, and result in possible smoothing and burnishing of the deposit.4,7
Assess UIT design carefully. UITs come in rounded, beveled (also known as bladed), and diamond-coated styles. When working with heavy ledges of calculus, the “beveled” or “bladed” UIT design is best. These UITs are triangular in cross-section and the blade allows for more power to be concentrated on the ledge of deposit. The rounded UIT tend to slip over calculus ledges and smooth out the deposit, leading to burnishing. Rounded UITs are best used for soft deposit and stain removal. Diamond UITs can be very aggressive on the root surface and should be used with extreme caution. They are best implemented when removing burnished calculus with the aid of a dental endoscope.6,7
The correct angulation of the UIT is different from the angulation used with hand instrumentation. The UIT should be used at a 0° to 15° angle from the root surface.9 This closed and straight angulation allows the UIT to be guided safely into the sulcus and helps prevent damage to the root surface. If the UIT is opened to a wider angle, there is increased risk of root trauma. The terminal 2 mm to 4 mm of the UIT is the most active, and care must be taken to keep it in contact with the deposit. If the UIT is worn, the effectiveness of ultrasonic instrumentation is greatly reduced.4,10
The use of ultrasonic instrumentation may increase the clinician’s visible field due to the lavage and irrigation of the pocket. The flushing action of the UIT can clear the sulcus of debris and hemorrhage. However, the vibrations created by an ultrasonic scaler can cause a reduction in tactile sensitivity. For this reason, power scaling must be followed with the explorer to detect any residual calculus. Finally, scaling is finished with hand instruments.
DETECTING BURNISHED CALCULUS
Detecting burnished calculus following nonsurgical periodontal therapy by exploring alone is difficult due to the smoothness of the residual deposit. Following are suggestions on how to determine if the root is truly calculus-free.
Tissue Color and Tone. Nonsurgical periodontal treatment should be followed by a tissue re-evaluation appointment approximately 10 days post-treatment to determine if the problem has resolved. A visual clinical examination inspecting the tissue color and tone in conjunction with exploring is an important adjunct in the detection of residual burnished calculus. Healthy gingival tissue is pink to coral-pink in color. If the marginal gingiva is dark red to bluish in color, continues to bleed when probed, and the patient does not present with visible plaque, this is an indication that subgingival burnished calculus is still present.8 To evaluate the tissue tone, dry the tissue with air, if any subgingival calculus remains, the dried tissue will reveal a smooth, shiny and an enlarged margin with a spongy texture.8
Use of the Dental Endoscope. If a patient continues to present with inflamed gingival tissue that bleeds on probing, the dental endoscope can help determine where the burnished calculus is present. The endoscope allows visual detection while instrumenting the residual calculus. Because it affords enhanced visualization and deposit removal, using an endoscope may help the patient avoid surgery. However, this may not be the case in all circumstances.5
TECHNIQUE FOR REMOVAL
If a dental endoscope is not available to aid in the confirmation and removal of residual burnished calculus, then additional root planing of the area is advised. Before root planing begins, the patient should be anesthetized. Ensure the selected instrument is sharp, has a rigid shank, and adapts to the root surface. If the pocket is deep, using an extraoral fulcrum will provide maximum leverage and enables the instrument to reach to the base of the pocket. Next, if possible to detect, find the edge of the deposit using an exploratory stroke. For correct angulation, be certain that the terminal shank is parallel to the surface being scaled and push with lateral pressure into the calculus to engage it. Begin at the apical edge to try to disengage it from the root surface by using a pull stroke. If this approach is ineffective, then the use of periodontal files is suggested. Hirschfeld files can aid in the fracturing and crushing of burnished calculus. Use an intraoral fulcrum close to the area of calculus removal and activate short vertical or oblique strokes to roughen the smooth calculus with the files. This should be followed by mini or micro-mini curets to clean the root of the smallest residual pieces of calculus. Diamond-coated files can then be used to finish the root so the surface becomes glass-like.11,12If power scaling is preferred, thin UITs on medium power or thin diamond UITs on low power can be used.11,12 Regardless of whether ultrasonic or hand instrumentation is used, implementing multidirectional strokes with sharp, rigid instruments using correct adaptation is imperative. Additionally, ongoing assessment with the manual explorer using firm pressure with the toe will aid in the complete removal of burnished calculus.
Burnished calculus left on root surfaces becomes a perfect niche for periodontal pathogens. While difficult to detect, dental hygienists should use their skills and the appropriate armamentarium to remove these burnished deposits so periodontal health can be achieved and maintained.
REFERENCES
- Carranza FA, Newman MG, Takei HH, Klokkevold PR. Carranza’s Clinical Periodontology 12th ed. St. Louis: Elsevier Saunders; 2015:118, 284–285, 482–483.
- Drisko CL, Killoy WJ. Scaling and root planing: removal of calculus and subgingival organisms. Curr Opin Dent. 1991;1:74–80.
- Checchi L, Montevecchi M, Checchi V, Zappulla F. The relationship between bleeding on probing and subgingival deposits. An endoscopical evaluation. Open Dent J. 2009;28:154—160.
- Pattison, A, Pattison G. Periodontal instrumentation transformed. Dimensions of Dental Hygiene. 2003:1(2):18–22.
- Osborn J. Role of the dental endoscope in calculus detection. Dimensions of Dental Hygiene. 2016;14(2):40–44.
- Pattison A. Keys to effective calculus removal. Dimensions of Dental Hygiene. 2011:9(10):50–53.
- Hodges MK. A close-up look at explorers. Dimensions of Dental Hygiene. 2013:11(9):34–38.
- Smith DM. Facing the challenge. Dimensions of Dental Hygiene. 2016;14(5):24–28.
- Darby ML, Walsh MM. Dental Hygiene Theory and Practice. 4th ed. St. Louis: Elsevier Saunders; 2015:486–525.
- Wilkins EM, Wyche CJ, Boyd LD. Clinical Practice of the Dental Hygienist. 12th ed. Philadelphia: Wolters Kluwer; 2016:715–724.
- Pattison AM, Matsuda S. Making the right choice. Dimensions of Dental Hygiene. 2003;1(8):4–10.
- Pattison AM. Using periodontal files. Dimensions of Dental Hygiene. 2008;6(12):42.
From Dimensions of Dental Hygiene. February 2017;15(2):28-31.
