 COPYRIGHT MICHAELA NGUYEN, RDH, MS
Accessing the Base of the Pocket
Clinicians must be able to gain access and remove all deposits from the base of the pocket in order to control disease and prevent probing depths from increasing.
Elimination of biofilm and calculus is paramount to stabilizing the periodontium and preventing the progression of periodontal diseases. These soft and hard deposits incite inflammation and may lead to the destruction of surrounding tissue and bone. Subsequently, periodontal pockets develop and grow deeper; becoming more complex and challenging to manage. To control disease and avoid increased probing depths from occurring, it is crucial for clinicians to gain access and remove all deposits from the base of the pocket. The clinician must comprehend and perform techniques that will allow them to achieve this goal in closed scaling and root planing procedures.
DETECTION
Periodontal probing and exploratory detection are critical to identifying the location of biofilm and calculus. By determining the actual depth of the pocket and using overlapping, exploratory strokes, the clinician can precisely hone in on the area where the deposits reside and increase the likelihood of calculus-free tooth surface at the sulcus. The 11/12 extended and #3A explorers are essential parts of the instrumentation armamentarium, as they assist with calculus detection in deep periodontal pockets. The 11/12 extended explorer is an area-specific explorer with the shank design characteristics of the extended 11/12 Gracey curet. Compared to a standard shank length, an extended shank can reach the base of a deep periodontal pocket easily because the lower shank is 3 mm longer.
The #3A explorer has a long, straight shank that curves and has a 2 mm working end.1 Because of its design, the #3A explorer is best employed when using horizontal or vertical probe-like strokes with the tip pointed apically toward the epithelial attachment. It adapts especially well to the anatomy of the tooth surface with narrow concavities, depressions, and deep pockets of buccal and lingual surfaces. Clinicians must be methodical and attentive when utilizing exploratory strokes to avoid injury to the epithelial attachment due to a pointed tip. Always implement 1 mm to 2 mm of the tip with light to moderate pressure; however, the actual point with firm pressure is ideal when detecting burnished calculus. To ensure the base of the pocket is reached, the tactile sensation is a soft, epithelial resistance and not a porous or hard-like structure. Calculus left undetected may eventually result in a breakdown of surrounding bone.
LOCAL ANESTHESIA
In cases when nonsurgical periodontal therapy (NSPT) is performed, local anesthesia should be administered. The majority of patients with periodontal involvement (greater than 4 mm) experience tenderness as subgingival instrumentation is activated. Failure to access calculus at the base of the pocket is often predicated on the clinician’s reservation to cause discomfort to the patient as the instrument is applied subgingivally. By administering block anesthesia, patients will obtain profound soft tissue and pulpal anesthesia This will enable an instrument to be inserted to the necessary depth and debride the root surface in its entirety without inflicting pain.
GRASP AND GRASP PRESSURE
Proper modified pen grasp or pen grasp is fundamental for hand or power instrumentation; however, the appropriate use of grasp pressure is critical. A light, relaxed pen grasp to a modified pen grasp should be used for ultrasonic instrumentation, periodontal probing, or gentle exploratory strokes along the tooth surface. When initiating any type of hand instrumentation, such as gross scaling or root planing strokes, a modified pen grasp needs the correct modulation of pressure for soft and hard deposit removal. With situations where tenacious or moderate to heavy amounts of deposits exist, moderate to firm pressure is required for efficacious removal.
In hand instrumentation, the concept of activating and applying lateral pressure during pull strokes is necessary.2,3 The grasp pressure is usually tantamount to the amount of lateral pressure necessary. In many cases, however, clinicians do not actually release the pressure during push strokes. Instead, the grasp pressure for pull strokes becomes the same as the push strokes. This improper technique can burnish calculus and inhibits access to the base of the pocket. Continual tight or firm grasps while pushing the instrument toward the apex restricts the working end from completely reaching the base of the pocket and fatigues the hand much more quickly. In fact, the tight grasp forces the fingers to actively finger-flex with pressure in both directions, which may cause unnecessary discomfort to the patient and distension or damage to the gingival tissue.
Clinicians must learn to modulate their grasp pressure so that the fingers and hand are relaxed at the appropriate moment during instrumentation. Relaxation of the grasp allows the fingers to naturally spring the working end gently toward the epithelial attachment without causing harm. Only when the instrument is being pulled should the grasp pressure then be increased. This deliberate hand and finger activation will improve the ease of getting to the base or wiggling the working end around a piece of calculus as it follows the anatomy or topography at the base of a pocket to complete removal deposits from that tooth surface.
Using an extended modified pen grasp is an important technique to master. Choking up where the fingers are close to the working end will impede the instrument in reaching the base of a pocket. By extending the grasp further away, the fingers are on the instrument handle and away from the working end. This allows the clinician to fulcrum further away to easily reach the base of a pocket by aligning the instrument blade with the root surface for proper angulation. This approach improves angulation, adaptation, and leverage for scaling deeper periodontal pockets.3
FULCRUM PLACEMENTS
To provide advanced therapeutic periodontal care, extraoral and alternative fulcrums must be used to treat deep periodontal pockets because they help to reach the base of a pocket with proper angulation and adaptation. Traditional intraoral, same-arch fulcrums are primarily used for prophylaxis with shallow pockets or supragingival calculus removal. Most clinicians feel stability, control, and power with same-arch fulcrums, however, their use impedes the ability to reach the base of deep periodontal pockets.3,4 When inserting into a deep periodontal pocket of the posterior teeth using an intraoral, same-arch fulcrum, the blade angulation tends to close or open to a greater degree. During activation, the arc of movement is shortened, resulting in a shallow stroke and closes or opens beyond proper angulation, which then causes burnished calculus.3,5
An extraoral fulcrum is predominately employed when instrumenting and accessing deep periodontal pockets.3,4 Many clinicians believe that by using an extraoral, alternative (opposite or cross-arch) fulcrum, control and stability will be diminished. As long as the fulcrum finger and whole hand rest on the side of the face or over osseous structure together as a unit, control and stability will be established to prevent slippage during activation.3 The advantage of an extraoral and alternative fulcrums is that they require an extended grasp to keep the “line of draw,” lateral pressure and leverage consistent throughout the working stroke from the base of the pocket to the contact.3,4
ANGULATION
If the blade-to-tooth angle is too open (more than 70°), it not only burnishes calculus, but also distends the tissue. This prevents the working end from reaching the sulcus. When the blade angulation is too closed, it will not permit the working end to reach the base because the blade is leaned too closely to the tooth. In addition, the lower shank will cross over the tooth and cause the blade to fall short of the base of the pocket by a few millimeters. If an area-specific (70° off-set blade) curet is used, the lower shank of the instrument should be parallel to the surface being scaled for proper angulation. If the instrument is a universal curet or sickle scaler (90° blade), then the lower shank should cross over slightly to make the angulation close to 70°.
INSTRUMENT SELECTION
Instrument selection is key to reaching the base of the pocket. Assessing the tissue tone, osseous topography, or clinical attachment loss; root morphology; accessibility; quality; and quantity of constituents will determine which instruments are suitable to accomplish complete root debridement.
Reaching the base of a deep pocket cannot be achieved if the instrument does not have a longer lower shank. Extended shanks have 3 mm longer lower shanks that are purposely designed to access deep pockets or significant attachment loss greater than 5 mm.

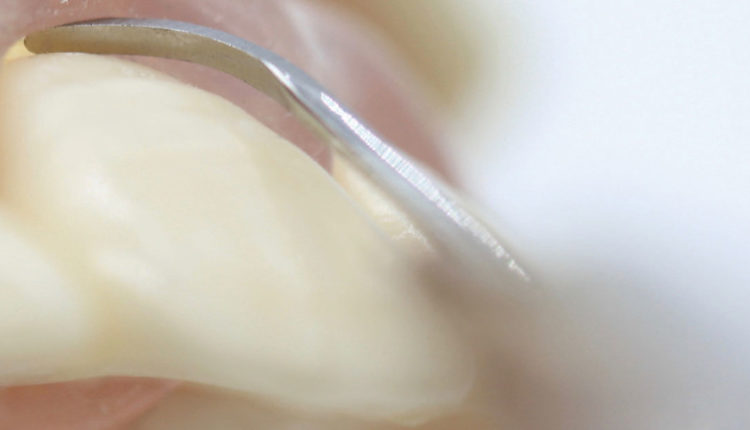
Miniaturized instruments, such as micro or mini-bladed curets, were developed to adapt well to contours of the tooth, such as cementoenamel junctions, line angles, root depressions, concavities, furcations, and narrow pocketing. Mini-bladed curets are 50% smaller and micro mini-bladed curets are 70% smaller in length and width than a standard blade. The shortness, thinness, and extended shanks of micro and mini-bladed curets enable them to reach deeper into periodontal pockets than standard Gracey curets. Generally, when using mini-bladed instruments, vertical and oblique strokes are activated in areas with deep pockets (Figure 1).
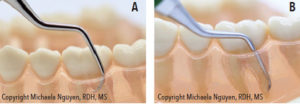
Instrument blade thickness is another factor clinicians must analyze to understand accessibility in tissue. Gingival tissue that is healthy, fibrotic, or treated after NSPT is typically tight and firm. Inserting into this type of tissue with thick bladed instruments is difficult and causes trauma when forced into the pocket. If the blade is too thick to safely insert subgingivally, then accessing the base of a pocket is impossible. Thinner blades, such as periodontal maintenance or micro or mini-bladed curets, are the best options to slip into the pocket and ensure access and debridement for these types of tissue consistency without trauma (Figure 2).6
TIP DIRECTION/DIRECTIONAL STROKES
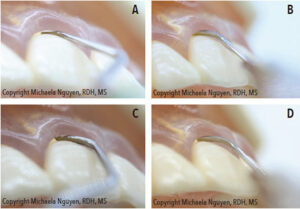
Multidirectional strokes are crucial in ensuring complete root coverage. Vertical strokes from the base of the pocket to the margin are the standard stroke direction for removing deposits with hand instrumentation; however, overlapping, vertical strokes alone cannot fully remove all deposits. Oblique or horizontal strokes should follow to finish cross-hatchings strokes. In certain cases, starting with horizontal or oblique strokes is a better option. When vertical strokes with a standard length blade cannot access the base of a pocket, horizontal strokes must be implemented instead. Areas with deep, narrow periodontal pockets are a case in point. A standard blade positioned parallel to the alveolar bone cannot be negotiated into the base of the narrow pocket (Figure 3). Alternatively, pointing the toe of a blade toward the apex of the tooth can fit better and reach the base the pocket.
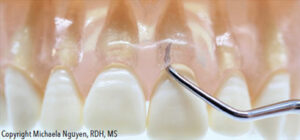
Horizontal strokes with a standard blade can extend and move apically from the margin to the base and effectively break up deposits (Figure 4). As the topography of the alveolar bone narrows, the horizontal strokes become more confined and shortened to follow the anatomy.7 Many clinicians don’t use these strokes due to the risk of separating the periodontal ligaments. However, if clinicians are mindful of their strokes, accessing and breaking up soft and hard deposits can be accomplished without damaging or traumatizing the soft tissue.
POSITIONING
Clinician and patient positions facilitate proper instrumentation technique. By moving or rotating around a patient’s head in all positions (8 o’clock to 3 o’clock to 5 o’clock position), clinicians achieve direct visibility with a variety of fulcrum placements to access all areas of the oral cavity, especially in difficult-to-reach areas.3 Clinicians can stand for leverage and use extraoral and opposite-arch fulcrums to extend directly down from the maxillary arch to the base of a deep pocket of the mandibular arch. At the same time, the clinician will achieve a state of musculoskeletal balance to protect the body from strain and injury.3
CONCLUSION
Complete removal of subgingival calculus at the base of the pocket may be a daunting task; however, it is attainable. Deposit removal at the base of a pocket requires effective periodontal skills in technique and due diligence by the clinician to effectively remove all deposits and leave no remnants behind.
REFERENCES
- Hodges K. Reconsidering the explorer. Dimensions of Dental Hygiene. 2005;3(4):26–28.
- Pattison G, Pattison A. Periodontal Instrumentation. 2nd ed. New York: Appleton & Lange; 1992.
- Sumi J, Nguyen M. Hand-activated instrumentation. In: Darby M, Walsh M, eds. Dental Hygiene: Theory and Practice. 4th ed. St. Louis: Saunders/Elsevier; 2015.
- Nguyen M, Pattison AM. Activate alternative fulcrums. Dimensions of Dental Hygiene. 2014;12(5):24–28.
- Pattison AM. Establishing effective extraoral fulcrums. Dimensions of Dental Hygiene. 2008;6(4):46.
- Pattison AM, Matsuda S. Making the right choice. Dimensions of Dental Hygiene. 2003;1(8)(Suppl):4–10.
- Nguyen M. A closer look at the 13/14 Gracey curet. Dimensions of Dental Hygiene. 2015;13(9):24–30.
From Dimensions of Dental Hygiene. May 2019;17(5):20,22,24–25.
