A Close-Up Look at Explorers
These time tested instruments are critical to the success of nonsurgical periodontal therapy, and many types are available to help clinicians maximize their use.
Exploring, or the use of a periodontal explorer during the delivery of oral care, should not be overlooked—it detects, evaluates, and enhances debridement therapy.
Although plaque biofilm is the main culprit in inflammatory periodontal diseases, subgingival calculus covered with biofilm has been directly related to more than 60% of sites with pocket wall inflammation when compared to sites with biofilm alone.1 Calculus removal is critical to successful therapy for periodontal diseases, making detection of calculus an essential skill among dental hygienists and dentists.
Advances in nonsurgical periodontal therapy (NSPT) include modifications of standard therapies, new technology, and novel treatment protocols—such as improved instrument tip designs and the use of lasers, to name a few.2 A review of random controlled trials found that these advances might enhance patient-related outcomes and cost effectiveness; however, there was no significant difference in efficacy when compared to scaling and root planing alone.2 Scaling and root planing, or periodontal debridement, remains the gold standard of therapy for most chronic periodontitis cases.2
Aggressive removal of cementum has been “unlearned,”3 meaning it is no longer necessary. The need for thorough mechanical debridement in NSPT, however, has not changed3 and cannot be deemphasized. Root smoothness remains an objective of mechanical debridement, and the explorer, while subjective, remains the best instrument to use when gauging root surface texture.
In addition, preparation of a biologically acceptable root includes cementum-sparing debridement. Therefore, an explorer is crucial to determining when to cease scaling and root planing. Although clinicians explore with the curet, it cannot replace the precision gained with a periodontal explorer. The fine, wire-like design of its working end allows optimal tactile sensitivity for detection of biofilm retentive factors, such as calculus, defective restorations, surface irregularities, and root caries. A periodontal probe can locate large pieces of deposit; however, the probe’s round, blunted tip and diameter limit its detection abilities. Explorer designs, technique specifics, and applications are worth revisiting, and the “art and form” of exploring also merits self-assessment in clinical practice.
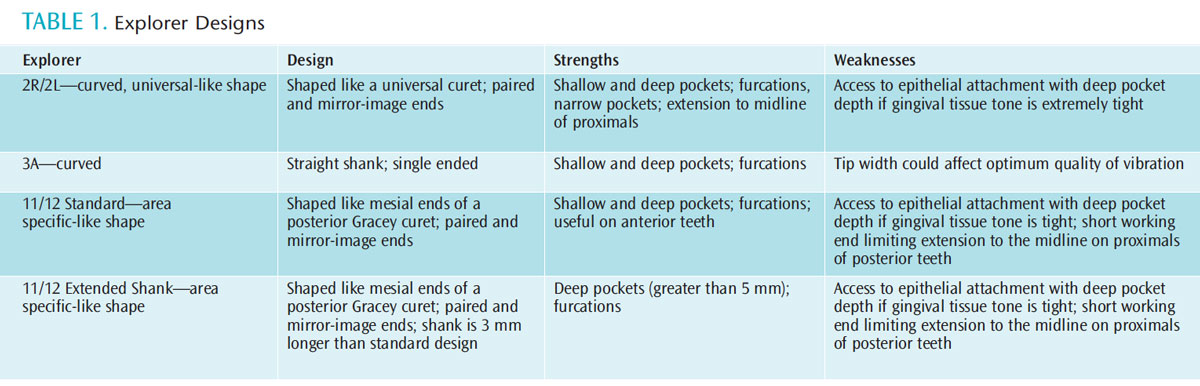
DESIGNS
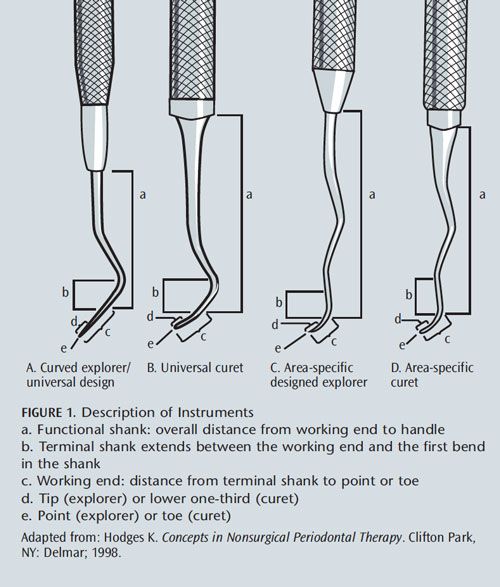
Three designs are most useful in debridement during oral prophylaxis and NSPT (Table 1). Curved explorers, typically labeled “2” by manufacturers, are available in various shank designs, and working end curvatures and lengths (Figure 1A). These designs were previously identified as “cowhorn” explorers, and are paired instruments with mirrored working ends. The longer the curved explorer working end, the more likely it is to adapt to varying root topography, such as shallow or deep pocket depth, furcation entrances and exposures, or narrow pocket depth. Also, less curvature of the shank and working ends increases the likelihood of adapting to deeper depths. This design is “universal like” as in a universal curet (Figure 1B), such as Columbia 13/14 or Barnhardt 5/6. Therefore, adaptation of curved explorers is similar to that of universal curets. The design meets the needs of various patient conditions. Specifically, the 2R/2L pattern features a very long working end, as well as a minimally curved shank. The working end is ideal for adaptation in deep pockets, on proximal surfaces at the midline, and in difficult-to-reach topography.
The 3A is a curved explorer that is single ended with a straight shank. It is adaptable in a variety of situations, thanks to its long shank and lack of curvature, which eliminates tissue distention when inserting subgingivally. It provides good access to furcations, longitudinal grooves, and other areas with tight, narrow, and/or deep pockets.
The 11/12 design (Figure 1C), or “area-specific like” shape, as in an area-specific curet (Figure 1D), is available in two explorer options: standard and extended, with the latter shank measuring 3 mm longer than the standard. It is a paired instrument with mirrored working ends. This design adapts to specific situations, such as pocket depth and furcations. It is very useful on anterior teeth with deep pocket depth. A challenge with this design is reaching the midline of proximal surfaces on posterior teeth, due to its short working end length (approximately 3 mm). Additionally, tight tissue tone prevents its access in deep and narrow areas due to shank curvature.
TECHNIQUE
A review of basic adaptation and activation principles will aid clinicians in self-evaluation. Extension to the epithelial attachment during initial assessment is essential to detecting biofilm-retentive calculus. Detection, prior to debridement, allows the clinician to appraise the type of deposits (light, moderate, or heavy; attached/tenacious; loosely attached; smooth or granular in texture). This assessment helps determine instrument selection, treatment planning, and patient education.
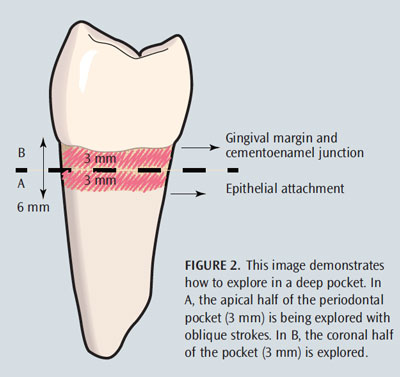
Depending on pocket depth, vertical and oblique strokes are used to advance from the distal surface, across the buccal or lingual, and to the mesial. In shallow pockets or healthy sulci, the stroke extends from the epithelial attachment to the gingival margin as the explorer is advanced across the root. In deep pockets, the subgingival environment can be divided into sections or halved; the apical aspect of the pocket is first examined with overlapping, oblique strokes, and then the coronal half is explored (Figure 2). This approach prevents the assessment strokes from being exceptionally long and indiscriminate.
Ensuring that only the tip of the explorer (last 1 mm to 2 mm) touches the tooth is one of the most important factors in maintaining continual adaptation to root anatomy. This small surface area, as it contacts the root, triggers the vibration of the explorer tip through the shank and handle to the clinician’s fingers. Clinicians who use 3 mm or more of the tip will not experience optimal tactile discrimination (ie, feel or touch) because the middle third of the working end will be in contact with the root or deposit, rather than the tactile tip. Instead, only up to 2 mm of the tip should be used, which allows the clinician to approach the deposit at a 5° to 10° angle to feel the configuration. This precision maximizes tactile sensations. During activation, continual rolling between the thumb and index finger is used, in conjunction with pivoting of the wrist and forearm, to maintain proper adaptation. Rocking the explorer in an oblique fashion on the lingual and buccal surfaces—or a vertical and diagonal direction on proximal surfaces—is continual and uninterrupted in order to assess the entire root surface. At times, horizontal strokes are applied, such as at line angles on posterior teeth and severe convexities.
This approach is not ideal, however, because calculus often forms in horizontal rings. If calculus has formed in this manner, a vertical or oblique stroke is needed to approach the deposit at right angles to detect its width and length. Use of a horizontal stroke might cause the clinician to explore above or below the deposit, never detecting its presence. The general appraisal of the roots, particularly with a new patient or one who has not maintained recommended continuing care intervals, is essential to determining the information necessary for optimizing further treatment. Should a general appraisal not be completed, the hand-activated or power instrumentation that follows could be haphazard and incomplete, which affects optimal healing.
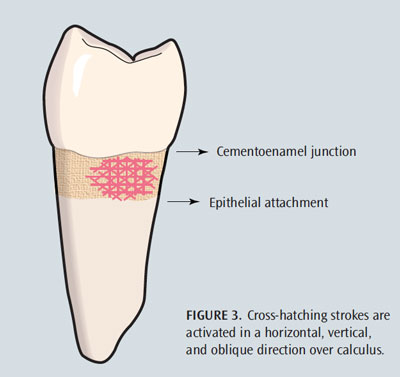
The presence of root structure with spicules or granules of deposit requires a cross-hatching approach with the explorer to determine if the root is smooth enough to facilitate healing. Determining this clinical endpoint is essential for deciding when instrumentation is complete. Cross-hatching involves taking a subsurface of the root and exploring in vertical, oblique, and horizontal patterns (Figure 3), which prevents small pieces of deposit from remaining undetected after treatment (causing biofilm retention and subsequent inflammation). In addition, cross-hatching is useful for detecting burnished deposits—of which one or more sides are smooth and difficult to detect—and allows the clinician to approach it from all sides, helping to distinguish the deposit from root anatomy. Burnished calculus is smoothest at the most apical extent, where the working stroke is started with a curet; however, it can be smooth on the sides if horizontal strokes are used. The presence of bleeding on probing helps identify burnished calculus when it is virtually impossible to detect. Checchi et al4 found a direct relationship between bleeding on probing and presence/amount of subgingival calculus deposits; however, they suggest future studies with larger samples are needed. Knowledge of root anatomy also aids in the correlation of what is being felt with the explorer to the identification of biofilm-retentive factors.
Another critical factor of exploring effectively is pressure—or, more appropriately, the lack of pressure. The explorer is held very lightly in the clinician’s grasp; light enough that if someone were to touch the explorer’s handle, it would slide out of his or her grasp. This feather-like touch is challenging for most clinicians, due to the greater grasp pressure needed during calculus removal. Prophylaxis, NSPT, periodontal maintenance, and reevaluation visits should be varied to help prevent the “death grip” phenomenon, and encourage modulated pressure throughout the day. Avoiding hand fatigue is important for accurate calculus detection and prevention of occupational injuries. If NSPT is scheduled all day, the repetitive needs of this type of instrumentation can create difficulty in modulating the pressure between exploration and working strokes. Use of ultrasonic instrumentation during therapy with an exploratory light grasp helps reduce the potential occupational hazard of too much pressure, or undue pressure.
Light strokes are placed strategically close to one another while overlapping across the root to cover the entire surface. When exploring, the dental professional becomes a detective—searching for clues of calculus, and other plaque biofilm-retentive factors. The feeling that a clinician experiences on the root is correlated with the radiographs (eg, anatomy, restorations, calculus) and the current periodontal assessment data, such as probing depth, bleeding on probing, attachment contour, and inflammation.
APPLICATIONS
Exploring is useful during intraoral examination, instrumentation, and post-instrumentation to determine the clinical endpoint for prophylaxis, NSPT, or periodontal maintenance. At the reevaluation appointment (4 weeks to 6 weeks later), exploring remains key to effectively assessing remaining bleeding points and residual deposits.
Strategies for exploring vary among clinicians and are dependent on patient needs. A patient who has been on a regular recare schedule for 20 years and whose condition is stable may not need exploring prior to, during, and post-therapy. On the other hand, initial therapy for nonsurgical care may warrant exploring prior to, during, and after instrumentation. Determination of the clinical endpoint should never be based on the fact that the appointment has ended.
Differing intraoral scenarios challenge the selection of explorer design and use. For example, consider these three patients who have localized 5 mm probing depths with bleeding on probing. For a patient who has returned at 3-month intervals and has maintained healthy sulci, occasional shallow pocket depth (4 mm), slight clinical attachment loss, and early periodontitis, and presents with a 5 mm probing depth on the distobuccal of #3, a 2R/2L or 3A explorer is used to reach the midline. These designs could be used elsewhere during therapy, as well. A patient with 5 mm narrow probing depth adjacent to #18 on the buccal and adjacent to a furcation exposure might require a 11/12 explorer due to the narrow configuration, if the gingival tissue is not taut. The 3A or a 2R/2L could be used elsewhere with nontortuous, shallow pocket depths. A 2R/2L, 3A, or 11/12 explorer is indicated for a patient who has a broad, bathtub-shaped 5 mm pocket on the lingual of #15. Tissue tone is a consideration.
CONCLUSION
Exploring is implemented in different ways for different patients, and the explorer must be used appropriately to ensure effective treatment outcomes. Suitability depends on the patient’s periodontal conditions, root anatomy, gingival conditions, calculus, and operator preference. Clinicians should reconsider the explorer’s use in therapy, purchase different designs, self-evaluate technique, and correct problems. Participation in peer review and clinical courses are both avenues to exploring clinical options. Until endoscopy, calculus detection devices, or other means of minimally invasive NSPT are commonly used in general and periodontal practices, the clinician will remain blind to the subgingival environment and depend on explorers and debridement instruments for optimal mechanical therapy.
REFERENCES
- Wilson TG, Harrel SK, Nunn ME, Francis B, Webb K. The relationship between the presence of tooth-borne subgingival deposits and inflammation found with a dental endoscope. J Periodontol. 2008;79:2029–2035.
- Sanz I, Alonso B, Carasol M, Herrera D, Sanz M. Nonsurgical treatment of periodontitis. J Evid Based Dent Pract. 2012;12(3 Suppl):76–86.
- Heitz-Mayfield LJ, Lang NP. Surgical and nonsurgical periodontal therapy.Learned and unlearned concepts. Periodontol 2000. 2013;62:218–231.
- Checchi L, Montevecchi M, Checchi V, Zappulla F. The relationship between bleeding on probing and subgingival deposits. An endoscopical evaluation.Open Dent J. 2009;3:154–160.
From Dimensions of Dental Hygiene. September 2013; 11(9): 34–38
