
Ultrasonic Therapy in the 21st Century
Strategies for ensuring success during power scaling and root planing.
Ultrasonic instrumentation technique protocols have gradually evolved over the past 35 years according to advancements in technology and theoretical interpretation of the literature. The key tenet of scaling and planing, however, remains the same—calculus removal is integral to reducing inflammation, improving tissue response, and stabilizing disease status. Biofilm removal alone without thorough calculus removal is not sufficient to maintain periodontal health.
The use of the dental endoscope has verified that calculus in any form serves as a mineralized scaffold permeated with Gram-negative pathogenic biofilm—the primary etiologic factor in periodontal inflammation—keeping it in direct contact with the overlying soft tissue. Endoscopic studies have demonstrated that an ulcerated lesion lies opposite every deposit of calculus mimicking its shape, whether it is a small piece, a tiny speck, or diffusely embedded in cementum.1–3 As long as calculus remains, inflammation persists (Figure 1).
Once calculus is removed definitively, many experienced endoscopy clinicians routinely witness the resolution of inflammation and pocket closure by long junctional epithelial attachment. Given the far-reaching ramifications of the periodontal-systemic links to chronic disease, dental hygienists must keep calculus removal as their ultimate goal in scaling and root planing. When clinicians use low-powered ultrasonics to try to remove tenacious calculus, deposits can be rapidly smoothed over, making them difficult, if not impossible, to detect and/or remove.
THERAPY OBJECTIVES AND MODES OF ACTION
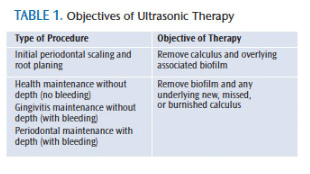
Ultrasonic instrumentation’s primary objectives and modes of action change depending on the procedure being performed (Table 1). In the mechanical/physical disruption of calculus and biofilm, the breaking up, loosening, and removal of deposits occur only when the ultrasonic insert/tip (UIT) actually comes in contact with the biofilm or calculus. The UIT must remain on the deposit long enough for disruption by mechanical vibration to occur.

This principle can be tested clinically by applying disclosing solution to adherent biofilm on the crown of a tooth. Place the side of the UIT in one place against the biofilm and activate the tip without moving it. The disclosing solution will be diluted by the water, but the adherent part of the biofilm will not be eliminated unless the side of the UIT is moved against it. Periodontal pathogens can only be disrupted and flushed out of the sulcus/pocket when careful technique and sufficient time are taken to instrument every square millimeter of the tooth surface.4
Ultrasonic instrumentation provides irrigation or the flushing and floating out of nonadherent bacteria and debris. Enough water must be used to gain this benefit. Acoustic microstreaming is caused by the vibration of the UIT in water and is most likely responsible for reducing bacteria counts following ultrasonic scaling. Its swirling, tumbling effect helps to physically flush the dislodged pathogens out of the subgingival space. Acoustic microstreaming and irrigation are the main reasons that ultrasonic scaling can be very effective in reducing periodontal pathogens. Acoustic microstreaming can rinse nonadherent pathogens out of the pocket, but it is not capable of removing adherent biofilm from the root surface. Research has shown that the very superficial removal of root surface elements occurs at a distance of 0.5 mm to 0.7 mm away from the point of the UIT only when it is placed at a 90° angle to the tooth.5
POWER INSTRUMENTATION FUNDAMENTALS
When ultrasonic scaling, a light to moderate modified pen grasp—not a regular pen grasp—should be used. Do not hold the UIT too close to the tip because this may limit the depth of insertion. Use an extended grasp positioned down on the handpiece away from the working tip to allow effective extraoral fulcrums or to get deeper access/adaptation with intraoral fulcrums.
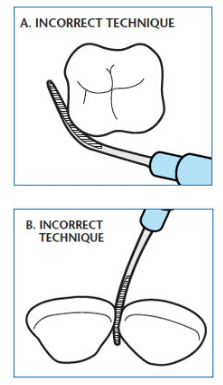
Extraoral fulcrums should be used for the maxilla. Use extraoral or intraoral fulcrums for the mandible. The UIT must touch the tooth surface in order for biofilm or calculus to be removed. Only the first 1 mm to 2 mm of the UIT comes in contact with the tooth due to the curvature of the tooth (Figure 2A and Figure 2B). It is physically impossible for more than 1 mm to 2 mm of the tip to touch the tooth at any time, regardless of the length or shape of the UIT. The curved surface of the tooth dictates the amount that the UIT touches the tooth surface, not the UIT?design.
Short, breaking 2-mm to 3-mm strokes should be used with vertical probing when removing calculus because the point is the most powerful part of the UIT. The point has the greatest ability to crack or break the calculus away from the tooth. Next, use oblique or horizontal 2 mm to 3 mm short back-and-forth strokes. Never use long, sweeping strokes for initial biofilm or calculus removal. Longer 4-mm to 6-mm strokes can be used at the end of a procedure when flushing or irrigating the area, but strokes longer than 6 mm cannot stay closely adapted to the tooth surfaces. Long sweeping strokes should never be used to remove deposits; they are not efficient due to the curvature of the tooth and root. A long stroke with the UIT?will only hit the high points (convexities) of the tooth or root on a tangent and miss the depressions (concavities) completely. This leads to haphazard ultrasonic scaling that results in inefficient and ineffective treatment that will only partially reduce inflammation for a short time. Methodical, thorough, and precise channels of short, overlapping ultrasonic strokes are necessary to ensure optimal removal of biofilm and calculus and complete elimination of inflammation for at least 2 months to 3 months.
CLINICAL TECHNIQUE![Ultrasonic Therapy]()
In order to be successful in ultrasonic therapy, patient positioning, light, and approach are important considerations. Regarding positioning, the clinician should move his or her body in relation to the patient’s head to improve access or switch to a UIT?that is better suited for the task at hand. Sufficient lighting is critical to successful therapy. Use an ultrasonic with a built-in light emitting diode (LED) or fiberoptic light in the handpiece, or use an LED light mounted to operator loupes or protective lenses.
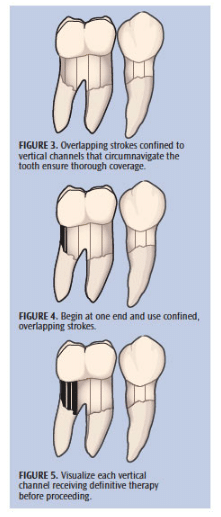
When approaching calculus deposits, always work from the top or side of the calculus ledge or piece. Go from a clean area with no calculus toward the deposit and engage the marginal, coronal edge with the point or side of point. Do not start in the middle of the calculus or at the bottom edge of the calculus. If calculus is hard and tenacious, begin by breaking it slowly and deliberately from the coronal edge and work downward in channels until the deeper, most apical parts of the deposit are reached. If calculus is new and soft, use short overlapping oblique strokes beginning at the side edge of the calculus, overlapping each stroke in 1 mm to 2 mm channels to ensure thorough calculus and biofilm removal (Figure 3 to Figure 5).
When approaching biofilm, use short, overlapping horizontal or oblique strokes and consistently work from the marginal, most coronal area to the deeper apical area. In shallow areas, 2 mm to 3 mm short, horizontal strokes should extend down to the base of the sulcus and come up in overlapping strokes to the margin—covering the entire subgingival space. In deep periodontal pockets, these same 2 mm to 3 mm short horizontal strokes should be advanced apically 1 mm at a time until the base of the pocket is reached, and then start again at the marginal area to debride another narrow channel of biofilm from top to bottom. Do this repeatedly, clearing multiple narrow channels of biofilm until the entire surface is instrumented. Once this methodical procedure is completed, perform a series of oblique and vertical strokes over the entire root surface to ensure that all biofilm is disrupted and flushed out of the deepest parts of the pocket.
Ultrasonic instrumentation is a valuable addition to the dental hygienist’s armamentarium that requires excellent technique and a dedication to calculus removal—no matter
how challenging the process may be.
REFERENCES
- Checchi L, Montevecchi M, Checchi V, Zappulla F. The relationship between bleeding on probing and subgingival deposits: an endoscopical evaluation. Open Dent J. 2009;28:154–160.
- Wilson TG Jr, Carnio J, Schenk R, Myers G. Absence of histologic signs of chronic inflammation following closed subgingival scaling and root planing using the dental endoscope: human biopsies—a pilot study. J Periodontol. 2008;79:2036–2041.
- Wilson TG, Harrel SK, Nunn ME, Francis B, Webb K. The relationship between the presence of tooth-borne subgingival deposits and inflammation found with a dental endoscope. J Periodontol. 2008;79:2029–2035.
- Schenk G, Flemmig TF, Lob S, Ruckdeschel G, Hickel R. Lack of antimicrobial effect on periodontopathic bacteria by ultrasonic and sonic scalers in vitro. J Clin Periodontol. 2000;27:116–119.
- Walmsley AD, Walsh TF, Laird WR, Williams AR. Effects of cavitational activity on the root surface of teeth during ultrasonic scaling. J Clin Periodontol. 1990;17:306–312.
From Dimensions of Dental Hygiene. July 2014;12(7):40,42,44.
