
Tools for Success
Selecting the right instruments for implant debridement is key to maintaining implants and the restorations they support.
Debriding an implant supported restoration is dependent on a number of factors. The dental hygienist must be familiar with and be able to recognize the different components of an implant supported restoration. The selection of an instrument for debridement relies on the component being cleaned, as well as the design of the prosthesis and the type of debris that is present. 
Peri-implantitis is the main cause of implant failure.1 As a result, the dental hygienist must maintain the peri-implant crevice in a state of health with the appropriate instrumentation. The first step is to assess the peri-implant tissues and note any areas of plaque, calculus, and inflammation that may be present. If areas of inflammation are noted, the hygienist should review with the patient appropriate plaque control techniques to help reduce the inflammation.2 Keeping the patient motivated and effective in daily plaque removal are necessary for the long-term success of the implant and the restoration it supports. This includes choosing the proper plaque control implements that are easy to use. Consideration should be given to the restorative design, the location of the implants, and the patient’s manual dexterity.
Following the assessment and plaque removal instruction, debridement is performed to maintain optimal health of the peri-implant tissues. All implant and restorative components within and above the peri-implant crevice should be cleansed of any plaque and calculus. The selection of instruments used for debridement is influenced by a myriad of factors, including the nature of the debris—soft or hard—and if hard, the tenacity of the adherence and the location within or coronal to the peri-implant crevice; the implant component; the design of the restoration; and the anatomic access.
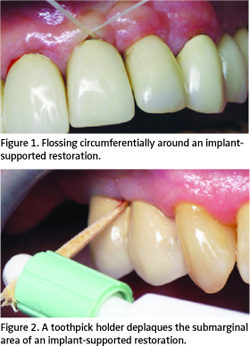 Removal of soft debris above the soft tissue margin can be completed by polishing the restoration, the abutment, or implant with a fine prophy paste or flour of pumice. This can also be completed using any plaque control implement such as an interdental brush, floss, or end tufted brush. For subgingival plaque removal, floss or a Perio-aid®* can be used to clean into the peri-implant crevice. The floss can be used circumferentially around an abutment (Figure 1). The Perio-aid is a plastic handle that holds round wooden toothpicks. It places the toothpicks into the crevice at an oblique angle and is moved 360° around the implant abutment surface. The tip of the toothpick will soften and splay with the saliva, creating a greater surface area to deplaque the abutment (Figure 2).3
In instances where the embrasure spaces are large enough for an interdental brush, the clinician should choose one that is all plastic or a traditional interdental brush that contains a nylon or plastic coating over the wire to prevent scratching the abutment surface.
THE RESTORATION
The restoration refers to the prosthesis attached directly to the implant or the abutment that gives the patient function. This can be a crown or an attachment that retains a denture. The hygienist can select any instrument for debridement that will not damage the restorative material. The fact that the restoration (crown) is implant-supported is not relevant to the instrument selection as long as the instrument does not damage the restorative material. Metal instrumentation can be effective for removing calculus from certain restorative materials if care is not taken to instrument the abutment surface (Figure 3).3
One of the biggest challenges in contemporary implant dentistry is the single tooth replacement. The circumference of the crown is greater than the supporting abutment. This results in a broad surface of restorative material in contact with the soft tissue. The crevicular depth in the esthetic zone must be sufficient for a proper emergence profile of the crown. In these restorative situations, the crevicular depth is not necessarily indicative of disease and cleaning to the base of the crevice becomes a challenge. It is not necessary to damage the connective tissue adherence to gain access to the base of the crevice. It is necessary to deplaque the crevice.3
THE ABUTMENT
The abutment attaches the implant fixture to the prosthesis it supports. In contemporary restorative designs, the abutment is typically contained within the peri-implant crevice. Maintaining the integrity of the titanium abutment and not scratching the surface are key. Increasing the surface roughness will cause greater plaque retention.4 To debride the abutment, the hygienist should choose a plastic curet that will be effective in removing calculus and not damage the abutment surface. This instrument selection should be determined based on the location and tenacity of the calculus present.
There are a wide choice of plastic curets available. Implacare™** consists of an autoclavable stainless handle that retains disposable plastic tips. There are three configurations available: Columbia 4R/4L, anterior sickle H6/H7, and a posterior sickle 204S. This instrument is effective for light to moderate calculus removal; it is too flexible for heavy calculus removal.
A 4R/4L universal design*** and a hoe design called the Orofacial Scaler™*** have graphite fillers to make the plastic more rigid. The 4R/4L is a universal instrument for light to moderate calculus removal (Figure 4). Due to the fine blade and rigidity of this instrument, breakage can occur when used on heavy calculus. The Orofacial Scaler™ is effective in the presence of severe ridge resorption in the anterior mandible. This instrument is appropriate for areas of heavy calculus with difficult access.
The Implant-Prophy+™* instruments are plastic curets that are slightly bulkier and slightly flexible. These instruments do not break easily and, therefore, are very good for heavy tenacious calculus removal. These are the only plastic instruments available in Gracey configurations (5/6, 11/12, 13/14). This instrument is also available as a universal curet ( Columbia 13/14). It wears slowly due to its size and shape.
The Implant Solution™** offers two types of disposable plastic instruments with a sharp edge. These instruments are available in a curet (Model IS-1) and a hoe (Model IS-2). The curet design is effective on light to moderate calculus and the hoe is very effective in the difficult to reach areas of heavy calculus.
THE IMPLANT FIXTURE
Debriding the implant fixture often occurs in the presence of peri-implant disease. This is a circumstance where the implant surface becomes exposed after bone loss.
If the threads or roughened body of an implant are exposed and no calculus is present, the surface should be deplaqued using a brush. If the implant surface is exposed and calculus is present in the threads, the hygienist can choose to use a power instrument. In some cases, a metal instrument may be necessary to remove calculus from these surfaces.
POWER INSTRUMENTS
A number of power instruments are available for use on the titanium abutment and implant fixture. A power instrument may be necessary if a large quantity of debris needs to be removed. These instruments should only be used on a low power setting with copious amounts of irrigation.
 The TIS magnetostrictive insert*** can be used in any commercially available 25 or 30 kHz ultrasonic units. The TIS insert is metal onto which a plastic sheath attaches. This instrument does not damage the titanium surface.3 A similar insert is available for a sonic handpiece called the Quixonic™ sonic scaler****.
A piezo scaler used with a carbon tip is very effective for calculus removal on the abutment or fixture surface (Figure 5). Care must be taken to use these tips on low power and with ample irrigation. Using them on high power can damage the tips. These tips are similar to curet designs and fit into the peri-implant crevice. Using them on heavy calculus on a titanium surface results in their rapid wear.
Another power instrument available for implant debridement is the Profin™*****. This reciprocating handpiece has nylon plastic inserts that can remove both plaque and calculus. This is ideal for supra- and submucosal debridement and areas that have limited access, such as a hybrid restoration (the abutments are supragingival and a denture-like restoration is attached) with heavy plaque and calculus.3
CONCLUSION
The prevention of peri-implant disease is fundamental to the prognosis of the implant and the function provided by the restoration it supports. Debridement of the implant and restorative components is dependent on an appropriate armamentarium that can include manual and power implements. Selection is based on the tenacity of the hard accretions, their location, access, and restorative design. All instrument tips will wear with use. Appropriate monitoring and replacement are necessary to reach the desired outcome. Achieving a pristine surface is the goal at the conclusion of this phase of the preventive peri-implant protocol.
REFERENCES
- Kourtis SG, Sotiriadou S, Voliotis S, Challas A. Private practice results of dental implants. Part I: survival and evaluation of risk factors—Part II: surgical and prosthetic complications. Implant Dent. 2004;13:373-385.
- Weber HP, Crohin CC, Fiorellini JP. A 5-year prospective clinical and radiographic study of non-submerged dental implants. Clin Oral Implants Res. 2000;11:144-153.
- Sternberg-Smith V, Eskow RN. Contemporary implant debridement. Journal of Practical Hygiene. 2001;10(2): 15-21.
- Quirynen M, Bollen CM, Willems G, van Steenberghe D. Comparison of surface characteristics of six commercially pure titanium abutments. Int J Oral Maxillofac Implants. 1994;9:71-76.
From Dimensions of Dental Hygiene. September 2006;4(9): 12-14.
