
Tips for Successful Sterilization
The sterilization of instruments is integral to the safe and effective provision of dental care.
This course was published in the July 2014 issue and expires July 31, 2017. The author has no commercial conflicts of interest to disclose. This 2 credit hour self-study activity is electronically mediated.
EDUCATIONAL OBJECTIVES
After reading this course, the participant should be able to:
- Describe the three categories of items in the Spaulding Classification for Medical Devices and Levels of Disinfection.
- Discuss the advantages and disadvantages of commonly used heat sterilization methods.
- Detail the ways in which heat-sensitive items can be properly sterilized.
- Explain the various methods for effective monitoring of sterilization.
Proper infection control is a critical component of every dental hygiene practice setting and ensures a safe working environment. Inadequate infection control practices can exert negative effects on the health of both patients and providers. An essential component of effective infection control protocol is the cleaning and sterilization of contaminated instruments. Sterilization is defined by the Association for Advancement of Medical Instrumentation as a process whereby all viable forms of microbial life, including bacterial spores, are removed or destroyed to achieve an acceptable sterility assurance level.1
The United States Centers for Disease Control and Prevention (CDC) classifies patient care items into three categories: critical, semicritical, and noncritical.2 These guidelines— the Spaulding Classification for Medical Devices and Levels of Disinfection—divide patient care devices into classifications based on risk of infection.2 Critical items are defined as those that come into contact with bone, the vascular system, and penetrate soft tissue (ie, scaling instruments, scalpels, and oral surgical instruments). Such items pose the greatest risk for transmitting infection and should be heat sterilized. Some critical items, such as sterile needles, are single use. Semicritical items are devices that come into contact with intact mucous membranes and skin but do not ordinarily penetrate tissue (ie, mouth mirrors, dental handpieces, and oral photography retractors). These devices should be heat sterilized. If sensitive to heat, semicritical items should be disinfected using a high-level disinfectant.2 Noncritical items comprise devices that contact intact skin and carry the least risk of infection transmission (ie, blood pressure cuffs, light handles, and radiologic equipment). They should be barrier protected or cleaned between uses with a low-level disinfectant. If visibly soiled, items are cleaned followed by disinfection with a medium-level disinfectant.2
STERILIZATION METHODS
Heat sterilization is the standard of care for recirculating instruments that come into contact with mucous membranes and/or penetrate oral soft tissue.2 This method destroys pathogenic organisms and their spores and reduces the risk of cross-contamination between patients. Dental hygienists rarely use instruments that do not require heat sterilization, though the sterilization method employed should be appropriate for the type of instrument at hand.
Steam under pressure, dry heat, and chemical vapor are three methods of heat sterilization recommended for use in dentistry.3 Because each method has limitations, most practices need more than one sterilizer.
Regardless of the method chosen, oral health professionals are mandated to use a US Food and Drug Administration (FDA)-cleared medical-grade sterilizer when practicing infection control protocols.3 Toaster ovens and household kitchen ovens do not meet the FDA’s criteria and should never be used in clinical settings.4 The reliable use of sterilizers requires the use of appropriate temperature and exposure times; adhering to safety parameters and manufacturer directions; and proper packaging, loading, and monitoring.
STEAM UNDER PRESSURE
Saturated steam under pressure is the oldest, most widely used method of heat sterilization for critical and semicritical items.3 It is recommended by the CDC for instrument recirculation due to its reliability and microbial lethality.2 A fast and nontoxic method, steam sterilization works by exposing each item to moist heat in the form of saturated steam under pressure for specific times. Four basic operating steps are involved in the sterilization process: heating, sterilizing, depressuring, and drying. Steam formation for the sterilization process is created by the addition of distilled water to the chamber. Microorganisms are destroyed by enzyme and structural protein coagulation and denaturation caused from the generated moist heat.4
Steam sterilizers are designed to eliminate all air from the chamber during the cycle.5 If air is entrapped, the temperatures in the air pockets will not reach the level required for sterilization.3 Pressure is required for the sterilizing device to reach the high temperatures needed for efficient and effective microbial destruction. Most autoclaves have preset sterilizing cycles with a range of time and temperatures based on size of load and the model. Recommended minimum sterilization parameters are 250° F with pressure of 15 pounds per square inch (psi) or 20 psi for 30 minutes.3 Start-up and drying time can increase the cycle length.4
The autoclave is also the most effective sterilizer of cloth goods, as it rapidly heats and penetrates fabrics. Steam, however, does not penetrate closed metal containers without vent holes, may cause rusting and corrosion of carbon steel instruments and handpieces, and may dull the sharp cutting edges of curets and scalers. Instruments can be packaged in pouches, wraps, or tubing. Paper and plastic pouches/wraps are safe to use with steam and unsaturated chemical sterilizers. To ensure effective steam penetration, instrument packs should be placed on their edges on each level in the sterilizer.6
Three types of autoclaves are available: gravity displacement autoclave, prevacuum autoclave, and steam-flush-pressure pulsing process autoclave.4 The gravity displacement autoclave is the most commonly used. It works by displacing air with steam, with gravity forcing the air outward.6 As the sterilizer heats up, the cool air is replaced by steam, which fills the chamber.7 Because steam is lighter than air, cool air is expunged via a drain valve at the bottom of the sterilizer and triggers the heat-regulated valve to close. The closing of the valve causes pressure buildup until required operational temperatures are reached.3 Heat in the chamber walls forces moisture to evaporate, but items dry poorly and typically are wet when the cycle is complete. Removing items before they are dry can result in tearing of wet wrappings and packages. Contaminants and microbes can be pulled inward, compromising the sterility of items inside the packaging.5
Prevacuum steam sterilizers have the same four operational functions as the gravity displacement sterilizer—heating, sterilizing, depressuring, and drying. In contrast, this sterilizer uses varying methods for air removal prior to being pressurized with steam, creating a vacuum. This causes a higher efficiency in air removal throughout the entire load.3 Typically, these sterilizers use a vacuum pump or ejector system for quick air removal prior to and during the heating phase, resulting in temperature and pressure reaching sterilization requirements quickly. This creates an environment for almost-instant steam penetration.
Sterilization time may be as short as 4 minutes to 5 minutes. Drying cycles require 15 minutes to 20 minutes. Drawbacks include high initial cost, complex maintenance, and a small sterilizing chamber. The Bowie–Dick Test should be used daily to detect air leaks and inadequate air removal.4 If the test fails, entrapped air will cause a spot to form on the test cloth, and the sterilizer should be evaluated by appropriate personnel before it is used to sterilize items.3 Some newer prevacuum models have built-in air tests that eliminate the need for physical daily testing.7
The newest type of steam sterilizer is the steam-flush-pressure pulsing device.4 These models use alternating sequences of steam flushes and pressure pulses to remove air quickly from the chamber of the sterilizer.3 An important advantage is its lack of susceptibility to air leaks that occur with prevacuum devices. Air is removed with the high pressure, and steam in the chamber is always above atmospheric pressure. Sterilization temperatures are typically preset by the manufacturer but typically range from 250°F to 254°F, 270°F to 275°F, or 285°F to 291°F. Minimum exposure for sterility achievement for wrapped instruments, however, is 270°F for 4 minutes.3 Steam-flush-pressure pulsing devices are also cost-effective and require little maintenance.
IMMEDIATE-USE STEAM STERILIZATION
Immediate-use steam sterilization is a mechanism for sterilizing unwrapped instruments for immediate use.8 Immediate-use steam sterilization is safe if used as indicated in the manufacturer’s cycle, exposure times, temperature, and drying times.6 The flash cycle is intended for select situations, such as a dropped instrument that is needed for reuse immediately; when a one-of-a-kind instrument has been contaminated and needs to be replaced immediately; and when specific instruments are needed in an emergency.9 Immediate-use steam sterilization uses high temperatures and a short cycle. Items must be unwrapped so immediate contact with steam occurs and sterilization can quickly commence.
Prior to flash sterilization of a dropped instrument, the tool should be free of soil by the appropriate decontamination procedure.6 The item must be transferred as soon as it cools off. This sterilization process is not recommended for routine use.
DRY HEAT
Dry heat is a nontoxic method of sterilization based on oxidation.3 Heat is passed from the outer surface of an item to the internal layers. Destruction of organisms occurs by a slow burning process that coagulates the cell protein.3 High temperatures are required and can damage sharp cutting edges, soldered joints, and plastics. Scorching of paper and cotton items can also occur. According to the CDC, common time-temperature parameters for sterilization with conventional dry heat sterilizers is 340°F for 1 hour and 320°F for 2 hours.3 Dry heat sterilization is especially appropriate for use on materials damaged by high pressure or moisture.3 Generally, dry heat sterilization is less complicated than an autoclave but is relatively slow. This sterilizer is a good option for materials that steam cannot penetrate or must remain dry. However, dry heat may damage heat-sensitive items.6
Two types of dry heat sterilizers exist—static-air and forced air.5 Conventional static-air dry heat sterilizers use heating coils in the bottom or sides of the sterilizer that cause hot air to rise and transfer heat. This device is slow to heat, needs a longer time to reach sterilization temperatures, and may exhibit nonuniform distribution of heat, requiring a longer exposure time for sterilization to be achieved.3 Forced air uses a mechanical blower to create an even distribution of heat. The heated air is transferred in the chamber at a high velocity, resulting in a more rapid transfer of energy. After factory set sterilizing temperatures are reached, the quick turnaround time of 12 minutes for packaged instruments and 6 minutes to 8 minutes for unpackaged instruments affords opportunities for rapid instrument sterilization.
CHEMICAL VAPOR
The chemical vapor sterilizer acts as a steam autoclave, with the steam replaced by a mixture of alcohols, formaldehyde, ketone, water, and other ingredients. This mixture is heated under pressure to form an unsaturated vapor that destroys microorganisms.7 Three basic operating steps are involved in the sterilization process—heating/vaporizing, sterilizing, and depressuring. In order to achieve sterility, a specified temperature, pressure, and exposure time must be achieved. While each manufacturer has specific directions, typically sterilization can be achieved at minimal temperatures of 273°F for 20 minutes with a pressure of 172 kPa/25 psi. When loading the chemical vapor sterilizer, items should be sufficiently separated to allow adequate gas penetration. Ideally, items should be loaded on their edges.3
A major advantage of the unsaturated chemical vapor method is that carbon steel instruments will not rust or corrode because the humidity of the sterilization process is reduced. In addition, dulling of sharp metal instruments does not occur. As the chemical solution quickly vaporizes in heat, drying of instrument packages is quicker than with an autoclave.7
The special chemicals required for chemical vapor make this option less desirable than the autoclave. Disadvantages include the fact that fumes are released during the process, necessitating good ventilation; use of closed impermeable containers is contraindicated, as they may explode; and heat-sensitive items made of plastic and rubber should not be placed in the chemical vapor sterilizer.7 A vapor filter or purge system can be used to eliminate the released odors that some practitioners find offensive. Clinicians should use gloves, masks, and protective eyewear when handling the solution to remain protected from potential chemical exposure.4
HEAT-SENSITIVE ITEMS
Immersion chemical disinfectants registered by the FDA as sterilants can be used for sterilization of semicritical items (ie, plastics and fiber optics) that cannot withstand heat.2 Use of liquid sterilants, however, is not optimal. If possible, a disposable item should be used, or the item should be processed in an ethylene oxide gas sterilizer (ETO). Unfortunately, the ETO low temperature sterilizer is not a practical device in most dental practices because of its long processing time (10 hours to 48 hours for aeration, in order to reduce potentially harmful effects of ETO).7 The use of chemicals, such as glutaraldehyde, require submersion in the liquid for 3 hours to 12 hours to achieve complete sterilization.
The exposure times recommended by the manufacturer must be followed. Due to the toxic effects of chemicals used as sterilants, items must be rinsed with sterile water before used in the mouth.3 Instruments must be handled with sterile gloves and an aseptic technique should be used when transferring to the point of use.7 The fact that items cannot be packaged during sterilization and effective spore tests to monitor sterilization are not available limits their use in the dental setting.
CLEANING
The efficacy of a sterilization method remains limited without proper cleaning of instruments to remove all organic debris and bioburden prior to the sterilization process. Cleaning is important to ensure the sterilant reaches all item surfaces during the process. A hands-free mechanical device should be used for cleaning contaminated instruments to reduce cross-contamination risk and sharp injuries.5
Ultrasonic cleaning devices work via ultrasonic vibrations with enzymatic cleaners or detergents mixed with water to remove debris on instruments. Most ultrasonic cleaning devices are inexpensive, work well, reduce potential for injury to the operator, and require minimal maintenance. The one drawback is the noise these devices generate.
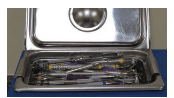
As the ultrasonic bath is one of the most contaminated areas in a practice setting, careful attention to excellent infection control protocols during use is essential. Use of heavy utility gloves by the operator is critical. Keeping the lid on during use to prevent aerosolization of contaminates is also crucial.5 Overloading the ultrasonic basket will hinder the cleaning of instruments (Figure 1) and negatively impact the sterilization process that follows.
Thermal instrument washers effectively clean and remove bioburden found on contaminated dental instruments.4 Washers use hot water with detergent sprays followed by high pressure and a spray rinse cycle to remove bioburden. Only FDA-approved thermal washers should be used in the dental environment. Some washers are calibrated to use such high temperatures so that a disinfectant effect occurs and reduces potential contaminants before the sterilization process. Thermal washers provide a large capacity, although the space commitment required can be a challenge for some practices.
Following proper cleaning, instruments should be inspected to ensure complete removal of debris. Once confirmed, the instrument is ready to be placed in the sterilizer. The 30-minute to 40-minute washer cycle time can be a drawback when only a few items require cleaning.
FOLLOW UP WITH STERILIZERS
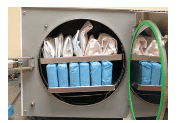
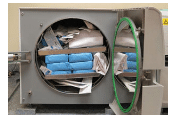
The manner in which instruments are loaded in heat sterilization devices is critical to success. When loading, care must be taken not to overload the chamber and to ensure no punctures to the wrapping material or packaging occur. Laying items flat and stacked on top of each other (Figure 2) will interfere with both the effective penetration of the sterilizing agent and air removal.4 Packages should be placed on their edges in single layers to maximize access to the steam, heat, or chemical vapors (Figure 3). This method also reduces the probability of tearing packages. Removal of instruments from the sterilizer prior to completion of the cycle is contraindicated.
Following proper sterilization, packaged items remain sterile infinitely, unless the packaging is compromised.4,7 Packages should always be inspected for compromises in the integrity of the packaging or wrapping material.7 Items displaying tears or punctures should be re-sterilized prior to use. Storing sterilized items in closed, dry cabinets or drawers is the preferred storage method. Any moisture exposure will compromise the package integrity.
Regular maintenance and cleaning of the sterilizer are also important. Following manufacturer instruction for cleaning schedules and cleaning agents will enhance infection control protocols and increase the working life of the sterilizing equipment.

STERILIZATION MONITORING
A sterilization quality assurance program should be a fundamental aspect of every practice setting. Regardless of the type of heat sterilizer used, malfunction can occur and prevent sterilization. Improper packaging, overloading, improper times and temperatures, and human error all contribute to failures in sterilization (Table 1).10 Therefore, monitoring of sterilization should be of utmost importance to every practicing dental hygienist.10–12 Monitoring is accomplished through three methods—mechanical, chemical, and biological.
Mechanical monitoring involves daily checking of the cycle timing, temperature, and, if applicable, pressure gauges to determine appropriateness. Printing and recording devices are regular features of many contemporary sterilizer models and effectively monitor these mechanical aspects. Some models provide a flash drive that is used to monitor time and temperature daily, providing a continuous computerized record of these mechanical issues. The newest models are also equipped for internet a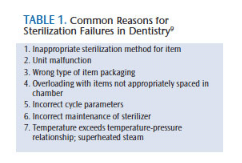 ccess, which enables monitoring of the system by the manufacturer in order to help with malfunctions. Reviewing manufacturer directions for use and regular maintenance are other important aspects of physical monitoring.
Internal and external chemical process indicators are used to identify immediate errors in sterilization. These indicators are chemical dyes that work by changing color after short exposure to sterilizing conditions. External indicators are printed on packaging materials or are found in tape form, and used on the outside of packs, bags, or wrapped cassettes. Because external indicators change color before requirements for sterilization have been achieved, their use is limited to distinguishing items that have been processed in a sterilizer vs those that have not.
An internal process indicator is placed on the inside of packaged items (Figure 4) prior to sterilization to determine if the sterilizing agent has penetrated the packaging and reached the instruments. A color change indicates that standards for sterilization have not been met. Used in every load, internal indicators are excellent for determining gross sterilization failures, but cannot provide precise assurance of sterilization.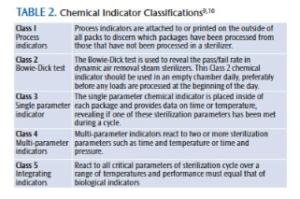
Five classifications (Table 2) of chemical process indicators are recognized for use in the health care environment.10 Multi-parameter indicators (Class 4) are designed to react to two or more sterilization parameters—time, temperature, and or sterilant contact.9 Multiparameter indicators may provide more reliable information on whether sterilization variables have been met compared to single parameter indicators.9,10 They are available as strips and pouches/bags.
Biological indicators are designed to assess whether sterilization has actually occurred. Because bacterial endospores are more resistant to sterilants than viruses and bacteria, spore tests provide the best proof of sterilization. Biological indicators should be used weekly.11 Readings of biological indicators may become available within 24 hours with some brands, while others require a 2-day to 3-day turnaround time, because results are sent to a testing facility for interpretation. Documentation of both process and biological indicator results should be maintained as proof of effective in-office sterilization.
CONCLUSION
Delivery of sterile items for patient care is a vital aspect of every office infection control program. Dental hygienists must be cognizant of applications involved in various sterilization methods. They must also be aware of advantages and disadvantages of each sterilization method in order to make prudent choices. Heat sterilization methods of steam under pressure, chemical vapor, and dry heat each provide excellent options for reliable sterilization in dental practice settings when used appropriately.
REFERENCES
- American National Standards Institute. Comprehensive Guide to Steam Sterilization and Sterility Assurance in Health Care Facilities. ANSI/AAMI ST79. Arlington, Virginia: Association for the Advancement of Medical Instrumentation; 2010.
- Kohn WG1, Collins AS, Cleveland JL, et al. Guidelines for infection control in dental health-care settings—2003. MMWR Recomm Rep. 2003:52:1-61.
- Center for Disease Control and Prevention. Guidelines for Disinfection and Sterilization in Healthcare Facilities, 2008. Available at: cdc.gov/hicpac/Disinfection_Sterilization/13_0Sterilization.html. Accessed June 18, 2014.
- Miller CH, Palenik CJ. Infection Control and Management of Hazardous Materials for the Dental Team. 5th ed. St Louis: Elsevier; 2014.
- Cuny E. Instrument sterilization. Dimensions of Dental Hygiene. 2010;8(1):48–51.
- Organization for Safety, Asepsis and Prevention. Frequently Asked Questions on Dental Infection Control: Instruments & Equipment Sterilization. Available at: osap.org?FAQ_Instrum_Ster1. Accessed June 18, 2014.
- Molinari JA, Harte JA. Cottone’s Practical Infection Control in Dentistry. 3rd ed. Baltimore: Lippincott Williams Willcott; 2009.
- Infection Control Today. Immediate use sterilization: a review of the basics. Available at: infectioncontroltoday.com/articles/2011/08/immediate-use-sterilization-a-review-of-the-basics.aspx. Accessed June 18, 2014.
- Tolle SL. Sterilization monitoring. Dimensions of Dental Hygiene. 2009:7(3);18-22.
- Association for the Advancement of Medical Instrumentation. AAMI 11140-1: Sterilization of health care products—Chemical indicators—Part 1: General requirements. Available at: engineers.ihs.com/document/abstract/HWULSCAAAAAAAAAA. Accessed June 18, 2014.
- Healthcare Purchasing News. Troubleshooting steam sterilization in process failures. Available at:. hpnonline.com/ce/pdfs/1104cetest.pdf. Accessed June 18, 2014.
- Darby ML, Walsh MM. Dental Hygiene Theory and Practice. 4th ed. St Louis: Elsevier; 2015.
From Dimensions of Dental Hygiene. July 2014;12(7):50–54.

Shared! Shared! This is AWESOME stuff man! Thank you!