The Power of Whitening
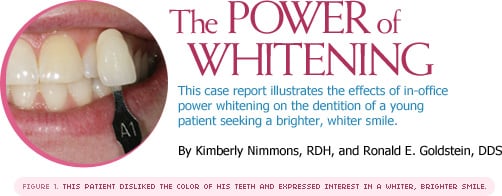
This case report illustrates the effects of in-office power whitening on the dentition of a young patient seeking a brighter, whiter smile.
Tooth whitening is one of the most commonly requested cosmetic dental procedures in the United States. Dental hygienists have a unique opportunity to educate patients about tooth whitening procedures as patients often inquire about bleaching techniques during hygiene appointments.
In-office power whitening is a well-tolerated and safe cosmetic procedure that has few contraindications. Patients with a history of moderate to severe tooth sensitivity may not be the most appropriate candidates but sensitivity can be managed, especially with the variety of products now available. Depending on the level of whitening desired the dental professional may recommend one to three whitening sessions. Combining the in-office power bleach with a 3- to 4-week at-home system is also effective.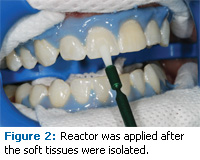
CASE REPORT
A 29-year-old man was seen for a routine dental hygiene appointment. During the periodontal and oral examination, it was noted that his teeth were beginning to darken and tooth #9 was yellowing (Figure 1). When asked if he had any concerns about his teeth, he replied that he was worried about his teeth looking discolored. The patient stated that he had been afraid to try over-the-counter whitening products for fear of sensitivity. A review of the patient’s dental history and current radiographs did not indicate any previous or existing endodontic concerns with tooth #9. A professionally-applied in-office treatment was determined to be the most appropriate option.
The patient’s treatment began with an overview of his health status. He was not taking any medications that might produce photo-sensitivity from the bleaching light. He was periodontally healthy and needed no restorative dental treatment. A tooth whitening product that included a titanium dioxide light-activated initiator and a 20% hydrogen peroxide whitening gel was chosen for his whitening treatment.
THE FIRST STEP
Treatment began with the important first step of taking baseline preprocedural photographs using a shade guide for future shade comparison. Next, the tooth surfaces (#5 to #12 and #21 to #28) were cleaned with a fluoride-free prophylaxis paste and rinsed well. Placement of a mouth prop and a thin layer of lip balm were used for added comfort and tissue protection prior to isolating the teeth, lips, and cheeks. A dental dam napkin, cotton rolls, and retractors were placed to isolate the lips and cheeks. A gingival protecting resin was applied along a 4 mm to 5 mm area apical to the gingival margins to protect the gingival tissues from the bleaching solution. The resin was hardened by light-curing for 10 to 20 seconds.
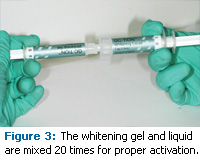
Next, using a disposable brush, a thin layer of reactor was applied to the facial surfaces of the teeth to be whitened (Figure 2). Any excess reactor should be gently removed using an air syringe. The two syringes containing the whitening gel and liquid were connected and mixed 20 times (Figure 3). Once the mixing was complete, a flocked applicator tip was placed on the delivery syringe and the whitening gel was applied to the teeth in a thickness of 1 mm or less. After the gel was placed, activation began using a specially-designed whitening light. A standard curing light can also be used. The whitening lamp used in this case provided light activation of the whitening gel to both upper and lower arches simultaneously.
This patient received three bleaching cycles, 20 minutes each, with the whitening gel reapplied after each 20-minute session. Once complete, the whitening gel was removed using 2×2 gauze and wiped from cervical to tooth edge. Water should not be used at this point as the gingival protector may come off before all of the whitening gel is removed, increasing the possibility of tissue irritation. Once the gel was wiped off, the mouth prop, cotton rolls, and protection were removed.
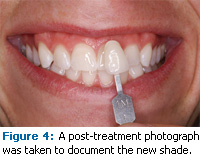 The patient was instructed to rinse his mouth with warm water to remove any residual gel and to begin rehydration of the teeth and tissues. At this point, the patient’s lips, cheeks, and surrounding oral tissues were also examined for irritation. The final step was taking post-treatment photographs to document the new whiter shade that the bleaching treatment produced (Figure 4).
Post-whitening sensitivity can be minimized by applying a layer of calcium phosphate paste to all of the treated teeth. A brush, prophy cup, or gloved finger can be used to apply the paste.The patient was instructed to bite on cotton rolls and remain in the chair for an additional 5 minutes during the paste treatment. The patient was given post-operative instructions to not eat or rinse for 30 minutes. For cases of possible continued sensitivity, calcium phosphate paste can be sent home with the patient for additional applications after routine toothbrushing. Dentifrices with potassium nitrate can also be recommended. Patients should be advised to not smoke, drink, or eat any foods that might cause tooth staining for at least 48 hours.
The post-treatment shade comparison showed a nice brightening effect. This patient chose not to proceed with any home bleaching. However, continued monitoring for color relapse should be done at future dental hygiene appointments and touch-up whitening treatments can be recommended as needed or desired by the patient.
From Dimensions of Dental Hygiene. May 2009; 7(5): 24-25.
