Tackling Terminal Distal Surfaces
Choosing the right instrument and implementing the appropriate technique to scaling terminal distal surfaces are key.
Accessing distal surfaces of mandibular and maxillary posterior teeth is challenging; however, terminal distal surfaces of the second or third molars present even greater difficulty. Some of these challenges are due to a lack of vision, inappropriate instrument selection, or small range of opening with inadequate access. All of these may lead to residual soft and hard deposits, especially at the base of the pocket. Complexity of the root anatomy increases with deep periodontal pockets. Adaptation and removal of deposits on the root surfaces also become more challenging as the clinician approaches the most posterior distal surfaces. The clinician’s ability to reach the terminal distal surfaces is critical for a positive therapeutic outcome.
POWER INSTRUMENTATION
Ultrasonic instrumentation is integral to the scaling armamentarium, however, obtaining access and complete removal of calculus are difficult to achieve. Standard or thin, straight ultrasonic inserts/tips (UITs) are commonly used for posterior teeth, even though they are designed for anterior teeth. A typical problem with using a straight UIT is the limited adaptation and angulation along the distal surfaces. The deeper the periodontal pocket, the more challenging it is to reach its base, and the anatomy of the tooth is more complex.
Curved UITs are necessary alternatives for adapting to distal surfaces, but they can only be used on low-to-medium power because of their thin tip design. When tackling more adherent calculus, the inclination to burnish is more likely, even though adaptation is ideal. In addition, ultrasonic instrumentation may leave behind a rougher root surface, therefore, following up with hand instrumentation for finishing or root planing is necessary to achieve complete root coverage. The risks posed by dental aerosols created via ultrasonic scalers must be considered during the novel coronavirus pandemic. Hand instrumentation may be the safest therapy to remove calculus at this time.
INSTRUMENT SELECTION
Instrument selection plays a vital role in clinician success when scaling terminal distal surfaces. Prior to selecting an instrument, clinicians should evaluate the patient’s case type, gingival tissue tightness, and quantity and quality of soft and hard deposits. Recommended instruments to scale terminal distal surfaces of the second or third molars include: curved, bladed universal curet; curved posterior sickle scaler; standard Gracey curet, extended Gracey curet; mini-bladed or micro-mini-bladed Gracey 13/14 curet; and Gracey 17/18 curet.
If the tissue is loose, select a large, curved, and thick-bladed universal curet for initial gross debridement. If the retromolar or tuberosity tissue is dense or tight, access to the base of the pocket can be inhibited. A thinner, rigid blade—such as a sickle scaler or Gracey curet—may be the most appropriate instrument.
A large, curved bladed instrument will provide increased access to the base of the pocket, especially with loose tissue. The long blade will extend around the crown of mandibular and maxillary molars. The shank and working end should always be rigid so larger adherent deposits will break with less pressure and clinician effort. A rigid or extra rigid standard or extended Gracey 13/14 curet can be used to remove the remaining calculus and for root planing. An extended Gracey 13/14 or Gracey 17/18 curet is preferred to instrument deep periodontal pockets and terminal distal surfaces of third molars when using vertical strokes. This acute bend in the shank and longer lower shank will allow the clinician to reach the base of the pocket without interference from the cusps of the teeth. To adapt to the anatomy of the distal depression or concavity, use mini-bladed or micro mini-bladed instruments with vertical strokes only.
SEQUENCE OF DIRECTIONAL STROKES
Use of multidirectional strokes improves coverage of the periodontal pocket and decreases the amount of deposits residing after instrumentation. When a terminal distal surface is laden with mostly biofilm, start with vertical strokes. When tackling a ledge of calculus from the edge, begin with horizontal or oblique strokes, then follow up with vertical strokes. This sequence of strokes will increase the ease of instrumentation for removing calculus toward the base of a pocket.
ACCESSING MANDIBULAR TERMINAL DISTAL SURFACES WITH HAND-ACTIVATED INSTRUMENTS
For the terminal distal surface of the mandibular arch, begin with the patient in a semisupine position. The clinician should stand when working on the mandibular arch to increase leverage, visibility and access. At an 8 to 9 o’clock position, retract the buccal mucosa or tongue with a mirror or index finger of the nondominant hand. Retraction using the index finger with the nondominant hand will assist with control and lend balance when instrumenting moderate-to-heavy and tenacious calculus deposits. Direct vision is used throughout instrumentation of the mandible.
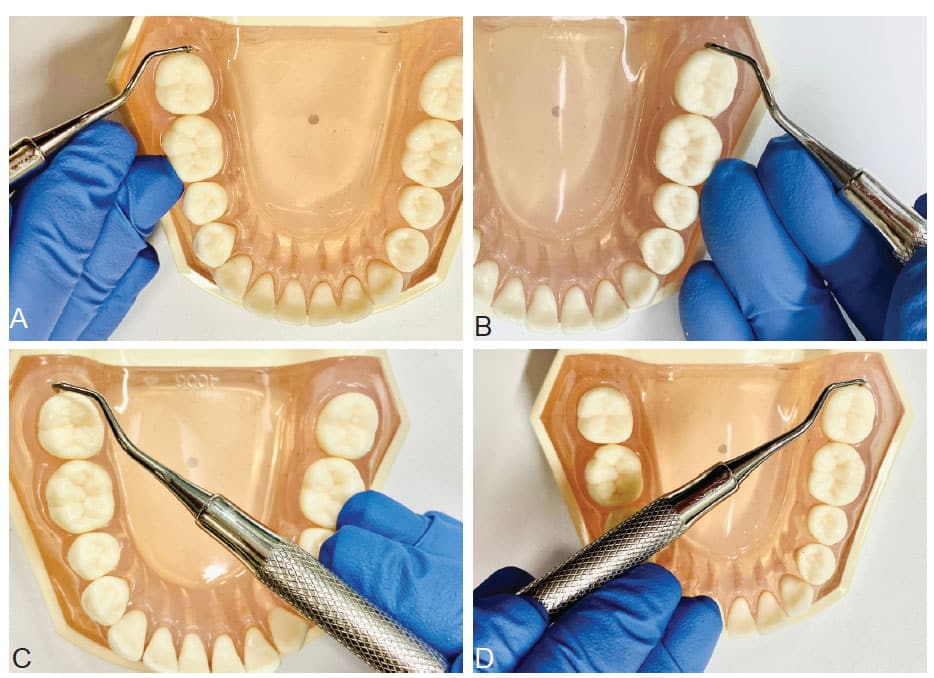
Approach the distal surface from the lingual aspect by starting with horizontal strokes with a cross-arch, palm-down fulcrum. Position the handle perpendicular to the long axis of the tooth and align the terminal shank parallel to the distal surface. Carefully adapt and insert the toe toward the apical direction of the tooth at the distobuccal line angle. Activate overlapping, channel, horizontal pull strokes to the distolingual line angle. Repeat this sequence of strokes as the working end is negotiated from the coronal margin to the apex of the tooth. Avoid rocking the hand and use slight finger pull strokes to maintain a 60° to 80° angulation to prevent burnishing the calculus. When performing horizontal strokes, the stroke should not extend beyond the line angles (Figure 1).
After completing the horizontal strokes, use the opposite end of the curet to finish with vertical strokes from the 8 to 9 o’clock position, moving from distolingual line angle to the distobuccal line angle. Continue with a similar instrumentation sequence from the buccal aspect. Fulcrum on the buccal surface with the same-arch fulcrum and swing the handle away from the tooth to align the terminal shank with the distal surface.
For cases with ≥ 5 mm clinical attachment loss, the clinician should begin with horizontal strokes at the 8 to 9 o’clock position, but then follow up with vertical or oblique strokes from the 3 to 5 o’clock position. The fulcrum is extraoral, opposite arch on the patient’s zygoma (Figure 2). This approach allows the instrument to be inserted to the base of deep, periodontal pockets with proper angulation and adaptation. Vertical and oblique strokes are employed after gross calculus debridement from the 8 to 9 o’clock clinician position.
ACCESSING MAXILLARY TERMINAL DISTAL SURFACES WITH HAND-ACTIVATED INSTRUMENTS
Access to terminal distal surfaces of maxillary second and third molars is easiest if initial gross scaling occurs from the lingual aspect. An extraoral, palm-up fulcrum is preferred because it allows the instrument to extend to the base of the pocket while maintaining proper angulation. A same-arch, palm-down fulcrum impedes reaching the distal surfaces, especially for deep periodontal pockets. Also, it forces a rocking hand motion that closes the blade angulation during activation, and makes it difficult to carry out oblique or vertical strokes. Visibility on terminal distals of maxillary molars presents an additional challenge. It is important to use indirect vision. If indirect vision is not possible due to thick buccal mucosa or limited opening, the clinician should use tactile sensation and perform exploring strokes with the instrument until pieces of calculus are detected.
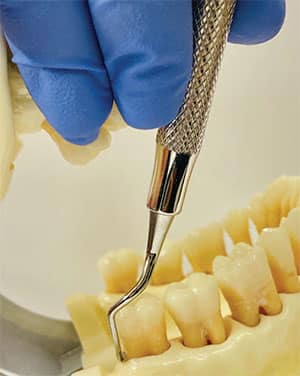
Gracey curet from the 3 to 5 o’clock position on the lower right quadrant. The fulcrum is on the zygoma and the instrument is extending down into the base of the pocket using a vertical stroke.
Begin with the patient in a supine position and the clinician in a 9 o’clock position. Use an extraoral, palm-up fulcrum to instrument the maxillary right posterior teeth and an extraoral, palm-down/cupping-the-chin fulcrum for the maxillary left posterior teeth. When doing so, the wrist will comfortably be in a neutral position. A 7 to 8 o’clock position or palm-down fulcrum for either side of the maxillary arch will bend the wrist and strain the hand. Retract the buccal mucosa with a mouth mirror or index finger and thumb of the nondominant hand to stabilize the instrument (Figure 3).
From the lingual aspect, insert the toe or tip at the distolingual line angle with the terminal shank parallel to the surface being scaled. To begin with oblique strokes, orient the handle so it slightly crosses over the occlusal plane with the toe pointing at a 45° angle toward the base of the pocket. Activate the instrument using oblique, pull strokes to traverse across the distal surface. Do not instrument beyond the distobuccal line angle. After completion of oblique strokes, reorient the instrument in a vertical manner and extend the instrument to the base of the pocket and use vertical strokes. From the buccal aspect, insert the instrument so the terminal shank is parallel to the surface being scaled. Perform only vertical strokes from the buccal aspect.
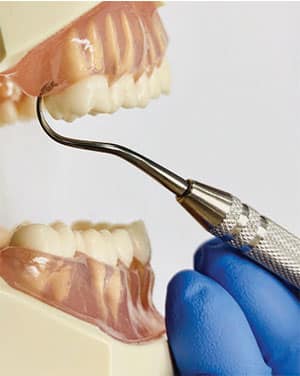
Vertical strokes can be followed with horizontal strokes with either a universal or Gracey curet, depending on the amount of subgingival calculus that remains. An alternative technique is to sit at the 2 o’clock position with the patient in a supine position and chin lifted. From this position, the patient’s maxilla can be treated similarly to the mandible. To approach the lingual aspect, use a cross-arch fulcrum for the area being instrumented. Insert the toe toward the apex, and start at the distobuccal line angle. Implement short, overlapping, pull strokes toward the distolingual line angle while adapting to the morphology (Figure 4). Next, fulcrum on the direct buccal and swing the handle out toward the buccal mucosa for horizontal strokes along the buccal side. Finish with vertical strokes with the same arch, intraoral hand rest on the occlusal surfaces and finger pull, then rock activation.
CONCLUSION
Instrument selection and technical approach to scaling terminal distal surfaces are integral to successful removal of subgingival deposits. By using multidirectional strokes from multiple planes, the clinician will be able to break the calculus with greater ease and less fatigue. All techniques above can be implemented with any hand-activated or power instruments with consideration of the appropriate instrument design characteristics and features.
From Dimensions of Dental Hygiene. May 2020;20(5):16-23.
