Sterilization Monitoring
Ensuring a safer clinical environment for both patients and practitioners.
The appropriate monitoring of sterilization is an essential component of every dental quality assurance program and the dental hygienist is perfectly poised to hold a leadership role in the monitoring process and to serve as a role model for other office staff.
The Centers for Disease Control and Prevention (CDC) suggests that three different types of monitoring methods be used in clinical practice: mechanical, chemical, and biological.1 While biological monitors are the most accurate, each of the three plays a vital role in the process.
Inadequate sterilization is a significant cause of exogenously acquired infections in health care.2 Sterilization failures can and do occur.3 Without proper monitoring, these failures may get overlooked, resulting in serious consequences for the practice. Common reasons for sterilization failure are listed in Table 1.
MECHANICAL MONITORING
Physical or mechanical monitoring involves physically checking the sterilization equipment during use to ensure that the cycle indicators are coming on at the appropriate times, which indicate that the equipment is functioning properly. In a busy clinical setting, this important aspect of monitoring may easily get bypassed. Thermometers, timers, pressure gauges, and fluid levels are all indicators that need observation.1 Physical monitoring should also include a review of basic operating instructions. All sterilizers do not have the same operating systems so dental hygienists should read the manufacturer’s instructions before use.
Many sterilizer failures occur because of improper technique.4 For example, overloading the packages/pouches in sterilizers is a common occurrence in some practice settings. Without appropriate space within the sterilizing chamber for the heat, steam, or vapor to circulate, sterilization cannot occur. Overloading will result in sterilization failures.
Recent models of sterilizers use sensors that are directly connected to the electronic control system, allowing for digital controls, LCD displays, and recording devices. These upgrades provide a printout or display of the functional data and generate an alert message if a malfunction occurs. These models are more accurate than the electromechanical systems.5
CHEMICAL MONITORING
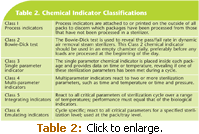 Chemical monitoring involves the physicochemical change of a chemical system in the presence of heat.6 Six classes of chemical indicators (Table 2) are recognized by the International Organization for Standards (ISO); three of these are commonly used in dentistry.7 The monitors used in dentistry contain heat sensitive chemicals/dyes that change color when exposed to certain temperatures. Indicators are crucial to the quality assurance program as they confirm that the conditions required for sterilization have been met or note that they have been missed.6
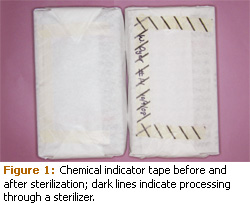
External chemical indicators (Class 1) are used on the outside of packages and change color to show that the right temperature has been reached. Chemical indicator tape or pouches/bags with special markings (Figure 1) are used as external indicators. External indicators are needed on the outside of packages/pouches only if the internal indicator cannot be seen. Some types of paper/plastic packages have a visible internal indicator, eliminating the need for the external indicator.1,3
Office staff may not know that chemically treated tape (autoclave tape) does not respond to all of the parameters of sterilization and may show diagonal lines with temperatures as low as 200° and well before 20 minutes of exposure has occurred. Hence, the purpose of external indicators is to make clinicians cognizant of which instrument packages have been processed in a sterilizer versus those that have not been processed. They do not provide proof of sterilization but they do play an integral role in the monitoring process by providing visual assurance that a pack has been through the sterilization process.8
Multiparameter indicators (Class 4) are designed to react to two or more sterilization parameters. Multiparameter indicators provide more reliable information on whether the sterilization variables have been met.9 Currently only available for the autoclave, these types of chemical indicators assess for time, temperature, and sterilant contact. Multiparameter pouches are available that eliminate using both internal and external indicators. They are designed to reach their end point color change only after the three parameters of time, temperature, and contact time have been met.
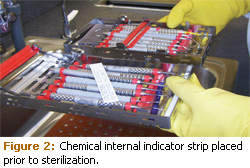
Chemical indicators are critical to the monitoring process, as they provide immediate feedback on the sterilization cycle upon their removal. They show that some sterilizing conditions have been met but they do not indicate whether the contents within the sterilizer have been sterilized.2 Internal indicators are important because a failure to change color provides a warning that the sterilizer is not working properly. Gross malfunctions can be quickly addressed. However, indicators may give false or positive readings so they cannot be used as a sole criterion for sterilization.
Indicators that fail to change color reflect problems with the sterilizer or the process, therefore the items undergoing sterilization should not be used until they are reprocessed and the sterilizer is tested with a biological indicator. Negative results can be influenced, however, by the location of the indicator within the sterilizer, the types of packaging materials used, and operator error. Chemical indicators are not as sensitive to suboptimal sterilization variables as biological indicators, and the variations in color change elicited by many chemical reactions, as well as color blindness of personnel, may confound the results.11 Hence, the use of chemical indicators is an integral part of the quality assurance program when used in association with biological indicators.
TABLE 1. COMMON REASONS FOR STERILIZATION FAILURES IN DENTISTRY.
- Improper timing
- Improper temperature
- Inappropriate sterilization method for item
- Unit malfunction
- Improper packaging
- Overloading
- Inappropriate operation
- Incorrect maintenance of sterilizer
- Improper cleaning of instruments
- Temperature exceeds temperature-pressure relationship; superheated steam<
BIOLOGICAL MONITORING
Biological indicators, impregnated with nonpathogenic bacterial spores, provide the quintessential test for sterilization. Spore testing is the only process that meets all sterilization parameters.12 The CDC recommends weekly use and some state dental practice acts require weekly spore testing.1 The biological indicator process involves the killing of externally added microorganisms, specifically highly resistant spores, which are passed through the sterilizer and then cultured.13 Because bacterial spores are more resistant to heat, chemical, and gases than vegetative bacteria or viruses, destruction of the spores is considered proof of sterilization.12 Geobacillus stearothermophilus spores are used with the autoclave and chemical vapor systems and Bacillus atrophaeus is the organism used for dry heat. These spores are impregnated on paper strips and placed in a glassine envelope or sealed in a glassine ampule.14
When using test strips, glassine envelopes containing the strips are placed in the middle part of the sterilizer. After the cycle is complete, the envelope containing the strip is opened with sterile cotton forceps and placed into a tube of sterile culture broth that is labeled with the identification number of the sterilizer.
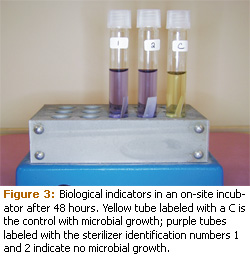 Control tubes are handled in exactly the same way but the strips are not sterilized. The biological indicators are placed in an incubator along with the control and evaluated for the presence of microbial growth. The sterilized tubes are compared to the unsterilized control. The control biological indicators are designed to always grow spores and represent microbial growth. If the cycle was successful in sterilizing the items, no microbial growth will be present in the biological indicators from the sterilizer, which is commonly indicated by the absence of color change, whereas the control will have a color change following incubation (Figure 3).15 If both the control and test biological indicators exhibit a change in color, microbial growth occurred in the test biological indicators.
Biological indicator kits are technique sensitive. Strips can be contaminated by the practitioner if they are handled inappropriately, which may result in microbial growth and a false positive reading. Sterilizer machine malfunctions are less common than human error when positive spore test results are found.3 On-site test kits with an incubator are available along with offsite professional testing services. In-house test results are typically available in 24 to 48 hours; mail-in services have results in about 2-7 days depending on the type of test and the testing service. Most companies phone the practice with a positive result prior to the weekly reading. The resulting third party evaluation from mail-in services is a benefit of off-site test evaluation while a more rapid and economical approach is provided by on-site testing. A list of sterilization monitoring services is available from the American Dental Association.8
In addition to regular weekly spore testing, spore testing should also be implemented after a sterilizer is repaired, for staff training, when new packaging material is introduced, and for a first cycle with a new sterilizer.
PROCEDURES FOR POSITIVE SPORE TESTS
If a positive result occurs with any sterilizer other than steam, all items that were processed in the failed sterilizer need to be identified and isolated.1,9 A disadvantage of the biological indicators is the extended time factor needed for results, making isolating packages from a sterilizer cycle from the previous 48 hours difficult. Regardless, all items from the failed test sterilizer should be resterilized before use.
The sterilizer should first be evaluated by performing the maintenance procedures recommended by the manufacturer. Following this step, the sterilizer should be started and all operating monitors scrutinized to ensure there are no leaks, that the unit is meeting and holding appropriate temperature for sterilization, and that the timing device is working correctly. Another sterilization cycle should be implemented with an in-house spore test. Table 3 lists possible reasons for a positive biological indicator test.
While waiting for results, items from the original failed cycle are contraindicated for use. If the follow-up spore test is acceptable, the sterilizer is ready to use again. One positive spore test does not mean the sterilizer does not work, but it implies the sterilizer should be checked for problems and or the biological indicator testing process should be reviewed for procedural errors.8 Malfunctions of the sterilizer are most often identified by consecutive positive spore tests—not just one positive result.3 With steam sterilization, the CDC recommends using three repeat biological indicator tests in consecutive cycles.3 If all three tests are positive, only then do the instruments that were processed in the sterilizer need to be recalled for reprocessing.
TABLE 3. REASONS FOR A POSITIVE BIOLOGICAL INDICATOR TEST.
- Exposure time not appropriate.
- The biological indicator was contaminated during the process.
- The biological indicator test was not appropriately prepared.
- The load never processed.
- The exposure time was not appropriate for configuration.
- Malfunctioning sterilizer.
- Malfunctioning incubator.
DOCUMENTATION
Written documentation is almost as critical as the process itself. Failure to document is often interpreted as failure to implement. Documentation provides an important safeguard against a liability suit. Essential record keeping for every load includes a log of the sterilization date, the person who ran the load as well as the time the cycle was started and finished.14 This important information verifies total time the load was exposed to the sterilization temperature and pressure. If more than one sterilizer is employed in an office, the identification number of the sterilizer must be recorded as well.
Prior to sterilization, each bag, wrapped item, or pouch needs to be labeled with the date and the sterilizer ID number in which it will be placed. If there is more than one sterilizer and a positive test occurs, items associated with the failed test need to be quickly and correctly identified. An easy identification system eliminates the confusion of trying to ascertain which instruments were processed in which sterilizer. Weekly spore test results, as well as the spore test lot number, should also be recorded for each sterilizer in the practice and labeled accordingly.
CONCLUSIONS
The monitoring and documentation of sterilization parameters are critical components of quality assurance. Dental hygienists need to use physical, chemical, and biological monitoring systems to determine if sterilization has occurred. Each type has limitations but when used together each helps create a safer clinical work environment for patients and clinicians.
REFERENCES
- Kohn WG, Collins AS, Cleveland JL, et al. Guidelines for infection control in dental healthcare settings—2003. MMWR Recomm Rep. 2003; 52:1-61.
- Kelkar U, Bal AM, Kulkarni S. Monitoring of steam sterilization process by biologic indicators—a necessary surveillance tool. Am J Infect Control. 2004;32:512-513
- Guidelines for Disinfection and Sterilization in Health Care Settings, 2008. Available at: www.cdc.gov/ncidod/dhqp/pdf/guidelines/Disinfection_Nov_2008.pdf. Accessed February 6, 2009.
- Staat RH. Sterilizer monitoring: rationale for using biological indicators. Dentistry Today. Available at: www.dentistrytoday.com. Accessed March 3, 2009.
- Reichert M, Young J. Sterilization Technology for the Health Care Facility. 2nd ed. New York: Aspen Publishers; 1997.
- Knjappu J. Facets of steam sterilization monitoring. Infection Control Today. Available at: http://infectioncontroltoday.com. Accessed February 6, 2009.
- Sterilization of Health Care Products—Chemical Indicators Part 1: General Requirements. Arlington, Va: Association for the Advancement of Medical Instrumentation; 2005.
- Flynn S. Extended steam sterilization cycles. Available at: www.hpnonline.com/ce/CE%202007.html. Accessed February 6, 2009.
- America Dental Association. Sterilization Monitoring Systems. Available at: www.ada.org/prof/resources/topics/icontrol/art_sterilization_monitoring.pdf. Accessed February 6, 2009.
- Schneider P, Reich R, Kirckof S, Foltz W. Performance of various steam sterilization indicators under optimum and sub-optimum exposure conditions. Am J Infect Control. 2005;33(5 Suppl 2):S55-67.
- Serry F, Kadry A. Potential biological indicators for gluteraldehyde and formaldehyde sterilization processes. J Ind Microbiol Biotechnol. 2003; 30: 135-140.
- Spry C. Using biological indicators appropriately. OR Manager. 2007;23:23-24.
- Miller C, Palenik C. Infection Control and Management of Hazardous Materials for the Dental Team. 3rd ed. St. Louis: Elsevier Mosby; 2005.
- Daniel S, Harfst S, Wilder R. Mosby’s Dental Hygiene Concepts, Cases, Competencies. 2nd ed. St. Louis: Mosby Elsevier; 2008.
From Dimensions of Dental Hygiene. March 2009; 7(3): 18-20, 22.

