Periodontal Debridement—A Case in Point
Donna Stach, RDH, MEd, discusses strategies for removing veneered calculus with ultrasonic and hand instruments.

Ms. Yang presented at our faculty practice for a new patient exam. Subsequently, she was scheduled for four quadrants of periodontal debridement. Ms. Yang is a 54-year-old Chinese woman who has lived in the United States for 5 years. Her medical history was not significant. Her dental presentation showed that she had no restorations and no decay. She had all of her teeth except for the third molars. She had severe periodontitis in the maxillary molars and moderate disease in the rest of her mouth.
She had experienced her very first dental visit about 1 year prior to her appointment with our faculty practice. At the time of her first dental visit, she’d had four 1-hour visits for periodontal debridement with local anesthesia. She felt satisfied with the treatment.
Upon examination, I noted some recession (2 mm to 4 mm), some pocketing, and black visible calculus where the recession was present. I presumed that the recession had resulted from her periodontal debridement a year ago. The black calculus was visible or tactilely detectable to the base of the pocket. Pockets ranged from 2 mm to 7 mm. She had bleeding, redness, and edema—all of the classic signs of active inflammation. Her plaque control was good.
RECARE CARE
Q. So Ms. Yang had not gone in for recare with the first dental office she visited?
A. I don’t know if the first dental office had stressed that she needed to return. But in my conversations with her, Ms. Yang did not understand the concept of chronic disease and the need for periodic professional care. This emphasizes an important point for dental hygienists. We need to insure that our patients understand that periodontal diseases require ongoing therapy or treatment. The literature shows that compliance with periodontal maintenance visits is essential to keeping periodontitis under control.1,2
THE NEED FOR A BLENDED APPROACH
Q. Had the patient received both ultrasonic and hand instrumentation at her previous dental visit?
A. No, when I started using hand instruments on Ms. Yang, she said that this was a brand new experience for her. The calculus was very smooth and veneered. Ultrasonic instrumentation can cause the veneering of calculus when the deposits are very dense and have been present for a significant amount of time. It appeared that the dental hygienist who performed the initial treatment was misled by the smoothness of the tenacious, burnished sheets of calculus. This is easy to do and I imagine that, compared to Ms. Yang’s initial presentation, this was a remarkable change and that good treatment was provided.
This case study brings up another important point—the need to evaluate your treatment. Dental hygienists need to assess after treatment is provided to see if the therapy was successful. This did not appear to have happened in her periodontal debridement series. The resulting presence of black calculus could have happened in the hands of the best clinician because if the hygienist does not have visibility, he or she may think the smoothness means that the calculus has been removed. This emphasizes the need for a re-evaluation appointment in a patient with extensive deposits.
BREAKING UP WITH THE DEPOSITS
Q. What was your next course of action?
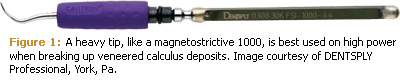
A. Once the deposit is veneered, the technical challenge is to break up the deposits. Veneered calculus can be more difficult to remove than the initial deposits. My instrument of choice with the ultrasonic was a heavy duty tip on high power. I was using a magnetostrictive unit so I chose a 1000 tip that could break up the deposit rather than just continue to smooth it (see Figure 1).
Because I was instrumenting on sheets of calculus and I had good visibility of the treatment area due to the flaccid tissue, I chose to be more aggressive by using the tip of the instrument as well as the back sides. The deposit was not breaking up easily so I actually came up on the point of the tip to start breaking up the deposit, which is not something that is recommended in schools but if you have good visibility and you are sure you are on deposits and not on tooth, it is an effective way to break up very difficult deposits. Without good visibility and assurance that you are instrumenting on the deposit not the tooth, irreparable damage can be caused to the tooth structure.
KEY POINTS
- Emphasize that effective therapy for periodontitis requires ongoing treatment.
- In patients with extensive deposits, re-evaluation appointments should be scheduled.
- A combination of hand and ultrasonic instruments is the best strategy for difficult deposits.
- Use periodontal files to initially break up veneered deposits before using curets.
- Use heavier tips on high power for veneered deposits.
- A variety of ultrasonic tips is necessary for effective instrumentation.
- All calculus deposits need to be removed for therapy to be successful.
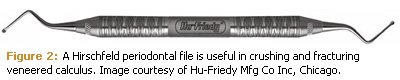
The other instrument I used in areas where I couldn’t see as well was a periodontal file. Periodontal files have a crushing action on a smooth deposit so they are very efficacious for breaking up flat deposits. Once the deposits start breaking up, you can go back with other ultrasonic and hand instruments to remove the calculus completely. I felt with Ms. Yang’s very generalized, flat, smooth calculus that I had better ability to remove deposits in some places with hand instruments than I did with ultrasonics. In deep pockets and furcations, ultrasonic instrumentation is terrific but once the calculus is really dense, flat, and veneered, it is easier to remove with hand instruments used in a specific order. Periodontal files, such as the Hirschfeld, can crush and fracture the veneer, making it possible to then thoroughly clean the root surface using curets. With this patient, the combination of the two was more successful than either ultrasonic or hand instruments alone.
CHOOSING THE RIGHT TIP
Q. What other challenges did you experience with this patient?
A. Ms. Yang had a lot of bone loss in her maxillary molars, and fused roots. She presented with many concavities on the distal of the last tooth. In particular, there was a very deep concavity that was also broad so I had access to it but I needed to work in multiple directions when using hand instruments. Because it was so concave, vertical strokes didn’t work very well. With the ultrasonic unit, the thin-tipped inserts had wonderful adaptation but when the calculus was initially very veneered, they didn’t seem very effective. Thin-tipped inserts are recommended for use on low power and although they can be turned up to medium power for selective use in difficult situations, this still didn’t improve their efficacy on this patient’s deposits. The files were definitely the most successful instrument with this patient as they have that narrow working end and could really fit in. On normal calculus, the contra angle thin-tipped inserts are the instrument of choice, but they are used at lower power, which on this patient’s calculus was not enough to remove the deposits.
I recently was part of a CE presentation that serves as an update for the clinicians in the community. I discussed ultrasonic instrumentation and I received some interesting feedback from the attendees. The majority of the people in attendance who interacted in the course had only thin-tipped inserts in their offices and often only the straight thin-tipped inserts. If I had only thin-tipped inserts to use on this patient, it wouldn’t matter how technically skilled I was, I could not have treated this patient adequately. It’s essential to have a range of tips available with an ultrasonic unit.
From this CE course, I came away with the general impression there is not always an understanding that when using ultrasonics on difficult patients, a different tip is needed than for a standard recare or easy new patient. The American Academy of Periodontology position paper still states that all of the calculus deposits need to be removed for therapy to be considered successful.3 This patient is an example of how important this is.
REFERENCES
- Drisko CH. Nonsurgical periodontal therapy. Periodontol 2000. 2001;25:77-88.
- Gibson C, Moosajee A. Selecting appropriate recall intervals for patients in general dental practice—an audit project to categorize patients according to risk. Dent Update. 2008;35:188-190, 193-194.
- American Academy of Periodontology.Guidelines for Periodontal Therapy. Available at: www.perio.org/resources-products/pdf/33-therapy.pdf. Accessed January 20, 2009.
From Dimensions of Dental Hygiene. February 2009; 7(2): 30, 32.
