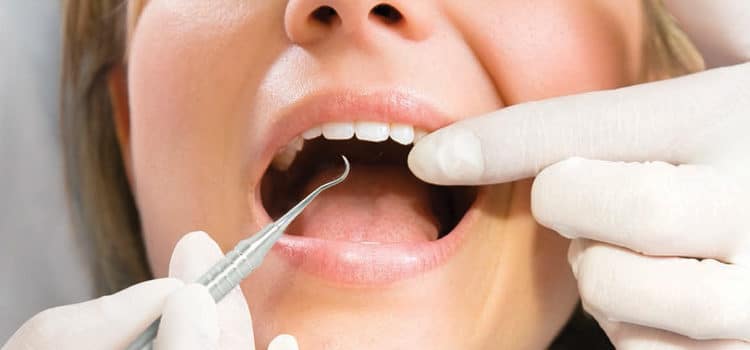
 DIEGO_CERVO/ISTOCK/THINKSTOCK
Maximize the Use of Sickle Instruments
Alternative fulcrums and different body positions can be implemented with this type of hand instrument to support the success of calculus removal.
Traditionally, the straight-shank sickle instrument, previously known as the sickle scaler, was limited to removal of mandibular anterior supragingival calculus or calculus 1 mm to 2 mm below the gingival margin if the tissue was inflamed and easily distended.1 The introduction of the contra-angle sickle enables clinicians to remove calculus from the posterior teeth.2 This article introduces alternative fulcrums and different body positions that allow clinicians to expand the use of sickles in additional ways and locations in the oral cavity, while maintaining ergonomically correct wrist positions and clinician postures.
SICKLE DESIGNS
A clear understanding of sickle design is important in order to make the proper instrument selection. Sickles have two cutting edges that are effective for heavy, tenacious calculus removal due to their more open angle of 80° to 90° when compared to a curet.2,3 The two lateral sides of the sickle come together in a V-shape on the back of the instrument and end in a pointed toe.2,3 Sickle instruments tend to crack or break off tenacious rings of calculus compared with universal and area-specific curets.2,4
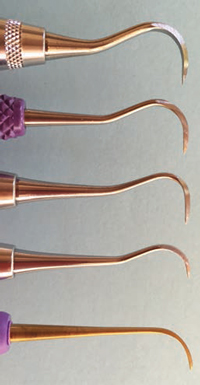
The curved sickle has a curved blade and pointed toe (Figure 1). The U15 Towner is a large hook-shaped sickle. Smaller versions of the hook shaped sickle are the small SHG (Goldman) 6/7 and the larger SH 6/7. When compared to the U15 Towner, the SHG 6/7 and SH 6/7 have thinner blades and slightly offset shanks. These features allow for easy adaptation to proximal root surfaces. Traditionally, these sickle designs have been used in the anterior areas; however, they can be effectively used on posterior teeth with the correct fulcrum placement.
The straight-shanked and straight-bladed Jacquette has two cutting edges and a pointed toe. The J34/35 is traditionally used subgingivally and supragingivally on the mandibular anterior teeth, but it can be used on the posterior teeth with alternative extraoral and opposite arch fulcrums.3
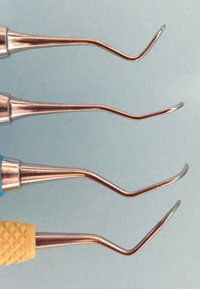
Contra-angle sickles, such as the 204S and 204SD, have a bend in the shank and a straight cutting edge with a pointed toe (Figure 2). The 204S and 204SD each have a small blade, but their shank length and angle are different. The 204S has a very short shank and tight contra- angle—which limits its use to supragingival scaling. The SD shank is longer and more open than the 204S, improving access to the distal aspects of teeth and extending its subgingival reach. The 204 IUFW (Indiana University of Fort Wayne) has a long shank and a blade that can reach deeper into proximal areas than the 204SD, but care must be used in order to prevent tissue trauma.
Once the clinician has decided which sickle to use, the correct instrumentation technique must be implemented. To be effective and efficient, a secure fulcrum and a proper modified pen grasp is needed to start instrumentation. After the fulcrum and grasp have been established, the calculus should be engaged by biting into the deposit with lateral pressure. Use the terminal one-third of the blade to engage the calculus and prevent tissue damage. The sickle instrument should be used with short controlled strokes to break up ledges of deposit and prevent shaving of the calculus, which could result in burnishing. As the piece of calculus becomes smaller, longer, lighter strokes can be used to prevent root damage.

ALTERNATIVE WAYS TO USE SICKLE INSTRUMENTS
1. Mandibular Posterior Teeth
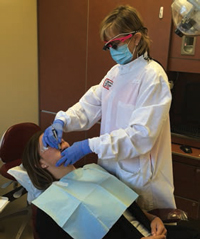
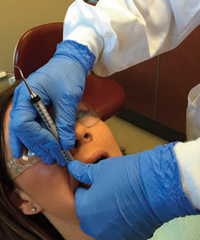
Patient position is critical when heavy calculus ledges and deep pockets are present. For maximum access, position the patient in a semisupine position with the chin tucked down toward the chest and the clinician standing (Figure 3). Right-handed clinicians working on the lower right mandible should stand on the left side of the patient at a 5:00 position with the arm at 3:00. With an extraoral fulcrum resting palm down on the boney part of the patient’s zygomatic arch, clinicians can use a straight-shanked sickle to extend the instrument down into proximal posterior pockets. Pairing similar instruments, the clinician can use the longer-bladed SH 6/7 to scale the proximal lingual aspects of the teeth and the shorterbladed SHG 6/7 for the buccal proximal surfaces. To prevent tissue damage, the end of the instrument that slightly-curves to hug the tooth should be used.
When activating the SH 6/7 from a lingual approach on proximal surfaces, an oblique stroke that orients the blade downward and under the ledge of calculus should be used. This allows the end of the sickle to reach deeper into the pocket and the handle to slightly cross over the plane of occlusion. As the instrument moves farther across the proximal surface, the stroke becomes more vertical to move up and under the contact area. Using the same standing position and fulcrum for the buccal aspects of the proximal surfaces, the clinician can use a vertical stroke with the smaller blade of the SHG 6/7. For the lower left mandible, the clinician can stay standing at the same 5:00 position with the arm at 3:00 on the left side of the patient, fulcruming palm up on the left zygoma. The same instruments and strokes are then implemented to remove the ledges of interproximal calculus. The opposite hand can be used for retraction of the cheek and reinforce ment/ stabilization of the working hand (Figure 4). Once the large ledges of calculus are removed, the clinician can follow up with rigid universals or area-specific curets for definitive scaling and reaching to the base of the pocket.5
The same technique (body positions) can be implemented with the use of the 204. The clinician should pair a 204SD sickle with the IUFW204, which has a longer shank and works well on posterior proximal surfaces from a lingual approach. The small 204SD sickle can be used on the proximal surfaces from both the buccal and lingual; however, it might not reach into deep areas on lingual surfaces. The clinician should align the terminal shank and blade with the long axis of the proximal root surface.
 |
 |
 |
2. Mandibular Anterior Teeth
For surfaces away from the clinician, an intraoral opposite arch fulcrum should be used on the maxillary incisors, standing at the 1:00 body position with the arm at the 12:00 position (Figure 5). The instrument should be extended to reach down to the lower anteriors. This technique allows the thumb to be dominant. The thumb has more strength than the fingers and can exert substantial lateral pressure. Reinforcement can be added with the left thumb, if necessary. The pairing should be the same as explained for the posterior teeth, with the small SHG 6/7 being used on proximal surfaces from a facial approach and the larger SH 6/7 on the proximal surfaces from a lingual approach. As the clinician works toward the contact area, the instrument should be moved up into a more vertical stroke to ensure that all ledges are reached. For surfaces toward the operator, the clinician should move to the 9:00 seated position. This again allows for the thumb to provide dominant lateral pressure. An intraoral fulcrum should be used with the same instrument pairing.
An alternative approach is to use a thinner and more flexible sickle or a stronger and more rigid sickle instrument with an intraoral fulcrum on the incisal edges of the adjacent teeth. These instruments offer long thin blades that may allow access to crowded, overlapped anteriors. The 1:00 standing body position for surfaces away from the clinician and the 9:00 seated position for surfaces toward the clinician will give the operator effective power strokes while maintaining correct ergonomics.
3. Maxillary Posterior Teeth
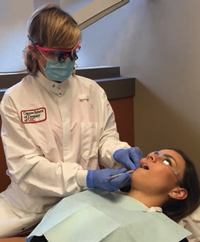
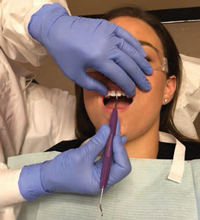
For maxillary posterior teeth, the right-handed clinician sits at 9:00 on the right side, with the patient in a supine position with chin slightly raised and eyes looking at the ceiling. For the maxillary right sextant, the fulcrum is placed extraorally and palm up on the boney part of the patient’s mandible, reaching up to the buccal or lingual aspects of the proximal surfaces (Figure 6 and Figure 7). For the maxillary left quadrant, the fulcrum is extraoral, palm down on the patient’s left mandible, reaching up and extending the instrument into the proximal surfaces from either the buccal or lingual aspect. The same pairing of the SH 6/7 and SHG 6/7 sickles can be used. An alternative instrument pairing can be the 204SD with the 204 IUFW. The nondominant hand can be used for retraction and reinforcement of the dominant hand.
 |
 |
 |
4. Maxillary Anterior Teeth
When instrumenting the maxillary anterior sextant, the clinician sits at the 9:00 position to access the surfaces toward the clinician and allow the thumb to be used for lateral pressure. For the surfaces away from the clinician, the operator may elect to stand at the 1:00 position to enable the thumb to provide dominant lateral pressure. A vertical stroke is used to instrument the proximal surfaces. Care should be taken to keep the terminal shank of the instrument parallel to the long axis of the tooth to guide the tip of the sickle deeper subgingivally and keep it aligned with the root surface (Figure 8). Intraorally, same arch fulcrums are the most stable for this area. Reinforcement with the nondominant hand may be used when necessary. The pairing of the SH 6/7 and SHG 6/7 works well in this area.
CONCLUSION
Understanding different sickle designs and the use of alternative fulcrums provides clinicians with myriad choices when beginning calculus removal. Incorporating new instruments into the dental hygienist’s armamentarium and applying innovative techniques can be challenging but rewarding. Developing ergonomically correct scaling methods will help clinicians enjoy a long and rewarding professional career and deliver the most effective and efficient scaling outcomes.
References
- Ridley K. Sickle Scalers. Available at: youtube.com/watch?v=isB_Mc8XGg0. Accessed August 25, 2016.
- Pattison AM. The secret use of sickle scalers. Dimensions of Dental Hygiene. 2008;6(9):44–47.
- Sumi J, Nguyen M. Hand-activated instrumentation. In: Darby M, Walsh M, eds. Dental Hygiene: Theory and Practice. 4th ed. St. Louis: Saunders/Elsevier; 2015.
- Pattison AM. Sickle scalers in the posterior areas. Dimensions of Dental Hygiene. 2011;9(6):86.
- Pattison AM. Using Sickle Scalers [videotape]. Los Angeles: Pattison Institute; 2015.
From Dimensions of Dental Hygiene. September 2016;14(09):29-30, 32-33.
