 JOVAN_EPN/ISTOCK/GETTY IMAGES PLUS
Maintain the Sharp Cutting Edge of Periodontal Instruments
Sharp instruments are crucial to achieving successful outcomes in nonsurgical periodontal therapy.
During the COVID-19 pandemic, dental hygienists have relied on hand instrumentation more than ever in an effort to reduce aerosol production. When used properly, multiple studies have confirmed that hand instrumentation is as effective as power instrumentation.1–4
In addition to selecting multiple hand instruments based on the severity of periodontal involvement, type and location of deposits, and specific root anatomy, instruments must be frequently evaluated for sharpness.5,6 Effective calculus removal depends largely on the sharpness of the blade or cutting edge of the instrument. It must be perfectly sharp to leave the surface of the treated root smooth and clean. Root surface roughness facilitates the adhesion of bacteria and the development of bacterial biofilm. The use of dull instruments can add to operator fatigue, patient discomfort, tissue trauma, and burnished calculus. Each of these factors may negatively impact the outcome of nonsurgical periodontal therapy.7
A sharp instrument will enable better results during scaling, including greater accuracy and efficacy, while significantly reducing burnished calculus and soft tissue trauma.8 The efficiency of the scaling instrument to produce a smooth surface is an important parameter. The consistent use of hand instruments results in dulling of the cutting edges. The cutting edge of a periodontal instrument is a well-defined, sharp edge with a continuous line formed by two adjacent surfaces. Only the lower 1 mm to 3 mm of the blade are engaged during calculus removal. A greater contact area between the lateral surface of the blade and the root will develop due to a dull cutting edge. This dullness requires clinicians to apply more force and pressure during scaling and root planing.9
How to Determine an Instrument’s Sharpness
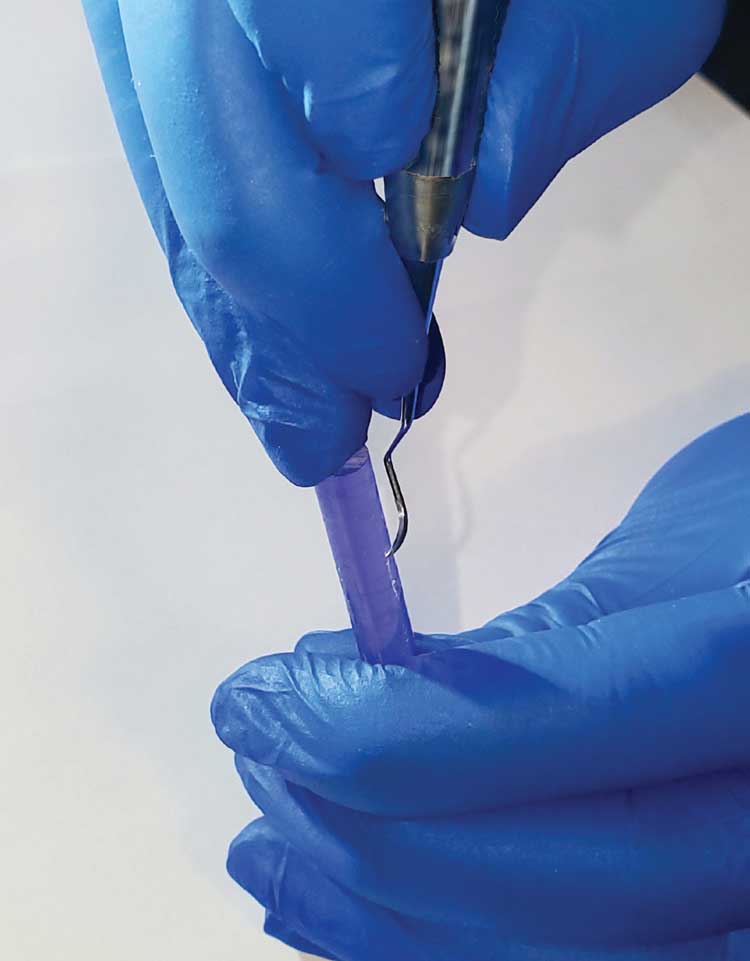
A plastic test stick may be used to test sharpness. This is achieved by holding the plastic test stick in the nondominant hand with a modified pen grasp. With the instrument in the dominant hand, establish a safe fulcrum on the flat surface of the test stick. Apply the cutting edge to the stick at a 70° to 80° angle and evaluate the “bite” as the edge takes hold. If there is no bite, the instrument needs sharpening (Figure 1).7,10 Another method to evaluate sharpness is with visual inspection using a bright light and, if possible, a magnifying glass. Hold the instrument under the light and rotate until the edge is facing the light. If the light can be seen reflecting off of the cutting edge, then the instrument is dull.7,10
Frequency of Sharpening
The metal material used by various manufacturers of periodontal instruments determines if and with what frequency those instruments need to be sharpened. Some periodontal instruments are manufactured from a more durable metal and may not require sharpening at all. However, for most periodontal instruments to retain optimal cutting edges, proper instrument sharpening must be performed on a regular basis.
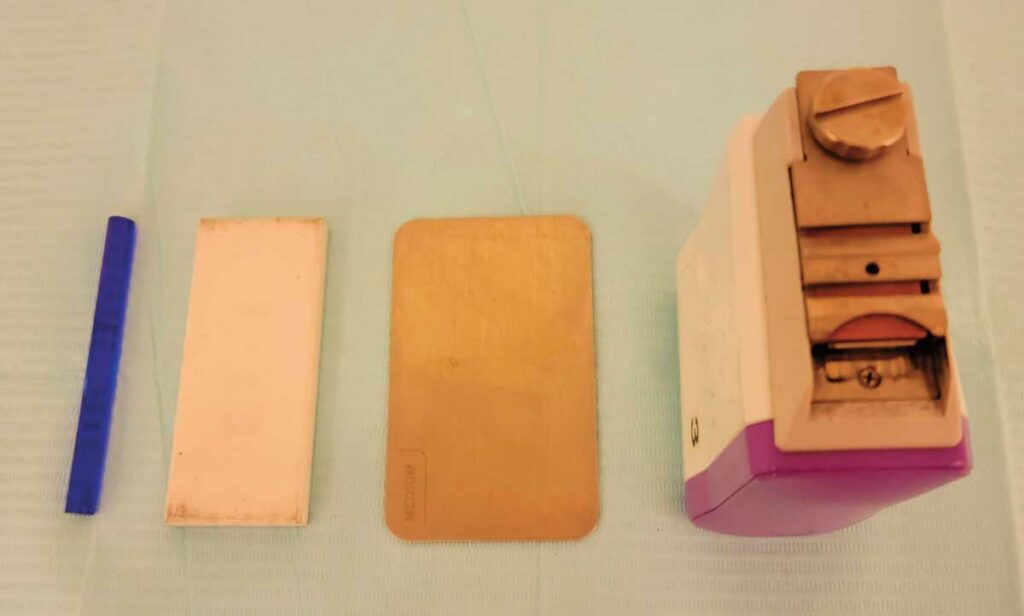
In order to maintain the instrument’s sharp edge, sharpening is required every 15 strokes to 45 strokes.11,12 When treating multiple patients with heavy and tenacious deposits, sharpening may be performed after completing each patient13 or chairside at the first sign of dullness.7 Therefore, sharpening equipment of the clinician’s choice and a plastic test stick should be a part of each sterile instrument setup (Figure 2).7
Instrument Design
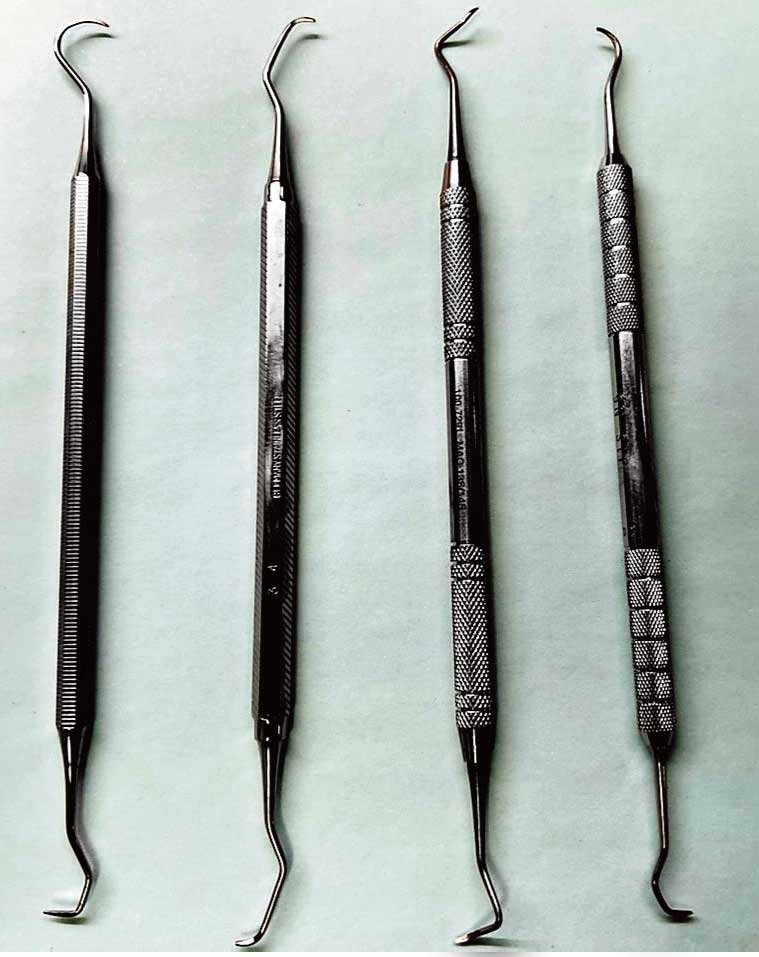
The ultimate goal of sharpening is to restore the instrument’s cutting edge to its original shape while removing as little metal as possible.8 Clinicians should understand instrument design before implementing any type of sharpening technique. Maintaining the original shape of the blade and internal angle of each instrument is integral to success. For example, the universal curet is double-ended with paired mirror-image working ends. The working end has two cutting edges, a rounded back, and a rounded toe with a semicircular cross-section. Clinicians must sharpen both sides of the blade at the proper angle while keeping the toe and back rounded to correctly maintain the universal curet.
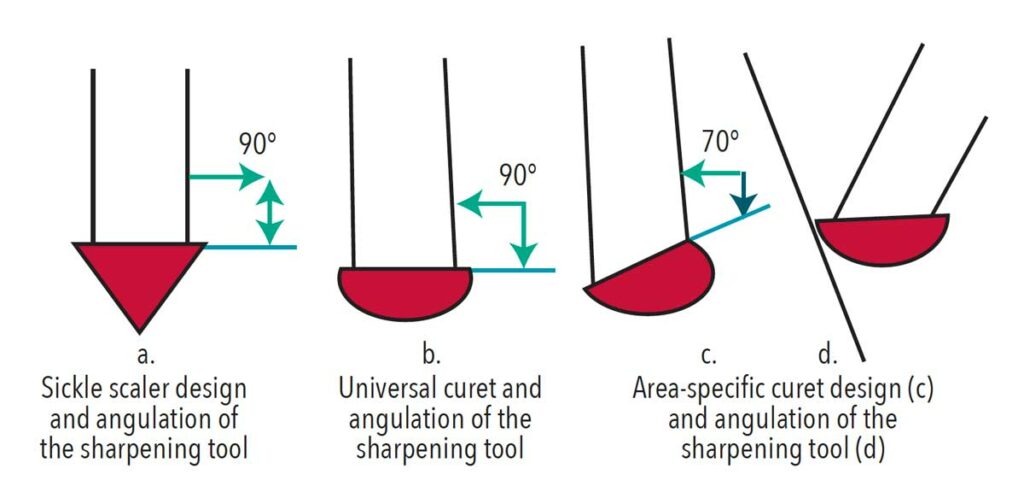
Area-specific curets have a single cutting edge that is offset by 70° in relation to the terminal shank and the rounded toe and back.7 The sharpening technique for these instruments is similar to that for universal curets. However, clinicians must be mindful of the offset shank design when establishing the correct stone and instrument blade relationship. Aligning the face of the area-specific curet parallel to the countertop will help maintain proper angulation between the stone and the cutting edge (Figure 3). Only the cutting edge of the area-specific curet will be sharpened.7,10 Curets can be used both for supra- and subgingival calculus removal while sickle scalers can only be used above the gingival margin. The internal angle between the face of the instrument and the side of the blade in universal curets and sickle scalers is 90° as opposed to the 70° angle in area-specific curets (Figure 3).7,10
Sickle scalers are triangular in cross-section, with two cutting edges and a pointed tip. Clinicians should hold the sharpening stone at a similar angle relationship to the sickle blade as with the universal curet, but they may now intentionally keep the tip of the instrument pointed to maintain the original instrument design.7
Sharpening Tools, Techniques, and Methods
Traditionally, sharpening stones have been used to sharpen instruments. Appropriate sharpening stone selection is crucial to obtaining an optimally sharp cutting edge while retaining the instrument’s original shape.8 There are two categories of stones: natural abrasive stones and synthetic stones. Natural abrasive stones are derived from natural sources such as Arkansas stones. Synthetic stones are artificially constructed such as man-made abrasive aluminum oxide stones. For manual sharpening purposes, the fine-grained Arkansas stone may offer the best results, as it has small abrasive particles that can be used to obtain sharp, smooth, and precise edges.14
Coarse sharpening tools have a greater abrasive capacity and produce less even cutting edges. Sharpening stones range in abrasive levels from extra fine to coarse grit. The coarser the tool, the quicker the metal is removed from the instrument. When using a coarse stone, it is important to follow up with a fine-grit stone to produce a smooth, uniform surface along the cutting edge.8
Appropriate sharpening stone selection is crucial to obtaining an optimally sharp cutting edge while retaining the instrument’s original shape.
Diamond-coated sharpening cards are a relatively new addition to the array of manual instrument sharpening tools. They are flat, card-shaped pieces of stainless steel covered in diamond particles of a various grit: fine, medium, and coarse. Sharpening cards are easy to use, simple to clean, and do not require lubrication.
Power-driven sharpening tools provide another option However, a study comparing the quality of the cutting edges of periodontal instruments sharpened with manual techniques vs power driven devices concluded that irregular cutting edges and inferior sharpness of the blade were more common with the power-driven sharpening tools.15
Manual Techniques for Sharpening
Three methods are typically used for manual sharpening. The first involves moving a periodontal instrument over a stationary tool, the second method involves moving a sharpening tool over a stationary periodontal instrument and the third method involves moving a periodontal instrument over a stationary stone supported by a holder.9 A 2020 study compared cutting edges of sickle scalers sharpened by both the moving instrument and the moving stone techniques.16 The researchers concluded that the moving instrument technique was superior to the moving stone technique in maintaining the cutting edge. The authors also suggested that a sharper and finer cutting edge was produced by periodically incorporating the moving instrument technique into the instrument maintenance routine.
The moving instrument technique restores the cutting edge by passing an instrument against the sharpening tool that is either positioned flat on the countertop or supported by a holder. The difference between those two modifications is in the ease of visualizing the angle established between the lateral surface of the instrument and the sharpening stone.10 The technique is achieved by holding the instrument in the modified pen grasp and using the fulcrum finger as support to slide the cutting edge of the instrument against the sharpening tool. The cutting edge is adapted at 70° to 80° and sharpened in three sections. By keeping the fulcrum finger stable and pivoting the working end of the instrument, the heel, middle, and toe thirds are adapted and sharpened with a few strokes.10
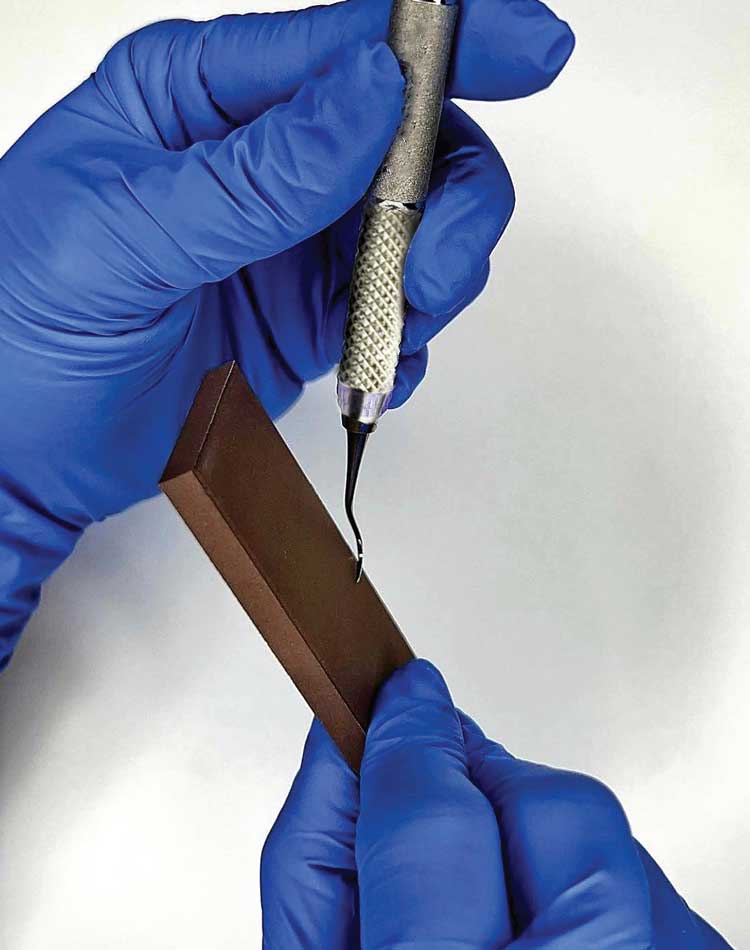
The oldest and most common manual sharpening technique involves the moving stone or a moving diamond-coated flat piece of stainless steel (Figure 4, page 18). This technique involves moving the sharpening tool over the cutting edge of a stabilized instrument. During the moving stone technique, the instrument is held vertically using a palm grasp, stabilized against the countertop, with the face of the instrument parallel to the surface of a countertop.10 The sharpening tool is angled at 70° to 80° to the face of the instrument (Figure 3). Sharpening is performed in three sections: heel, middle, and tip/toe thirds.10 Care must be taken to occasionally sharpen the toe of the universal and area-specific curets to maintain original instrument design. The ideal angulation is established by initially placing the sharpening tool at a 90° angle toward the face of the instrument and slightly changing the angle to achieve desired angulation.
Power-driven sharpeners are another option (Figure 2). Designed to perform routine sharpening of scalers and curets, power-driven sharpeners are lightweight, cordless, and small. Power-driven sharpeners have instrument guide channels and a vertical backstop to allow simple positioning for scalers and curets to help control blade angulation. The following steps are helpful when using a power-driven sharpener:
- Position the instrument in the proper channel, with the terminal shank resting on the incline of the channel.
- Hold the back of the instrument along the backstop.
- Turn on the unit and glide the instrument within the channel from side to side.
- Insert the toe of the curet into the small round window on the guide to maintain original instrument design. This step is not necessary when sharpening a sickle scaler.
Determining when to retire Instruments
Noting when to discard an instrument that is no longer safe or effective is crucial to successful instrumentation outcomes. Thinning of the blade and wear of periodontal instruments can occur due to sharpening, frequent contact with calculus deposits, and constant instrument processing methods, such as disinfection and sterilization.17 Many researchers suggest the lifespan of a curet is defined by the volume of its cutting edge. Compromised integrity of the instrument increases the risk for breakage. A reduction of the instrument’s width or length by at least 20% usually means the instrument should be retired (Figure 5).18 The number of uses, tenaciousness of deposits removed, frequency and quality of sharpening, sterilization methods, and the type of metal the instrument is made of all contribute to the wear of an instrument.
Conclusion
The ability of clinicians to identify the first signs of the dulling of the cutting edge of instruments and to perform timely maintenance will enable precise and efficient calculus removal strokes. The use of sharp instruments aids in the production of a smooth surface, improving tissue response. Frequent evaluation of the cutting edge for sharpness, selection of proper armamentarium, and perfection of instrument sharpening techniques are critical to the success of hand instrumentation, reduction of operator fatigue and appointment time, and increased patient comfort. Understanding how frequent use, excessive sharpening, and sterilization methods affect the integrity of the instrument will guide decision-making on when to replace hand instruments.
References
- Baghizadeh Fini M. What dentists need to know about COVID-19. Oral Oncol. 2020;105:104741.
- Zafar MS. Comparing the effects of manual and ultrasonic instrumentation on root surface mechanical properties. Eur J Dent. 2016;10:517–521.
- Krishna R, De Stefano JA. Ultrasonic vs. hand instrumentation in periodontal therapy: clinical outcomes. Periodontol 2000. 2016;71:113–127.
- Johnston W, Paterson M, Piela K, et al. The systemic inflammatory response following hand instrumentation versus ultrasonic instrumentation—a randomized controlled trial. J Clin Periodontol. 2009;36:132–141.
- Whiteley J. A helping hand: some tips on hand scaling. Available at: dentistryiq.com/dental-hygiene/clinical-hygiene/article/14178446/some-tips-on-hand-scaling-during-covid19-for-dental-hygienists. Accessed January 19, 2022.
- Smith D. Remembering your roots. Dimensions of Dental Hygiene. 2021;19(9):18–23.
- Boyd LD, Mallonee LF, Wyche CJ, Halaris JF. Wilkins’ Clinical Practice of the Dental Hygienist. 13th ed. Burlington, Massachusetts: Jones & Bartlett Learning; 2021.
- Hessheimer HM, Payne JB, Shaw LE, Spanyers EM, Beatty MW. A comparison of efficiency and material wear of diamond-plated versus ceramic sharpening stones. J Dent Hyg. 2017;91:64–67.
- Di Fiore A, Mazzoleni S, Fantin F, Favero L, De Francesco M, Stellini E. Evaluation of three different manual techniques of sharpening curettes through a scanning electron microscope: a randomized controlled experimental study. Int J Dent Hyg. 2015;13:145–150.
- Gehrig JS. Fundamentals of Periodontal Instrumentation and Advanced Root Instrumentation. 8th ed. Burlington, Massachusetts: Jones & Bartlett Publishers; 2020.
- Scaramucci M. Hone your sharpening technique. Dimensions of Dental Hygiene. 2014;12(2):32–33.
- Darby M, Walsh M. Dental Hygiene Theory and Practice. 4th ed. St Louis: Saunders; 2015.
- Scaramucci M. Strategies for effective instrument sharpening. Dimensions of Dental Hygiene. 2017;15(9):54.
- Andrade Acevedo RA, Sampaio JEC, Shibli JA. Scanning electron microscope assessment of several resharpening techniques on the cutting edges of gracey curettes. J Contemp Dent Pract. 2007;7:70–077.
- Nahass HEL, Madkour GG. Evaluation of different resharpening techniques on the working edges of periodontal scalers: a scanning electron microscopic study. Life Science Journal. 2013;10(1):589–593.
- Komara I, Susanto A , Setiapribadi IM, Bawono CA. Analysis of manual sharpening method towards the cutting edge index of sickle scaler instrument. Indian Journal of Forensic Medicine & Toxicology. 2020;14(4):2949–2954.
- De Pedro D, Puglisi R, Levi P, Pascual A, Nart J. In vitro evaluation of the effect of chemical and thermal stress of the mechanical properties of periodontal curettes under simulated conditions of sharpening wear. Oral Health Prev Dent. 2017;15:379–384.
- Moses O, Tal H, Artzi Z, Sperling A, Zohar R, Nemcovsky CE. Scanning electron microscope evaluation of two methods of resharpening periodontal curets: A comparative study. J Periodontol. 2003;74:1032–1037.
From Dimensions of Dental Hygiene. February 2022;20(2):16-18,21.

