Instrumenting Periodontally Involved Anterior Teeth
Correct instrument selection and effective technique are key to successful debridement of these challenging areas.
Visualizing the root with the use of a dental endoscope provides the best approach to achieving definitive root debridement. When a dental endoscope is not an option, a closed root planing procedure using the latest periodontal instrument designs, such as mini–bladed extended shank or micro mini Gracey curets, provides access to the base of deep, narrow anterior pockets.2 Once access to the pocket depth is achieved, proper adaptation of the blade and correct stroke activation with firm lateral pressure make the removal of embedded calculus possible. Elimination of calculus and plaque biofilm is necessary to bring pockets back to a normal range of health. A pocket depth of 1 mm to 3 mm is preferred, although a 4 mm pocket may be acceptable if bleeding is not present within the sulcus or around marginal tissue upon probing.3
EXPLORATION
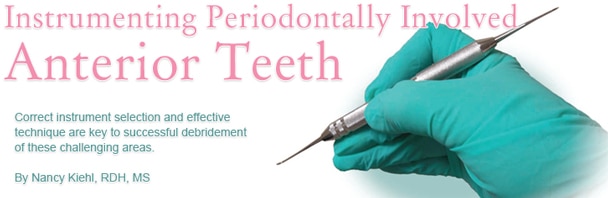
When relying on tactile sense, using an explorer that can navigate the length and circumference of deep narrow anterior pockets is crucial. While exploring, reaching the epithelial attachment is essential to accessing the entire root surface. The use of light, overlapping strokes while paying attention to vibrations as the tip of the explorer is rotated will help identify calculus deposits. Explorers best suited for anterior pockets include the 11/12 and 3A designs. The ODU 11/12 is best used in more shallow pockets, while pockets deeper than 4 mm should be accessed with an extended shank 11/12 or a 3A explorer. Incorporating multiple strokes (vertical, horizontal, toe down, and oblique) enables the clinician to explore every square millimeter of the root surface (Figure 1).
Dental endoscopy has shown that a smooth root surface felt with an explorer is not necessarily calculus–free. Flat veneer or embedded calculus—as well as calculus in the CEJ, depressions, and grooves, or on crown and restorative margins—can be virtually undetectable with an explorer. As such, during a closed procedure, the surface should be instrumented until smooth when felt with an explorer and then instrumented again with additional strokes to remove any undetectable deposits. In my opinion, while this return to traditional root planing may remove unnecessary root structure, it is the only way to thoroughly instrument the root surface in the absence of a dental endoscope. With an endoscope, the clinician can see when the calculus has been removed and thus knows when to stop instrumenting. If using an endoscope is not possible, instrumenting beyond smooth or reevaluating initial debridement and then rescaling any pocket with residual depth and bleeding is a thorough approach.
INSTRUMENT SELECTION, GRASP, AND ACTIVATION
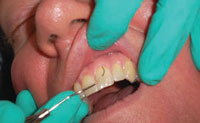
When considering instrument selection, remember that the width of an anterior tooth tapers as the pocket deepens toward the apex. An instrument that extends the length of a narrowing pocket without snagging tissue laterally is the best choice. Mini–bladed or micro mini–bladed Gracey curets, with 50% to 70% shorter, thinner working ends compared to traditional curets, are excellent choices for root planing anterior teeth. A 1/2, 5/6, or 13/14 mini or micro mini Gracey curet can be used. A Gracey Curvette Sub–0 is also an excellent choice. When selecting an instrument with a straight shank, fulcrum next to the tooth being instrumented. When using an instrument with a curved or bent shank, such as a 13/14, the fulcrum may be several teeth away from the tooth being instrumented (Figure 2). Fulcruming firmly on the ring finger with pressure equal to what is applied during the lateral stroke is critical to maintaining control and avoiding slipping on the fulcrum. Fulcrum pressure that equals lateral pressure creates safe, powerful working strokes.4
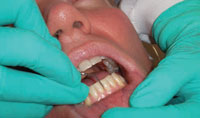
Establish a tripod grasp on the instrument with the shank or handle resting on the side of the middle finger next to the fingernail5 (Figure 3). Obtain a firm fulcrum, accommodating the type of instrument being used. Stroke activation is a side–to–side wrist motion with a slightly pinching finger pull at the end of each stroke to keep the blade from closing down and possibly burnishing calculus. Use smaller, more powerful strokes for calculus removal and finish with lighter, longer strokes to smooth the root surface. Lastly, files or ultrasonic instruments can be used to remove tiny embedded pieces of calculus.6 If ultrasonic instruments are used initially for larger deposit removal, adequate power—medium to high on initial ultrasonic instrumentation—must be used to prevent burnishing of calculus. When exploring reveals a smooth root surface, use the ultrasonic instrument again on medium power, making sure the entire root surface is covered so the remains of undetectable, embedded calculus are removed. The clinician can switch to hand instruments after the bulk of the calculus is removed to enhance the tactile sensitivity needed to detect and dislodge any remaining residual calculus.
LINGUAL OF MAXILLARY ANTERIOR TEETH
For many clinicians, the lingual surfaces of maxillary anterior teeth are particularly challenging areas to access. Because of this difficulty, subgingival calculus can be missed during routine dental hygiene care, resulting in increased pocket depth and bone loss. Appropriate patient positioning is helpful when attempting to reach this area of the mouth. Place the patient in supine or trendelenburg position where he or she is looking at the ceiling. Then ask the patient to tip his or her head back and tilt the chin away from the chest (Figure 4). When the clinician is sitting in a 1 o’clock to 3 o’clock position, this patient position essentially turns the maxilla into a mandible—providing better access to maxillary lingual areas. The clinician can then fulcrum on the maxillary incisal edges.

LOCAL ANESTHESIA
When viewing a pocket with the dental endoscope, the presence of a meshing of calculus is revealed within the tissue at the pocket base. It is, therefore, essential that clinicians instrument to the base of pockets during root debridement, which will, most likely, require the use of local anesthesia to ensure patient comfort. If local anesthesia administration is not permitted in the state practice act, then an intrapocket topical anesthetic should be applied or the dentist should be asked to administer local anesthesia.
RESIDUAL POCKETING
Attachment loss may be caused by other factors besides plaque biofilm or calculus laden with plaque biofilm. Root fracture is one possibility. During periodontal charting, there are times when the probe is walked around the circumference of a tooth that has seemingly healthy periodontium, and then suddenly the probe drops down until the marginal tissue is resting against the 6 mm to 9 mm mark. A fracture should be suspected in this situation and steps should be taken to verify the diagnosis. A radiograph, endoscopic view of the subgingival root surface, if available, and questioning the patient about symptoms will help determine the cause. In the case of root fractures, periodontal debridement is contraindicated and the tooth should be extracted.
A persistent periodontal pocket that bleeds on probing needs to be evaluated for probable causes, which may include residual subgingival calculus, root fractures, enamel projections, internal or external root resorption, or root caries. Viewing the problem area with a dental endoscope is extremely helpful in diagnosis, otherwise tactile exploration, radiography, reevaluation, and, when absolutely necessary, exploratory surgery can definitively diagnose the reason for continued pocketing.
While using a dental endoscope is the most effective way to instrument difficult–to–reach anterior pockets, closed periodontal debridement can be successful. Clinicians need to ensure they are using the correct instruments and appropriate technique to help restore these sites back to health.
REFERENCES
- Hodges K. Revisiting instrumentation in anterior segments.Dimensions of Dental Hygiene. 2007;5(2):30—33.
- Pattison AM, Matsuda SA. Mini–bladed gracey curets.Dimensions of Dental Hygiene..2006;4(2):28—30.
- Checchi L, Montevecchi M, Checchi V, Zappulla F. The relationship between bleeding on probing and subgingival deposits. An endoscopical evaluation. Open Dent J.. 2009;28:154—160.
- Pattison AM, Pattison GL. Periodontal Instrumentation. 2nd ed. Norwalk, Conn: Appleton and Lange; 1992.
- Pattison AM. Improve your grasp Dimension of Dental Hygiene.2011;9(12):62
- Hodges K. Using files in periodontal therapy. Dimensions of Dental Hygiene..2004;2(11):16—20.
From Dimensions of Dental Hygiene. November 2012; 10(11): 26, 28–29.
