Hone Your Sharpening Technique
Technique, routine, workstation setup, and maintenance are all integral parts of an effective sharpening regimen.

Maintaining sharp instruments provides innumerable benefits to clinicians. By using optimally sharpened instruments, dental hygienists experience less fatigue, improve their ability to remove calculus, and increase the instruments’ tactile sensitivity. The pain sometimes felt by patients during instrumentation is also reduced when sharp instruments are used. Clinicians will need to use less pressure during scaling and root planing, which improves their control of the instrument and reduces the risk of root surface injury. Sharp instruments are better able to fracture calculus, decreasing the likelihood that deposits will become burnished. Dull instruments, in comparison, necessitate a tight operator grasp and the need to apply more lateral pressure to the tooth surface, increasing patient discomfort.1
SHARPENING TECHNIQUE
The desired outcome of sharpening is to remove the least amount of metal from the blade while regenerating its ?ne cutting edge and maintaining the instrument’s original shape.2 This can be achieved through the use of proper sharpening technique.
Maintenance of the instrument’s original shape is equally important as the generation of a sharp edge. Instrument manufacturers invest much thought and care into the designs of their instruments to ensure they are effective and safe. Changing the instrument’s shape can lead to reduced efficacy of treatment and discomfort for the patient.
The grinding of a coarse stone against the instrument to sharpen its edge is the cornerstone of sharpening technique. Clinicians can either grind the face of the working end or the lateral sides of the working end. Reducing the face of the blade, however, results in a compromised instrument that may break more easily.3–6 Grinding the lateral sides of the working end supports the overall strength of the instrument and ensures its viability.7
SHARPENING ROUTINE
Instruments should be sharpened before every debridement procedure and when an instrument becomes dull during treatment. Factors to consider when deciding on the timing of instrument sharpening include the number of patients on the day’s schedule, frequency of use, the degree of case difficulty, and the type of procedure being conducted.
The ?ne, sharp edge of hand instruments become dull with use. A slightly rounded cutting edge occurs after as few as 15 strokes, and 45 strokes create a very round cutting edge.3,8 In order to maintain instrument efficacy, sharpening should begin at the ?rst sign of dullness.9–11
Manufacturers have created instruments that maintain their sharpness for extended periods. The use of stainless steel alloys and heat treatment processes create instrument blades that maintain their sharpness for up to 4 months. Instruments with diamond-coating never need sharpening, but they are available in only a few designs and are costly. Power sharpening tools are also available to help clinicians with the sharpening process, as are guides that support sharpening efficacy. In addition, there are companies that will sharpen dental instruments for a fee or as part of an instrumenting-buying program, with some even offering same-day service. This article, however, will focus on the traditional handheld stone technique.
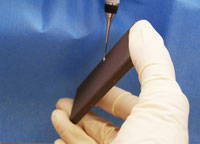
FIGURE 3A. The stone can be grasped by the dominant hand at either end with the thumb on top and fingers on the bottom.
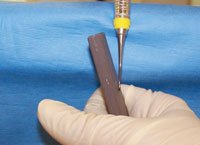
FIGURE 3B. The stone may also be held from the bottom with a palm grasp.
WORKSTATION
A sharpening workstation should include a ?rm countertop on which to sharpen and a light source. Though a magnifying glass or loupes are helpful in observing wire edges, they are not necessary. The required tools include: a ?ne stone, medium to coarse stone, and conical stone; a plastic test stick to evaluate instrument sharpness; gauze for wire edge removal; and lubricant or water (Figure 1). Personal protective equipment, including eye protection, mask, and examination gloves, should also be worn.
Instruments should be sharpened once sterilization is complete, and prior to the start of the appointment. All sharpening supplies must be sterile when sharpening is conducted during the provision of care. As such, the use of a stone that requires oil lubricant is not appropriate because oil cannot be sterilized.7 Sharpening stones are available that do not need oil/water lubrication. In addition, stones are available with two grades of coarseness in one stone.
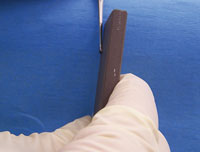
FIGURE 4A. The stone should be positioned on the lateral side of the instrument.
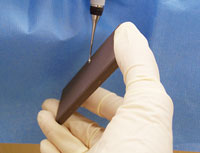
FIGURE 4B. The stone should be moved from the 90° position to the 110° (or 1 o’clock) position when held on the right side.
The oldest and most accurate method for instrument sharpening is the handheld, moving stone/stationary instrument technique.5 This technique allows the clinician to see the shape of the blade from heel to toe, thereby maintaining the contour of the instrument while sharpening the cutting edge. The general technique is as follows:
- Choose the appropriate stone for the degree of dullness. Lubricate the stone based on the manufacturer’s suggestions.
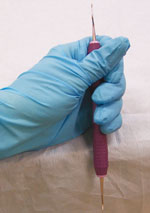
- Hold the instrument firmly against a stable surface, such as a countertop (Figure 2). The toe of the instrument should be pointed toward the clinician, and held low enough so the contour of the instrument can be seen.
- Hold the stone in the dominant hand by grasping it at either end with the thumb on top and ?ngers on the bottom, or a palm grasp near the bottom (Figure 3A and Figure 3B).
- Position the stone on the lateral side of the instrument, near the heel of the working end at a 90° angle (or 12 o’clock position) to the face of the blade (Figure 4A). Move the stone from the 90° position to the 110° position (or 1 o’clock for right and 11 o’clock for left, Figure 4B).
- Start the sharpening motion on a down stroke, positioning the stone down and up while maintaining the 110° angulation (or 1 o’clock for right and 11 o’clock for left). The downstroke should consist of ?rm pressure, whereas the upstroke should be light.
- Continue this down/up motion, following the contour of the cutting edge until the junction of the toe and cutting edge is reached (Figure 5). Stop the sharpening procedure on a down stroke to reduce the chance of creating wire edges above the face of the blade.
- Reposition the stone on the lateral side of the opposite cutting edge of the instrument, near the heel at a 90° angle. Repeat steps two through six on the opposite cutting edge.
- Throughout the sharpening process, look for wire edges below the face of the blade. Their appearance indicates that the correct stone-to-cutting-edge angle is being maintained.12 Use gauze to wipe the wire edges from the instrument.
- Evaluate the instrument for sharpness using a plastic test stick. Position the heel of the cutting edge against the test stick and press the instrument into it (Figure 6). Listen for a pinging sound while rolling the cutting edge to the toe. Testing for sharpness by scaling the test stick is not reliable, as a dull instrument will create plastic shavings.
- The entire procedure should include a multiple stroke sequence. The down/up movement of the stone should be 1?2 inch to 1 inch in length.13
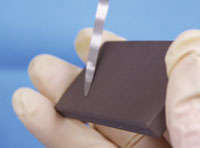
FIGURE 5. Once the junction of the toe and cutting edge is reached, the down/up motion should cease.
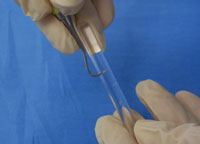
FIGURE 6. To evaluate sharpness, position the heel of the cutting edge against the test stick and press the instrument into it. Then listen for a pinging sound while rolling the cutting edge to the toe.
CONCLUSION
Instrument sharpening maintains the usefulness of instruments, enabling them to effectively remove deposits. Ideally, sharpening should be performed at the ?rst sign of dullness. Clinicians must be prepared to sharpen instruments during the provision of care by keeping a sterile stone and test stick available. By adhering to proper technique and preparing appropriately before each appointment, instrument sharpening can be completed quickly and efficiently.
REFERENCES
- Pattison AM, Pattison GL. Periodontal Instrumentation. 2nd ed. East Norwalk, Conn: Appleton & Lange; 1992.
- Smith BA, Setter MS, Caffesse RG, Bye FL. The effect of sharpening stones upon curet surface roughness. Quintessence Int. 1987;18:603–613.
- Balevi B. Engineering specifics of the periodontal curet’s cutting edge. J Periodontol. 1996;67:374–378.
- Huang CC, Tseng CC. Effect of different sharpening stones on periodontal curettes evaluated by scanning electron microscopy. J Formos Med Assoc. 1991;90:782–787.
- Marquam BJ. Strategies to improve instrument sharpening. Dental Hyg (Chic). 1988;62:334–338.
- Paquette OE, Levin MP. The sharpening of scaling instruments: II. A preferred technique. J Periodontology. 1977;48:169-172.
- Nield-Gehrig JS. Fundamentals of Periodontal Instrumentation and Advanced Root Instrumentation. 5th ed. Philadelphia: Lippincott Williams & Wilkins; 2000.
- Green E. Sharpening Curets and Sickle Scalers. 2nd ed. Berkeley, Calif: Praxis; 1972.
- Wilkins EM. Clinical Practice of the Dental Hygienist. 9th ed. Philadelphia: Lippincott Williams & Wilkins; 2005.
- Woodall IR. Comprehensive Dental Hygiene Care. 4th ed. St Louis: Mosby; 1993.
- Zimmer SE. Instrument sharpening—sickle scalers and curettes. Dental Hygiene (Chic). 1978;52:21–24.
- Parkes RB, Kolstad RA. Effects of sterilization on periodontal instruments. J Periodontol. 1982;53:434–438.
- Daniel SJ, Harfst SA, Wilder RS. Mosby’s Dental Hygiene Concepts, Cases and Competencies. 2nd ed. St. Louis: Mosby; 2008.
From Dimensions of Dental Hygiene. February 2014;12(2):30,32–33.
![]()
