 HAMBURGUESACONQUESO/ ISTOCK/ THINKSTOCK
An Alternative Approach With the Gracey 7/8 Curet
When used with appropriate fulcrum placement, this instrument can improve access to pocket depths and proximal surfaces.
Debridement and root planing are integral to the complete removal of contaminants, such as toxins and embedded calculus, from the root surfaces in periodontal pockets.1,2 Gracey curets are key to the process of instrumenting a tooth surface to completion in order to achieve tissue health.2–4 While Gracey curets were designed for root planing in specific areas of the mouth, they can be used in ways other than those originally intended. Using appropriate intraoral and extraoral fulcrum placements in conjunction with ideal instrument selection are essential to advanced periodontal instrumentation.
Extraoral, opposite, and cross-arch fulcrums are necessary in advanced periodontal instrumentation. An extended modified pen grasp is required to reach the base of deep periodontal pockets or difficult-to-access areas in the mouth. Extending the grasp farther away from the working end facilitates proper working angulation and adaptation, while increasing leverage for complex cases. Intraoral and same-arch fulcrums are used mostly for instrumenting shallow pockets. Intraoral rests are most stable and powerful when fingers stay close together and near the working end; however, limitations arise when trying to access deep periodontal pockets with proper working angulation. Upon activation of the instrument, a short arc of movement occurs in which the hand is rocking, as the working end cannot reach the sulcus, the blade angulation closes, and the instrument is pulled to the margin.4,5
CHARACTERISTICS OF THE GRACEY 7/8 CURET
The Gracey 7/8 curet is an area-specific curet that has a straight shank with an angle or bend. Its primary function is to remove soft and hard deposits along the buccal and lingual surfaces of the posterior teeth for patients with slight to severe periodontitis.6
The Gracey 7/8 is often overlooked because clinicians frequently use the Gracey 1/2 or 5/6 curet, as they are designed to instrument all surfaces of anterior teeth using a same-arch fulcrum. Many clinicians are unaware that a Gracey 7/8 curet can be implemented on all surfaces of the posterior teeth, as well as anterior teeth. It executes well from the lingual aspect of the proximal surfaces. With a deeper bend at the shank than the Gracey 1/2 or 5/6, the Gracey 7/8 curet allows better access to the base of the pocket or proximal surface with all types of directional strokes.
Experienced clinicians can debride and root plane with any Gracey curet (standard, extended, mini-bladed, and micro-mini-bladed) in all areas of the mouth by adjusting positions.6 Gracey curets have regular shanks for light calculus and rigid or extra-rigid shanks for moderate to heavy calculus removal.
TECHNIQUE
Proper technique is integral to achieving successful outcomes. Following are examples of techniques used with Gracey 7/8 curets for right-handed clinicians.
1. Mesial and distal surfaces for posterior teeth
Recommended Instrument: standard, extended, mini-bladed, or micro-mini-bladed 7/8 Gracey curet
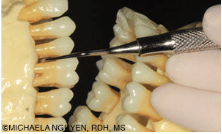
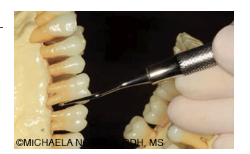
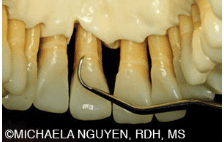
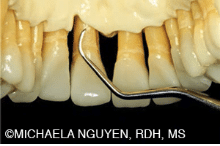
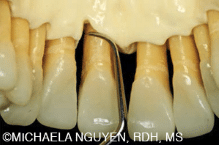
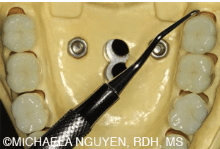
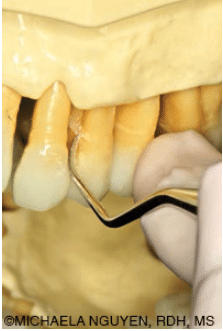
All types of rigid or extra-rigid Gracey 7/8 curets should be used for the mesial and distal surfaces with oblique and/or vertical strokes to remove sheets or rings of calculus. When a straight shank is applied on the mesial or distal surface of posterior teeth, stroke pressure is increased without exerting extra pressure from the hand (Figure 1 and Figure 2). An angled shank, such as the Gracey 11/12 and 13/14, may adapt well to the mesial and distal surfaces; however, power is dissipated as the shank becomes more angled. The Gracey 7/8 performs especially well from the lingual aspect, because the angle of the terminal shank is positioned farther away from the contact, allowing the blade to enter at a more proximal angle without the shank hitting the contact (Figure 3). As long as the lower shank remains parallel to the tooth surface being scaled, proper angulation is maintained with a Gracey curet blade because it is off-set with 60° to 70° angle to the lower shank.
Recommended Technique: Upper right posterior molars-palatal aspect
When using any of the Gracey 7/8 curets, an extraoral fulcrum is necessary to reach the base of a periodontal pocket for all surfaces of the teeth in the maxillary arch. The right-handed clinician’s position is at 9 o’clock, with the back of the hands and fingers resting on the side of the patient’s mandible, using an extended modified pen grasp. This palm-up hand rest will allow a Gracey 7/8 curet to align the lower shank parallel to the mesial or distal surface in coordination with the lateral pressure applied by the thumb or middle finger by raising or lowering the whole hand against the side of the mandible. This fulcrum placement will also permit access and visibility to the posterior teeth, while maintaining correct blade angulation and adaptation with neutral wrist position.5 The stroke activation is a combination of a slight pulling of the finger and the hand. This will keep the blade angulation on the same plane throughout the stroke from the base of the pocket to the contact. The Gracey 7/8 curet can effectively instrument any mesial or distal surface of the posterior teeth, depending on the patient’s range of mouth opening and how far posteriorly the clinician can fulcrum against the side of mandible.
Establishing an intraoral, same-arch fulcrum in the posterior teeth may not be the best approach with a Gracey 7/8 curet or any straight-shanked instrument. Many clinicians may feel stable only when instrumenting with a same-arch fulcrum; however, limitations in gaining access, correct angulation, and effective working strokes exist. Instead of pull strokes, hand rocking is activated and will eventually close the angulation beyond the 2 mm to 3 mm of strokes, resulting in burnished calculus. For this reason, intraoral fulcrums are only appropriate for supragingival and shallow subgingival root planing in the maxillary arch.5
2. Deep periodontal pockets in the mandibular and maxillary anterior teeth
Recommended Instruments: standard or extended 7/8 Gracey curet followed with mini-bladed or micro-mini-bladed Gracey 7/8 curet
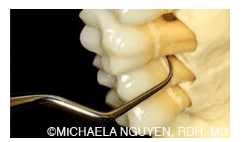
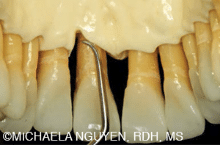
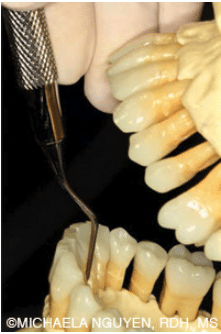
As previously discussed, the angle on the Gracey 7/8 curet is more bent than the standard or extended blade of a Gracey curet, so it can reach farther into the base of a deep periodontal pocket than a Gracey 1/2 or 5/6 curet (Figure 4 and Figure 5).
The straight shank provides added power against the tooth surface being scaled. For vertical strokes, a mini- or micro-mini-bladed Gracey is better adapted into the sulcus. The short, small blade of mini-bladed instruments fits easily into the topography of a periodontal pocket without distending the tissue and/or causing minimal trauma (Figure 6 and Figure 7). Unlike the standard or extended Gracey curet blade, the short blade length on a mini- or micro-mini-bladed Gracey curet cannot reach the base of the pocket using horizontal strokes. Instead, oblique or vertical strokes should be applied.
Recommended Technique: facial and lingual surfaces of the maxillary anterior teeth
Begin by positioning the patient in a supine position with the chin raised toward the ceiling. Sit at approximately the 1 o’clock position with the fulcrum on the same arch. The clinician’s sitting position must be adjusted so the wrist is straight and not strained. With a palm-up fulcrum, the pad of the fulcrum finger should rest on the incisal edge, just to the right of the area being scaled. If the fulcrum finger was to rest on the facial surfaces, the handle would be obstructed by the incisal edge, thereby preventing the working end from reaching the base of the pocket. In addition, fulcrum stability is decreased, generating less control and power when a stroke is activated.
Use horizontal strokes by pointing the toe of the blade toward the apex of the tooth. At the gingival margin, initiate short, incremental strokes toward the apex to break up the calculus. Finger-pull hand activation is necessary for control in these tight areas, especially as the topography of the periodontal pocket varies or becomes narrow.
For complete coverage, follow multidirectional strokes with vertical strokes. For surfaces away from the clinician, start at the midline of the tooth and roll the toe into the proximal surfaces with a finger-pull stroke. Then move to the 8 o’clock position and fulcrum with the same arch and palm-down finger rest to instrument the surfaces toward the clinician to complete the entire tooth surface.
Recommended Technique: proximal surfaces of the mandibular anterior teeth-lingual approach
To achieve greater extension to the sulcus with better leverage, an opposite-arch fulcrum is highly recommended. Position around 1 o’clock and bring the patient at semi-supine to a supine position with the patient’s mandible almost parallel to the floor. Fulcrum intraorally by placing the pad of the finger on the incisal edge above the area being scaled. This will anchor and secure the fulcrum and instrument from slipping when pulling up on the calculus or against the tooth surface. An intraoral and opposite fulcrum will efficiently assist in removing tenacious, moderate to heavy calculus in pockets greater than 5 mm from either surface, all from the back position. Use the thumb or middle finger for lateral pressure and activate overlapping, finger-pull strokes from the apex to the contact of the tooth (Figure 8).
3. Terminal distal and distal line angle surfaces of the posterior teeth
Recommended Instrument: standard or extended Gracey 7/8 curet
Access to the base of a deep pocket with horizontal or oblique strokes is made possible by the long blade and deep bend of a standard or extended Gracey 7/8 curet blade. The terminal shank is oblique to the handle, so reaching the base of the pocket requires less raising of the handle to drop the toe into the sulcus compared to the Gracey 1/2 or 5/6 curets. Firm, controlled strokes are easily applied against the tooth.
Recommended Technique: mandibular distal and distal line angles of the lower left posterior teeth-lingual approach
The patient is in a semisupine position with the mandible slightly parallel to the floor. The clinician is positioned at 8 o’clock. The fulcrum is cross-arch, opposite side of the area being scaled (Figure 9). Position the handle so it is perpendicular to the long axis of the tooth and parallel to the tooth surface.7 The toe is pointed toward the apex of the tooth. Begin as proximal to the distal line angle as possible and progress anteriorly with short, 1 mm to 2 mm controlled horizontal strokes to break the calculus around the line angle. The clinician must be careful to avoid lacerating the tissue near the line angle.

Fulcrum with a palm-down finger rest on the incisal or occlusal surface, rather than the facial surfaces. Clinicians often fulcrum on the direct facial surface to gain resistance when activating strokes. This is not advantageous because the fulcrum placement is lower than the occlusal plane, so the handle can teeter off the incisal edges or occlusal surfaces of the tooth and inhibit the handle and working end from advancing subgingivally. As the curet is advanced forward, change fulcrums following the tangent of the surface.
4. Surfaces with deep and narrow periodontal pockets, depressions, and concavities
Recommended Instrument: standard Gracey 7/8 curet, followed with mini- or micro-mini-bladed 7/8 curet
Eliminating soft and hard deposits from the varying tooth morphology and topography of a periodontal pocket is challenging; however, it is achievable with the right instruments and technique. If tissue is loose, a standard Gracey 7/8 curet is an exceptional instrument to adapt in a narrow pocket, depression, or concavity when the toe is pointed toward the apex.
Before the innovation of mini- and micro-mini-bladed instruments, standard Gracey curets were used horizontally because the blades on other instruments were either too large or too long to accommodate the blade vertically into a narrow deep pocket and adapt to the curvatures of the tooth. Because the blades of mini- and micro-mini-bladed Gracey curets are half the length and smaller in size than standard Gracey curets, they can adapt in these confined areas with vertical strokes.
Recommended Technique: mesial surfaces of the upper left posterior teeth
Begin by positioning the patient supine and turning his or her head slightly toward the clinician. Sit at the 8 o’clock to 9 o’clock position and start with a same-arch, intraoral finger rest on the buccal surface of the tooth to the right of the mesial surface being instrumented.

Choke up on the instrument closely on the handle so the lower shank is completely parallel to the mesial surface from the facial aspect (Figure 10).
Slowly scale from the margin to the apex with very short, overlapping, horizontal strokes. Activate with a finger-flexing motion for controlled strokes and follow the morphology by adjusting the anterior third of the toe to the tangent of the surface in the depression, concavity, or narrow pocket.
Lastly, complete cross-hatching strokes using a mini- or micro-mini-bladed Gracey curet, following with vertical strokes with an extraoral, palm-down, opposite-arch fulcrum (Figure 11). Insert the blade from the base of the pocket and instrument to the margin with incremental strokes along the contours of the tooth.
CONCLUSION
Proper clinician position and instrument selection accompanied by appropriate alternative fulcrums are critical for optimizing technique and achieving successful outcomes. The techniques discussed above are applicable to similar instruments and can be applied to all areas of the mouth.
REFERENCES
- Glossary of Periodontal Terms. 4th ed. Chicago: American Academy of Periodontology; 2001.
- Hodges KO. Decision making related to nonsurgical periodontal therapy. In: Dental Hygiene: Theory and Practice. 4th ed. St. Louis: Saunders/Elsevier; 2015.
- Deas DE, Moritz AJ, Sagun Jr. RS, Gruwell SF, Powell CA. Scaling and root planing vs. conservative surgery in the treatment of chronic periodontitis. Periodontol 2000. 2016;71:128–139.
- Sumi J, Nguyen M. Hand-activated instrumentation. In: Dental Hygiene: Theory and Practice. 4th ed. St. Louis: Saunders/Elsevier; 2015.
- Pattison AM. Extraoral fulcrums. Dimensions of Dental Hygiene. 2004;2(10):20–23.
- Pattison AM, Pattison G. Scaling and root planing. Carranza’s Clinical Periodontology. 12th ed. St. Louis.: Saunders/Elsevier; 2015.
- Nguyen M. A closer look at the 13/14 Gracey curet. Dimensions of Hygiene. 2015;13(9):24–30.
From Dimensions of Dental Hygiene. November 2016;14(11):18–20,22–23.
