
Focusing On the Image
How to produce error-free radiographic images for the pediatric patient.
Panoramic radiographs are often recommended for assessing growth and development of the pediatric patient and for evaluation of developing third molars during adolescence.1-3 While the panoramic technique seems relatively straight forward, producing a diagnostic quality image of the pediatric patient requires a mastery of technical skill.4 Modern panoramic x-ray equipment is designed for ease of use, yet studies continue to demonstrate a high incidence of errors.5-7 Positioning errors may occur at an even higher rate in pediatric panoramic radiographs.7 The goal of the dental hygienist is to maximize the use of panoramic imagery in the assessment of the pediatric patient, while minimizing the occurrence of retakes that result from radiographic error.
Producing A Quality Panoramic Image
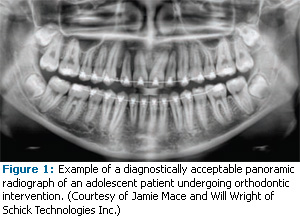
A quality panoramic radiograph should image all of the teeth, erupted and unerupted, in both the maxillary and mandibular arches from condyle to condyle in the horizontal dimension, and from the superior third of the orbit in the superior region to the inferior border of the mandible in the inferior region.8,9 The arches should appear straight or slightly Ushaped with the occlusal plane parallel to the horizontal edges of the film (Figure 1). The anterior teeth must not be magnified or diminished in size and overlapping of adjacent posterior teeth should be kept to a minimum.
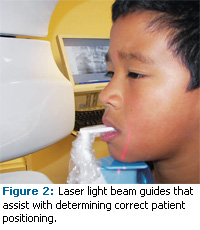
The most important component in producing a diagnostically acceptable panoramic image is the patient positioning. All panoramic x-ray machines have guidelines to assist with positioning the dental arches within the three dimensions of the focal trough, an area where the anatomical structures will be imaged in relative clarity. Most panoramic x-ray machines have a bite block to indicate the correct anterior-posterior position or how far forward or back the patient should be positioned, side positioner guides for determining the correct lateral alignment, and a chin rest to correctly locate the superior-inferior dimension or how far up or down the chin should be positioned.4,10 Panoramic x-ray machines are available with a mirror and laser light beam guide that shines on the patient’s face to illustrate various anatomical planes (Figure 2). Incorrectly positioning the patient in any of these three dimensions will produce unique and distinct radiographic image errors (Table 1).
Anterior-Posterior Positioning Error
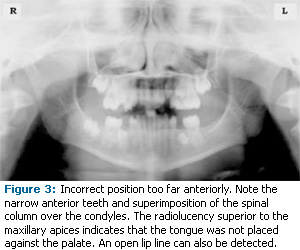
When the arches are positioned incorrectly in the anterior-posterior direction, distortion or ghosting of the anterior anatomy occurs. Unerupted teeth in the anterior region may not be imaged on the radiograph if positioned outside of the focal trough. It is important to note that an error of only 3 mm to 4 mm in either direction will result in a significantly compromised image.11 When the arches are positioned too far anterior, the anterior teeth will appear narrow and diminished in size. The vertebrae of the spinal column may be superimposed over the condyles at the edges of the film and, depending on the size of the child, may be superimposed over the rami of the mandible blocking a clear view of the posterior teeth (Figure 3). When the arches are positioned too far posteriorly, the anterior teeth will appear broad or widened. If the position is excessively posterior, anterior teeth may be completely blurred from the image and the condyles may be cut off from the edges of the film.
To avoid these imaging errors, the anterior teeth must occlude edge-to-edge onto the designated area of the bite block. Achieving this position is easily compromised during exfoliation of primary teeth, making precise occlusion difficult when one tooth or multiple teeth are missing or partially erupted. A cotton roll may be attached to the bite block to fill in the space created by the missing tooth or teeth. Additionally, an adjustment may be necessary when using a laser light beam guide. The manufacturer’s instructions for directing the laser light beam at a predetermined tooth or interproximal space usually apply to adult patients. These instructions may need to be modified for the pediatric patient with primary or mixed dentition.
Lateral Left-Right Positioning Error
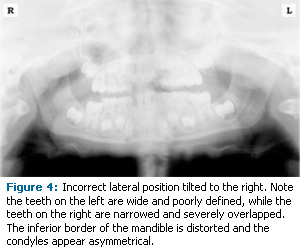
When the arches are positioned incorrectly in the lateral left-right dimension, the posterior teeth on one side will appear broad or widened, while the teeth on the other side will appear narrowed or diminished in width and severely overlapped (Figure 4). This image distortion is similar to that which occurs with an incorrect anterior-posterior position. When the arches are rotated or tilted, the posterior teeth on one side move out of the focal trough to a position further away (back) from the image receptor, while the opposite side simultaneously moves closer (forward) to the image receptor. Depending on the severity of rotation or tilting, the inferior border of the mandible will appear distorted and the condyles and rami will appear asymmetrical.
To avoid imaging errors that result from incorrect lateral positioning, the midsagittal plane must be positioned perpendicular to the floor. Most panoramic x-ray machines have a head positioner and/or laser light beam guide, along with a mirror, to assist in determining the correct lateral head position. The pediatric patient may need additional instructions to maintain the correct position throughout the exposure.
Movement of the tube head during exposure may pique the pediatric patient’s curiosity, causing the head to rotate as the eyes follow the movement of the tube head. A vertical line decal affixed to the mirror can serve as a visual aid and a focus point. An eye-catching sticker, such as those purchased from a craft store, can be adhered to the mirror in a position that aligns with the midsagittal plane. The patient can be directed to position the head so that the sticker appears at the tip of the nose and to maintain focus on this reflection throughout the exposure. Pediatric patients may find looking at themselves in the mirror entertaining and a fun way to participate in the process.9
Superior-Inferior (Updtown) Positioning Error
Positioning the dental arches within the superior- inferior (up-down) dimension of the focal trough can be difficult to achieve, especially with children whose smaller size reduces the distance between the shoulders and the inferior border of the chin. When the arches are positioned incorrectly in the superior-inferior direction, the image exhibits multiple distortions, including increased overlapping in the premolar regions. When the arches are positioned too far up or down, the teeth will simultaneously move into a position that is too far back or too far forward, respectively, out of the focal trough.11
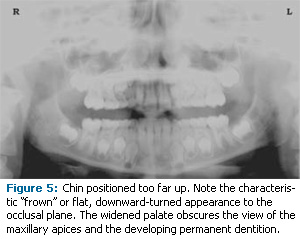
Positioning the arches too far superiorly produces a characteristic “frown” or flat, downward- turned appearance to the occlusal plane (Figure 5). The condyles flare out and off the edges of the image and the palate appears as a widened, thick, dense radiopacity. This positioning error results in a widened appearance of the palate and obliterates the apical regions of the maxillary teeth, compromising the images of the unerupted developing dentition. As the maxillary arch tips upward, the anterior teeth tilt backward producing the same widened appearance that results from an incorrect anterior- posterior position. Positioning the arches too far inferior produces a characteristic “smile” appearance or upward curve of the occlusal plane, with the condyles tilting inward toward the center of the image (Figure 6). Depending on the severity of the downward position, the vertebrae may also curve inward and appear superimposed over the condyles, and the hyoid bone may be superimposed over the mandible blocking a clear view of the erupted and unerupted mandibular teeth.
Correct positioning of the arches in the superior- inferior dimension requires that the patient stand with erect posture while tucking the chin in and down slightly, a direction that both adults and pediatric patients often find difficult to follow without specific guidance. The result is often a slumped position with the patient hunching the neck and shoulders over in an attempt to place the chin on the chin rest. The vertebrae collapse causing attenuation of the x-ray beam that produces a triangular radiopacity superimposed over the mandible, and if severe, over the maxillary anterior regions as well.
Depending on the manufacturer, panoramic x-ray machines direct the operator to position the Frankfort or the canthomeatal plane parallel to the floor, or the ala-tragus line 5° down toward the floor. This is achieved by raising or lowering the chin rest so that the appropriate landmark lines up with indicators on the machine (Figure 2). The patient should be directed to stand in front of the panoramic x-ray machine allowing the operator to place the chin rest into a position that is slightly higher than the patient’s chin. The patient is then requested to move into the overhead assembly of the machine and remain standing tall. If further adjustment is needed, it is usually to a lowered chin position. Once the patient’s chin is resting on the chin rest, it is easier to move to a lower position than to a higher one. To assist with placing the chin on the chin rest while maintaining an erect posture, the pediatric patient can be directed to stand like a soldier. Most children are familiar with the straight back, chest forward, tucked chin position demonstrated by military persons, and can readily mimic this stance.
Further Recommendations
Prior to beginning the exposure, the patient should be directed to close the lips around the bite block and to place the tongue against the palate. Leaving the lips open will create a soft tissue shadow across the teeth that that can be mistaken for caries.7 Leaving the tongue at rest during the exposure allows the radiation to easily penetrate the empty space of the oral cavity between the dorsal surface of the tongue and the palate, producing a radiolucent shadow that diminishes the diagnostic quality of the radiograph (Figure 3).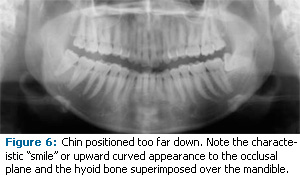
“Filling in” this space with the soft tissue of the tongue can increase the quality of the image by diminishing this radiolucent shadow. When directed to place the tongue on the roof of the mouth, the pediatric patient is likely to press only the tip of the tongue against the palate. While an adult patient can usually understand what is required when directed to swallow and note the position of the tongue, a child may be directed to suck in the cheeks, which results in pushing the tongue into a position flat against the palate.7
Conclusion
In addition to these guidelines for producing error-free radiographic images for the pediatric patient, panoramic machines should be evaluated periodically for accuracy. Changes may occur over time to the focal trough that interfere with the diagnostic quality of the machine.6 If a decrease in image quality is noted in spite of following accurate patient positioning steps, the panoramic x-ray machine should be inspected and the focal trough recalibrated. The dental hygienist who is skilled in understanding panoramic equipment operation and pediatric patient management is more likely to produce radiographic images that result in higher diagnostic yields.
REFERENCES
- Public Health Service, Food and Drug Administration, American Dental Association Council on Dental Benefit Program, Council on Dental Practice, Council on Scientific Affairs. The Selection of Patients for Dental Radiographic Examinations. Washington, DC: United States Department of Health and Human Services; 1987 (revised 2005):1-23.
- Pinkham PS, Casamassimo, Fields HW, McTigue DJ, Nowak AJ. Pediatric Dentistry Infancy through Adolescence. 4th ed. St. Louis: Elsevier Saunders; 2005:677.
- Thomson EM. Panoramic radiographs and the pediatric patient. Dimensions of Dental Hygiene. 2008;6(2):26-29.
- Rushton VE, Rout J. Panoramic Radiology. London: Quintessence Publishing Co Ltd; 2006:17, 84-85.
- Kullman L, Joseph B. Quality of digital panoramic radiography in a newly established dental school. Swedish Dent Journ. 2006; 30: 165-170.
- Akarslan ZZ, Erten H, Güngör K, et al. Common errors on panoramic radiographs taken in a dental school. J Contemp Dent Pract. 2003;4:24-34.
- Rushton VE, Horner K, Worthington HV. The quality of panoramic radiographs in a sample of general dental practices. Br Dent J. 1999; 26: 630-633.
- White SC, Heslop EW, Hollender LG, Mosier KM, Ruprecht A, Shrout MK. Parameters of radiologic care: an official report of the American Academy of Oral and Maxillofacial Radiology. Oral Surg Oral Med Oral Pathol. 2001;91:498-511.
- McDonald RE, Avery DR, Dean JA. Dentistry for the Child and Adolescent. 8th ed. St. Louis: Elsevier Mosby; 2000:71-72.
- Johnson ON, Thomson EM. Essentials of Dental Radiography for Dental Assistants and Hygienists. 8th ed. Upper Saddle River, NJ: Prentice Hall 2007:388-397.
- Serman N, Horrell BM, Singer, S. High-quality panoramic radiographs. Tips and tricks. Dentistry Today. 2003;22(1):70-73.
From Dimensions of Dental Hygiene. February 2009; 7(2):24-26, 28.
