
The Right Stuff
Optimize your ultrasonic scaling technique to effectively remove subgingival calculus.
 Ultrasonic instrumentation is an integral component of dental hygiene care. Power scaling technique has evolved over the past 35 years as research has demonstrated which approaches are most effective. While advancements have been made in both equipment and technique, the basic tenet of power and manual instrumentation—that calculus removal is integral to reducing inflammation, improving tissue response, and stabilizing disease status—has not changed. Without thorough calculus removal, periodontal health will not be maintained.1–6 Dental hygienists need to remember that calculus removal is the goal when scaling and root planing.7 Biofilm removal also is important, but if calculus is left behind, biofilm recolonizes rapidly on residual deposits and continues to incite inflammation.
Effective and efficient ultrasonic instrumentation technique depends on several factors, including choosing the most appropriate ultrasonic insert/tip (UIT) for the clinical situation, selecting the appropriate power level for the type of calculus being removed, utilizing effective local anesthesia, implementing the best fulcrum to achieve the best adaptation possible, and using the correct strokes and speed for different types of calculus removal.
THE RIGHT ULTRASONIC INSERT/TIP
Selection of the appropriate UIT depends on the task at hand, and many types are available (Figure 1 to Figure 8). For moderate to heavy calculus removal in periodontal pockets, select magnetostrictive or piezoelectric UITs with bevels or edges. These types of UITs will often remove heavy, tenacious calculus more efficiently than a smooth tip that is round in cross section. The side of a smooth tip may shave away tenacious calculus layer by layer, rather than fracturing the surface.7
If calculus is new or soft, any large UIT on medium to high power—regardless of the cross-sectional shape—will break through the calculus. With UITs of any shape, the point is more powerful than the side, so attacking the calculus first with the point is the most effective strategy. Be careful to keep the point parallel to the tooth, and probe into the top or side edge of the calculus to begin breaking it up.
For heavy or hard calculus removal, start with a large UIT, moving to a thinner tip only when the majority of the calculus has been removed. Several types of thin UITs are available that can be used at higher power levels. These UITs should be reserved for tenacious residual calculus removal after a large UIT has been utilized or if the tissue is tight and does not allow access with a large UIT. Always check with an explorer to determine whether a thinner tip or hand instrument is indicated. Tenacious sheets of calculus can be burnished to a smooth, difficult-to-detect veneer if the surface is continually stroked with a thin UIT—especially if used on low power. Sheets or veneers of calculus should be fractured with sharp Hirschfeld files or sharp mini-bladed Gracey curets before proceeding with additional ultrasonic scaling.8
THE RIGHT POWER
Regardless of shape or size, any UIT used on low power will effectively remove biofilm, but will not efficiently dislodge heavy or hard calculus—even if the point of the tip is utilized.
If a large amount of supragingival calculus is present, start on medium power and incrementally increase the power until the UIT is working effectively. Remember that subgingival calculus may be considerably harder and more tenacious than the supragingival calculus on the same patient. The power setting that works on the supragingival calculus may be too low for efficient removal of the deeper subgingival calculus.
THE RIGHT PAIN CONTROL
The power setting should not be reduced when instrumenting patients with heavy calculus due to pain or discomfort. Almost all patients with heavy calculus require local anesthesia for thorough initial scaling. Save time and patient discomfort by administering local anesthesia first.
THE RIGHT PAIN CONTROL
A modified pen grasp should be used for calculus removal strokes because it enables the clinician to achieve more precise adaptation to the tooth. Precise adaptation and short, overlapping 1 mm to 2 mm strokes on the root in subgingival areas require a grasp that actively engages the tips of the middle finger, index finger, and thumb.
THE RIGHT FULCRUM
Intraoral fulcrums can work well in the anterior areas of the mouth, but they can often limit insertion of the UIT into deeper pockets. Extraoral or other alternative fulcrums, such as opposite arch or cross arch fulcrums, should be used in order to achieve optimum adaptation of the tip to the root surface.9,10
THE RIGHT STROKES
Implementing the appropriate strokes for calculus removal is key to the therapy’s success. Each step is discussed below and a visual representation is provided in Figure 9.
1. Probing Strokes to Break the Calculus
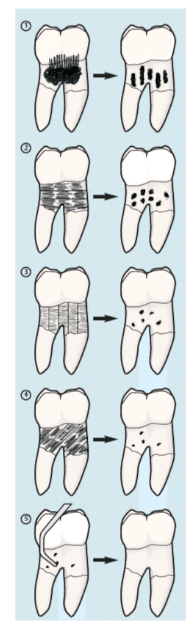
For moderate to heavy calculus removal in periodontal pockets, select a large magnetostrictive insert or piezoelectric tip with bevels or edges, and begin scaling on medium or medium-high power. Using a modified pen grasp, press the point of this large UIT with light to moderate pressure against the top edge of the calculus in an apical direction. Implement a continuous series of probing strokes, keeping the tip parallel to the tooth/root surface at all times. If progress is not being made, gradually turn up the power until the deposit is efficiently removed.
Break into the calculus deposit with short 1 mm to 2 mm vertical probing strokes. The strokes must be applied very close together, as if probing during a periodontal examination. Allow the power of the ultrasonic vibrations to break through the calculus before moving on, or keep probing repeatedly against the edge of the hard deposit until the calculus breaks away.
If the deposit is a flat, tenacious, burnished veneer and the point of the UIT is not able to engage the top edge of the deposit, the following steps should be followed:
- Use a sharp Hirschfeld file or mini-bladed Gracey curet to fracture the surface of the veneer and begin breaking up the deposit before proceeding further with ultrasonic scaling.
- Follow with a beveled magnetostrictive insert or the edge of a flat piezoelectric tip so the side or bottom edge of the deposit is engaged with short, horizontal, or oblique strokes.
- Avoid utilizing a UIT that is round in cross section because it usually will not bite into this type of flat calculus. As a result, the deposit may continue to burnish, making it so smooth that it is undetectable without the use of a dental endoscope.
2. Short Horizontal Strokes, Horizontal Channels
After using vertical, probing strokes to break away the bulk of the calculus, begin to work across the top of the dep-osit in horizontal channels. Adapt the edge of the first 2 mm of the UIT against the tooth and begin attacking the remaining pieces of residual calculus with short, 1 mm to 2 mm back-and-forth horizontal strokes.
Start coronally and make very short horizontal strokes against the top edge of any remaining deposits. Work horizontally across the surface in a channel about 2 mm deep. Continue instrumenting downward apically, channel after channel, until the base of the pocket is reached.
3. Short Horizontal Strokes, Vertical Channels
The area also needs to be scaled apically in a series of vertical channels. If the calculus is not tenacious and breaks away from the tooth rapidly, keep moving back and forth with these very small horizontal strokes. Move apically down the root in one narrow vertical channel to the base of the pocket.
After reaching the base of the one vertical channel, reposition the side of the UIT coronally and start moving with short horizontal strokes again. Work downward apically, moving the tip back and forth in short, 1 mm to 2 mm strokes—covering the next small vertical channel down the root until the base of the pocket is reached. Continue scaling in successive vertical channels until the entire area is covered.
4. Short Horizontal Strokes, Diagonal Channels
A series of short diagonal strokes must now be activated. Keep moving the side of the tip back and forth in 1 mm to 2 mm strokes while proceeding in diagonal channels across the root surface, so the whole surface is covered with a “basketweave” of short strokes in all three directions. Almost every square millimeter of the root will be contacted when working methodically and meticulously in this manner. This overlapping technique will allow the UIT to remove as much calculus from the root as possible.
5. The Right Finishing Strokes with Hand Instrumentation
After the root surfaces have been checked carefully with an explorer, residual calculus should always be removed with deliberate, definitive hand instrumentation. Although finishing strokes can be activated with a thin UIT on low power, this can be more time consuming and less effective. Using a thin UIT still requires an overlapping series of very short horizontal strokes to cover every square millimeter of the root surface. When thin tips are utilized on low power, the risk of burnishing the deposit increases.
THE RIGHT SPEED
The UIT should not be moved too quickly against the calculus. Let the power of the vibrations work long enough to disrupt the deposit. Move the tip at approximately the same speed as is used during hand instrumentation to remove heavy calculus. A UIT that is moving too fast will remove only a thin top layer of the deposit and burnish the surface.
Direct observation with the dental endoscope has shown that ultrasonic calculus removal is not necessarily faster than hand instrumentation. Both techniques require precise adaptation, sufficient pressure or power, overlapping strokes in different directions, and dedication of sufficient time and thoroughness to be successful. The common misperception that ultrasonic scaling is much faster than hand instrumentation is based on the erroneous assumption that a smooth root surface is a clean root surface. Endoscopic evaluation of these ultrasonically scaled root surfaces usually reveals burnished, embedded calculus that has not been thoroughly removed (Table 1).
THE RIGHT LENGTH
Short strokes (1 mm to 2 mm) are most effective for calculus removal. The use of long (3 mm to 9 mm), haphazard strokes should be avoided because they do not conform to the convexities and concavities of the root surfaces, and they tend to burnish residual deposits. Long strokes are more likely to randomly and incompletely remove heavy, hard calculus.
THE RIGHT FOLLOW UP
Probing to see if bleeding is present should be performed during the reevaluation appointment after 4 weeks to 6 weeks or at the first maintenance appointment 2 months to 3 months later. If there is no bleeding on probing, the area can be deplaqued with thin hand instruments using light strokes or with a thin UIT on low power. If bleeding on probing is still present in deep pocket areas, repeat the steps for calculus removal with ultrasonic instrumentation or perform definitive scaling and root planing with sharp hand instruments, such as Gracey curets or mini-bladed Gracey curets.
CONCLUSION
While effective when used correctly, ultrasonic instrumentation is not an easy technique. By following these steps, power instrumentation can be an effective means of calculus removal. Ultrasonic scaling is an important part of the dental hygienist’s armamentarium, but it requires excellent technique, sufficient time to perform multidirectional strokes, and a dedication to thorough calculus removal to be successful.
REFERENCES
- Lowenguth RA, Greenstein G. Clinical and microbiological response to nonsurgical mechanical periodontal therapy.Periodontol 2000. 1995;9:14.
- Claffey N. Decision making in periodontal therapy: the reevaluation. J Clin Periodontol. 1991;18:364.
- Joss A, Adler R, Lang NP. Bleeding on probing. A parameter for monitoring periodontal conditions in clinical practice. J Clin Periodontol. 1994;21:402–408.
- Lang NP, Joss A, Orsanic T, Gusberti FA, Siegrist BE. Bleeding on probing. A predictor for the progression of periodontal disease? J Clin Periodontol. 1986;13:590–596.
- Greenstein G. Nonsurgical periodontal therapy in 2000: a literature review. J Am Dent Assoc. 2000;131:1580.
- . Cobb CM. Microbes, inflammation, scaling and root planing, and the periodontal condition. J Dent Hyg. 2008;82(Suppl 3):4–9.
- Kiehl N. The keys to successful power instrumentation. Dimensions of Dental Hygiene. 2012;10(7):42–48.
- Pattison AM. Using periodontal files. Dimensions of Dental Hygiene. 2008;6(12):42.
- Pattison AM, Matsuda S, Pattison GL. Extraoral fulcrums: the essentials of using extraoral fulcrums for periodontal instrumentation. Dimensions of Dental Hygiene. 2004;2(10):20–23.
- Matsuda SA. The right moves. Dimensions of Dental Hygiene. 2013;11(4): 26–28.
From Dimensions of Dental Hygiene. January 2015;13(1):31–32,34,36–37
