 NASTASIC/E+/GETTY IMAGES PLUS
Techniques Tips for Ultrasonic Instrumentation
Learn how to improve the effectiveness of your power instrumentation during initial periodontal therapy, prophylaxis, and periodontal maintenance.
The usual method of accomplishing scaling and root planing in contemporary practice is with ultrasonic and hand instrumentation. Success with ultrasonic instrumentation relies on a relationship between an appropriate insert or tip for the task at hand, power setting for the type of deposits, use of the active tip area (ie, working end), and the working end to root angle. The power setting, which controls the length of the stroke or displacement amplitude, is generally discussed using the terms low, medium, and high.
There are three types of patient care: initial periodontal therapy, prophylaxis, and periodontal maintenance (PM). Effective calculus removal is an important outcome for each of these scenarios. Calculus is a secondary etiological factor in causing periodontal diseases as it provides a porous medium for biofilm retention and growth.1
INITIAL PERIODONTAL THERAPY
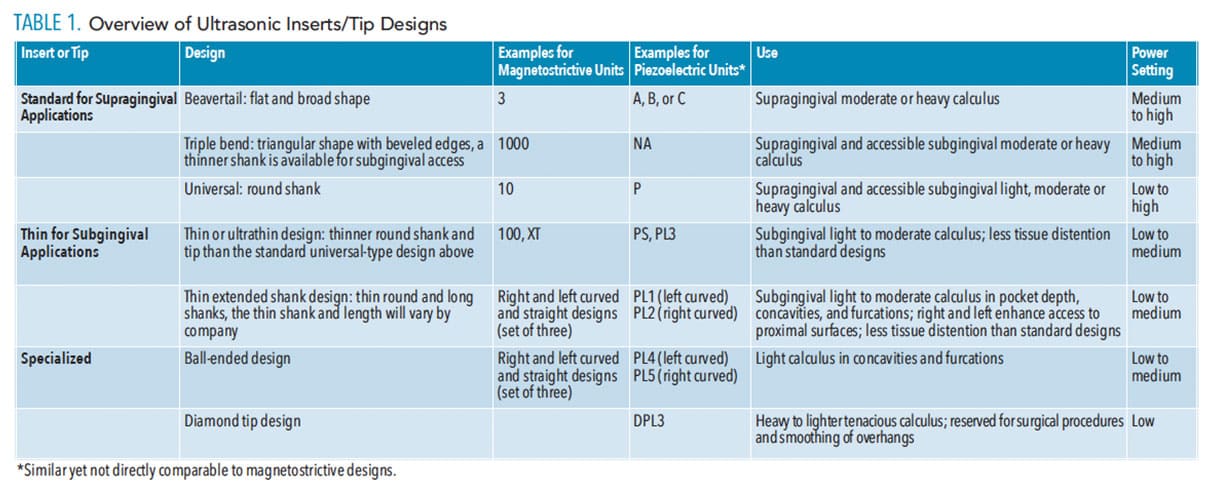
Evidence-based guidelines recommend scaling and root planing for the initial nonsurgical treatment of chronic periodontitis.2 Ultrasonic instrumentation during initial periodontal therapy can be divided into three phases. In Phase I, calculus is identified knowing plaque biofilm will be removed throughout the instrumentation process. Initially, select standard ultrasonic inserts or tips (UITs), such as a beavertail or universal-type design, and remove large supragingival deposits (Table 1). The power setting will be in the medium range because of the density of the calculus. Generally, the supragingival deposit is not as tenacious as subgingival calculus; however, a higher setting might be indicated if the deposit is very calcified.
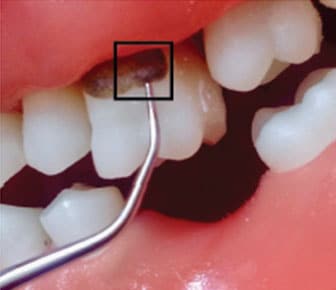
 Next, select a standard UIT, such as a rectangular triple bend or round universal-type design, and adapt the point on the top of the calculus at an angle of 0° (Figure 1). The power used will depend on the tenacity; however, low power is not appropriate for this phase of care. Low power encourages incomplete removal along with the potential for burnishing calculus deposit. Therefore, medium or higher power is indicated to approach heavy tenacious calculus from its most occlusal or incisal location. A study reported that the most efficient removal of heavy calculus was at a 0° angle to the deposit within the first 30 seconds of instrumentation.3 Although this study used a slim insert, which is not generally recommended for heavy calculus removal, it does provide some support for the technique recommended.
Use the UIT’s working end and an explorer to assess calculus removal as the process continues. If deposit is not removed, change the working end to root angle to a slightly more open angle or increase the power. A key element in this phase is to discontinue the process if calculus is being smoothed or only partially removed. If this is the case, reassess the UIT used, the power setting, and the working end to root angle to enhance effectiveness. Hand instruments, such as a universal curet or a periodontal file, might be indicated to further fracture deposits before continuing with ultrasonic instrumentation. Trying to remove tenacious deposit with long and thin UITs and/or low power tends to encourage burnishing and partial calculus removal, significantly inhibiting healing.
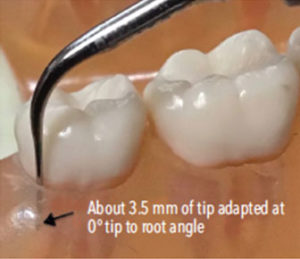
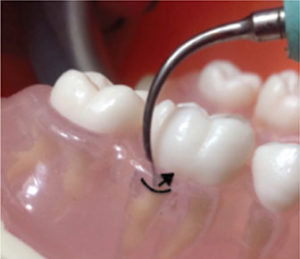
In Phase 2, select a set of three UITs—either a thin or very thin diameter width—depending on type and size of the remaining calculus and the length needed to match the depth of the periodontal pockets (Table 1). The right and left curved designs are optimal for proximal surfaces, root anatomy, and furcation involvement. The straight design is useful for localized deep pockets, narrow pocket depth, and anterior teeth. For a magnetostrictive unit, use up to 4 mm of the insert working end placed at a near 15° to the root. For a piezoelectric unit, use up to 3.5 mm of the working end at a near 0° angle to the root (Figure 2). This part of the working end is the active tip area. Use low or medium power depending on the tenacity of the calculus remaining. Move from the epithelial attachment to the margin with overlapping oblique strokes.
If tenacious deposits are encountered in this phase, use the approach described in Phase 1 to remove the calculus deposit from the most marginal edge toward the apical border. As such, the power setting might be increased and the UIT changed back to a standard round design with a wider diameter shank and working end. Again, use the working end and an explorer to assess progress. Use hand instruments, such as files and curets, as needed for difficult-to-reach calculus deposits or smooth deposits that need fractured prior to complete removal.
Phase 3 is a finishing phase where very thin UITs are selected to match the pocket depth and root anatomy. The same UITs used in Phase 2 might be employed or thinner and longer UITs may be selected because only fine deposits should remain. The goal in this phase is to remove fine calculus deposits and remaining plaque biofilm to facilitate optimal healing.
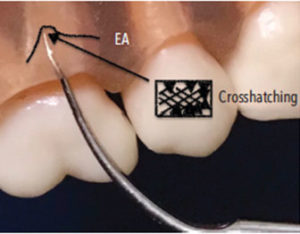
In Phase 3, move from the epithelial attachment to the gingival margin in oblique overlapping motions using a low power setting. Overlapping strokes are vital in this phase to remove any remaining plaque biofilm (Figure 3). Crosshatching, or multidirectional strokes, is also indicated to remove deposits and smooth the root surface without intentionally removing cementum (Figure 4). The use of a low power setting minimizes cementum loss.3 Also, narrow, probe-like designs have been shown to remove the least amount of root surface when compared to wider working tip designs.4
In Phase 3, specialized UITs might be employed (Table 1). For instance, a ball-ended tip might be indicated for exposed or accessible furcation involvement. A diamond-coated UIT could be used for remaining narrow, flat, and tenacious calculus, however, it could also be reserved for heavier deposits earlier in the process. It is best used for surgical procedures with enhanced access and direct vision.
Use hand instruments as needed and employ an explorer to evaluate the clinical endpoint to determine if the surfaces are well prepared for healing. At times, depending on the amount of calculus deposit, Phase 2 and Phase 3 can be condensed into one phase.
PROPHYLAXIS
This type of therapy is generally indicated for those without alveolar bone loss and a diagnosis of gingivitis not periodontitis. Scaling of calculus is easily accomplished with the blended approach of ultrasonic and hand-activated instrumentation.
The selection of UITs and power setting depends on the type of deposits. It should not be assumed that the scaling can be accomplished with only one UIT on low power. Some patients could present with similar deposit conditions as above for initial therapy. If so, the approach for initial nonsurgical periodontal therapy can be used and it is likely that more than one appointment will be needed.
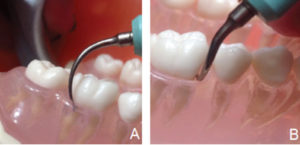
If the prophylaxis involves moderate and light deposits, then Phase 2 and Phase 3 are appropriate as described above. UITs will be selected that match the sulcus or pocket measurements, which will likely be shallow in depth (5 mm or less). For example, the standard universal-type design with medium power could be used for well-defined calculus deposits, followed by the set of three thin UITs (right, left, and straight designs) with lower power (Figure 5). It is important to incorporate this set of three UITs because of the propensity to reach all surfaces with these combined designs.
If only very light deposits are detected in a generalized manner, then the set of three thin UITs (right, left, and straight) is an appropriate choice to reach proximal surfaces and shallow pseudopockets. In this case, only Phase 3 is indicated.
PERIODONTAL MAINTENANCE
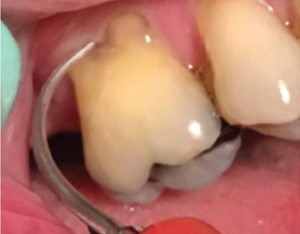
During PM, general periodontal pocketing or isolated deep periodontal pocket depth with furcation involvement may be present (Figure 6, page 19). The presentation of varying depths of periodontal pockets and accompanying clinical attachment levels signals the need for multiple UIT’ to thoroughly debride the pocket topography of calculus and plaque biofilm. Also, localized root planing might be indicated.
During PM, the patient could present with moderate to heavy deposits, light deposits, or a combination of all three sizes of calculus. The reaccumulated calculus, however, should be nontenacious due to the typical 3-month or 4-month intervals of time for PM; therefore, Phase 2 and Phase 3 are appropriate for this type of care. Use a thin or ultrathin single design coupled with the curved right and left designs or the thin set three UITs to adapt to all tooth surfaces and varying root topography. Generally, a low power setting is adequate for maintenance, particularly after many years of seeking PM. A study concluded that the ultrasonic instrumentation created the smoothest roots during PM when compared to sonic and hand-activated curet instrumentation.5 Further recommendations for ultrasonic instrumentation during PM are found in the April 2019 issue of Dimensions of Dental Hygiene.6
CONCLUSION
Keys to efficacious ultrasonic instrumentation for these three clinical scenarios include selecting appropriate UITs for the oral conditions, using the selected UITs with appropriate power, and employing correct technique. Generally, a single UIT is not adequate to complete efficacious initial periodontal therapy, prophylaxis or PM. Different UITs are indicated for specific clinical scenarios and, thus, varying power settings are also indicated. Power settings can be adjusted on most units to change from medium to medium high or low to a lower medium. In other words, the power output is adjustable between low, medium, and high settings. UITs will be changed and power settings will be varied during the phases of care for each scenario.
REFERENCES
- Kamath DG, Nayak SU. Detection, removal and prevention of calculus: literature review. The Saudi Dental Journal. 2014;26,1:7–13.
- Smiley CJ, Tracy SL, Abt E, et al. Evidence-based clinical practice guideline on the nonsurgical treatment of chronic periodontitis by means of scaling and root planing with or without adjuncts. J Am Dent Assoc. 2015;146:525–535.
- Chien H, Ye D. Microscopic view of scaling influence on the root, using different power and time settings. Quintessence Int. 2016;47:559–568.
- Jepsen S, Ayna M, Hedderich J, Eberhard J. Significant influence of scaler tip design on root substance loss resulting from ultrasonic scaling: a laserprofilometric in vitro study. J Clin Periodontol. 2004;31:1003–1006.
- Graetz C, Plaumann A, Wittich R, et al. Removal of simulated biofilm: an evaluation of the effect on root surfaces roughness after scaling. Clin Oral Investig. 2017;21:1021–1028.
- Hodges KO. The intersection of periodontal maintenance and ultrasonic instrumentation. Dimensions of Dental Hygiene. 2019;17(4):14–16.
From Dimensions of Dental Hygiene. January 2020;18(1):18–20.
