
Sharpening 101
Brush up on your instrument sharpening skills with this primer on manual sharpening technique.

As clinicians, it can be challenging to work instrument sharpening into our already busy schedules. But maintaining the sharpness of periodontal instruments is important. Properly sharpened instruments reduce operator fatigue, improve calculus removal, save time, enhance tactile sensitivity, and minimize patient discomfort. Less pressure is required with sharp instruments, which improves control of the instrument and decreases the likelihood of gouging a root surface. When dull instruments are used, the operator grasp is tight and more lateral pressure is applied to the tooth surface. This increase in pressure is uncomfortable to  the patient and makes the clinician seem heavy-handed.1 In addition, sharp instruments decrease the probability of burnishing calculus by “biting” into the deposit and not shaving over it.
SHARPENING TECHNIQUE
Accurate sharpening technique is designed to remove a minimum amount of metal from the instrument blade to re-establish the fine cutting edge while maintaining the original shape of the instrument.2 Maintaining the original shape of the instrument is as important as the maintenance of a sharp edge. Much research, care, and time are incorporated into the design of instruments to produce effective and safe instruments for debridement. Changing the original shape of an instrument by using poor sharpening technique creates an opportunity for ineffective periodontal treatment and potential patient harm.
The basis for any sharpening technique is using a coarse stone against the instrument to create a sharp edge. Two different methods result in sharp instruments: removing the face of the working end and removing the lateral sides of the working end.
Reducing the face of the blade creates a weaker instrument that, in turn, will break more readily.3-7 Removing metal from the lateral sides of the working end maintains the overall strength of the instrument and provides the longest instrument use-life.8
However, both methods produce a wire edge that may interfere with the sharpness of the blade. Research indicates that the direction of the wire edge may have a profound effect on the quality of sharpness.3,9,10 Wire edges are unsupported metal fragments that extend beyond the cutting edge from the lateral side or the face of the blade. They are termed functional or nonfunctional. When the wire edge is parallel to the scaling direction, the edge is considered functional. A functional wire edge does not gouge into the tooth surface, it digs into the tooth deposit. Therefore, it helps remove deposits and does not damage the tooth. Using a stone against the lateral sides produces functional wire edges.3,9,10
A nonfunctional wire edge is a metal fragment that is perpendicular to the scaling direction and is produced when the instrument is sharpened from the face of the blade. Nonfunctional wire edges produce gouging on the root surface and do not aid in the removal of deposits or amalgam from the tooth.3,9,10
SHARPENING ROUTINE
Unlike other equipment maintenance procedures, no standard timeline exists for instrument sharpening because it depends on how dull the edge is and on the operator’s skill. However, instruments should be sharpened before each scaling and root planing procedure or as soon as the instruments become dull during treatment. Factors affecting the best time to sharpen instruments include: the number of patients scheduled for the day, the frequency of use, the amount and tenacity of deposits, and the type of procedure to be completed. Dulling of the fine, sharp edge is a normal outcome of scaling and root planing. Approximately 15 working strokes produce a slightly rounded cutting edge, whereas 45 strokes create a very rounded cutting edge.3,11 Ideally, instruments should be sharpened at the first sign of dullness.5,12-14
Manufacturers are now producing instruments that maintain a sharper edge longer. Newer stainless steel alloys and heat treatment processes create a more durable edge that maintains sharpness for up to 3 or 4 months and does not require sharpening. Also diamond-coated instruments that should not be sharpened are available.
HAND-HELD STONES

Hand-held stones are a common tool for instrument sharpening. These stones are available in a variety of shapes and materials. Stones can be rectangular and flat, rectangular and wedge-shaped, or cylindrical in shape (Figure 1). Although no one stone shape is superior, the cylindrical stone is efficient in removing wire edges. The wedge-shaped stone contains a rounded side that can be used like the cylindrical stone to remove wire edges, thus serving as an all-purpose stone. Newer designs include a channel-shaped stone system (Figure 2A). These stones are designed with a trough in which the instrument is placed and then moved through. The channel-shaped system produces a smoother cutting edge with fewer wire edges (Figure 2B).15
Stone types vary from quarried from natural mineral deposits (Arkansas stone), to synthetic (man made). Research is not conclusive on which type of stone produces a sharper edge. Some studies support man made stones while others recommend synthetic stones.4,15,16 Texture varies from fine to medium to coarse. Selection of type and texture are based on which cutting edge needs sharpening or recontouring. If instruments are excessively dull or require a great deal of recontouring, a coarse stone ( India stone) is recommended. A fine or medium (Arkansas) stone is preferred for routine sharpening and instrument finishing.17
Two methods of instrument sharpening with hand-held stones can be used. One method is the stationary stone/moving instrument while the other is the stationary instrument/moving stone. Although these techniques vary significantly in visibility and control, both methods require skill, visual acuity, control, and precision to master.18 Research demonstrates that clinicians accomplish effective sharpening techniques when using the stationary instrument/moving stone method.6 This method permits the clinician to see the shape of the face of the blade, thereby making it easier to maintain the contour of the cutting edge. Therefore, instruments are more evenly contoured to provide a better fit subgingivally without significantly reducing the instrument strength.11
WORKSTATION AND EQUIPMENT
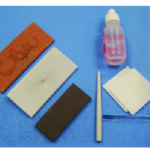
Ideal conditions for a sharpening workstation include a firm disinfected countertop to support the instruments and a light source. A magnifying glass or loupes are helpful to observe wire edges and the cutting edge. An armamentarium for instrument sharpening consists of the following (Figure 3):
- A fine stone,
- A medium to coarse stone,
- A conical stone,
- Plastic test stick to test for instrument sharpness,
- Gauze for sludge removal, and
- Personal protective equipment, including eye protection, mask, and examination gloves.
Ideally, instruments should be sharpened when sterile, before the beginning of the appointment. When sharpening is necessary during patient treatment, all sharpening tools must be sterile. Therefore, using a stone that requires an oil lubricant is contraindicated as there is no effective method to sterilize oil.8
TECHNIQUE
- Select the appropriate stone for the type of instrument to be used and the degree of dullness.
![]()
- Lubricate the stone based on manufacturer’s suggestions. Apply small drops of lubricant and rub them into the flat surfaces of the stone.
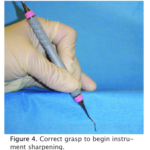
- Grasp the instrument to be sharpened in a palm grasp or modified pen grasp with the nondominant hand and place the hand against the countertop (Figure 4).
- Rest the hand holding the instrument on the tabletop and the instrument handle against the edge of the countertop for stabilization (Figure 4).
- Point the toe of the instrument toward the clinician and place the face of the blade parallel to the floor. The instrument should be held low enough to look down on the face to visualize the contour (Figure 4).
- Hold the stone in the dominant hand. If a wedge-shaped stone is being used, the wedge should be directed toward the clinician. The stone is held lengthwise using one of two methods: grasp the stone at either end with the thumb on top and fingers on the bottom or grasp the stone in a palm grasp near the bottom (Figures 5A and B).
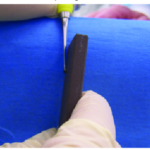
- Position the stone on the lateral side of the instrument, near the heel of the working end at a 90° angle to the face of the blade (Figure 5A).
- Move the stone from the 90° position to 100° to 110° (Figure 5B).
- Begin the sharpening motion on a downstroke, moving the stone down and up while maintaining the 100° to 110° angulation. The downstroke should consist of firm pressure, whereas the upstroke should be lighter (Figure 6).
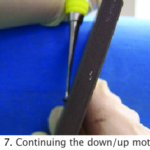
- Continue the down/up motion, following the contour of the cutting edge until the toe is reached (Figure 7).
- Stop the sharpening procedure on a downstroke to reduce the chance of creating a wire edge.
- Reposition the stone on the lateral side of the opposite cutting edge of the instrument near the heel at a 90° angle.
- Move the stone away to a 100° to 110° angle from the face of the blade and repeat the sharpening technique on the opposite cutting edge.
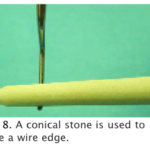
- When sharpening is completed, observe the cutting edge for wire edges. To remove a wire edge using a conical shaped stone, gently roll the stone along the face of the blade, from heel to toe, maintaining a minimal amount of pressure (Figure 8).
- During the sharpening process, look for a layer of sludge. Sludge indicates that the correct stone to cutting edge angle is being maintained.19 Wipe the sludge from the instrument using a gauze square.
- Test the instrument for sharpness, using a plastic test stick. Place the cutting edge against the test stick and press the instrument from heel to toe into the test stick to listen for a “pinging” sound.The entire procedure should include approximately four to five stroke sequences and the down/up movement of the stone should be 1?2 to 1 inch in length.
![]()
Some clinicians have difficulty visualizing the stone-to- instrument angles necessary for proper sharpening. Because sharpening must be precise to maintain the contour and cutting edge of scaling instruments, an angle guide may be helpful. Research has indicated that angle guides enhance the clinician’s ability for precise sharpening.20
One option is to visualize the hands of a clock. Twelve o’clock represents the 90° set-up; 1 o’clock is the angle of the stone (100°-110°) to begin sharpening the cutting edge on the right side; and 11 o’clock is the angle of the stone to begin sharpening the cutting edge on the left side. Many commercial angle guides are also available. A guide can also be made with a notecard and protractor.20 The guide can be taped to the front edge of the countertop or it can be folded over the edge to serve as the angle guide. A piece of masking tape can be placed on either side of the 110° line to further enhance stone positioning. In addition, the guide can be laminated and disinfected for use during patient treatment.
REFERENCES
- Pattison AM, Pattison GL. Periodontal Instrumentation. 2nd ed. East Norwalk, Conn: Appleton & Lange; 1992.
- Smith BA, Setter MS, Caffesse RG, Bye FL. The effect of sharpening stones upon curet surface roughness. Quintessence Int. 1987;18:603-613.
- Balevi B. Engineering speci?cs of the periodontal curet’s cutting edge. J Periodonto. 1996;67:374-378.
- Huang CC, Tseng CC. Effect of different sharpening stones on periodontal curettes evaluated by scanning electron microscopy, J Formos Med Assoc. 1991;90:782-787.
- Smarten Up, Sharpen Up (product insert). Chicago: Hu-Friedy; 1997.
- Marquam BJ. Strategies to improve instrument sharpening, Dent Hyg (Chic). 1988;62:334-338.
- Paquette OE, Levin MP. The sharpening of scaling instruments: II. A preferred technique. J Periodontol. 1977;48:169-172.
- Nield-Gehrig JS. Fundamentals of Periodontal Instrumentation and Advanced Root Instrumentation. 5th ed, Philadelphia: Lippincott Williams & Wilkins; 2000.
- Antonini CJ, Brady JM, Levin MP, Garcia WL. Scanning electron microscope study of scalers. J Periodontol. 1977;48:45-48.
- Clark SM, Ueno H. An examination of periodontal curettes: an SEM study, Gen Dent. 1990;38:14-16.
- Green E. Sharpening Curets and Sickle Scalers. 2nd ed. Praxis, Berkeley; 1972.
- Wilkins EM. Clinical Practice of the Dental Hygienist. 9th ed. Philadelphia: Lippincott Williams & Wilkins; 2005.
- Woodall IR. Comprehensive Dental Hygiene Care. 4th ed. St Louis: Mosby;1993.
- Zimmer SE. Instrument sharpening-sickle scalers and curettes. Dent Hyg (Chic). 1978;52:21-24.
- Moses O, Tal H, Artzi Z, Sperling A, Zohar R, Nemcovsky CE. Scanning electron microscope evaluation of two methods of resharpening periodontal curets: a comparative study. J Periodontol. 2003;74:1032-1037.
- Silva MV, Gomes DA, Leite FR, Sampaio JE, de Toledo BE, Mendes AJ. Sharpening of periodontal instruments with different sharpening stones and its influence upon root debridement- scanning electronic microscopy assessment. J Int Acad Periodontol. 2006;8: 17-22.
- Murray GH, Lubow RM, Mayhew RB, Summitt JB, Usseglio RJ. The effects of two sharpening methods on the strength of a periodontal scaling instrument. J Periodontol. 1984;55:410-413.
- Paquette OE, Levin MP. The sharpening of scaling instruments: I. An examination of principles. J Periodontol. 1977;48:163-168.
- Parkes RB, Kolstad RA. Effects of sterilization on periodontal instruments. J Periodontol. 1982;53:434-438.
- Mazzone DM. Quantitative evaluation of scaling instrument contour and sharpening techniques [master’s thesis]. Ann Arbor, Mich: University of Michigan;1983.
From Dimensions of Dental Hygiene. May 2007;5(5): 18-20.
