
A Primer on Instrument Sharpening
Incorporating sharpening into your daily routine.
When scaling, it takes approximately 15 working strokes to produce a slightly rounded cutting edge and 45 strokes to produce a very rounded cutting edge.1 As a result, our instruments can become dull after use on one or two patients. The necessary cleaning and sterilization processes can also contribute to the dulling of cutting edges.
Preventing Unnecessary Dullness
To prevent unnecessary dullness do not overload the ultrasonic bath, because instruments can be dulled when they bump against each other.2 Bundling the instruments and placing them in a small instrument box may decrease bumping. Placing instruments in a cassette and cleaning in a dental instrument washer will preserve the cutting edge as well. Using stainless steel instruments that can withstand sterilizing with steam (250º F), chemical vapor (270º F), or dry heat (340º F) will not dull cutting edges. However, carbon steel instruments can be dulled with saturated steam sterilization.3 Purchasing the appropriate instruments that match the sterilizing equipment already in place is important to the longevity of the cutting edge. Additionally, the hygienist should be aware that debriding around amalgam restorations and margins of fabricated crowns will nick or at least create a roundness to a sharp cutting edge.4
Choosing the Right Sharpening Device
Instrument sharpening should be performed at the first sign of dullness, which means a sharpening work station needs to be incorporated into the dental hygiene treatment room. Ideally to prevent cross-contamination, sharpening should be performed after sterilization. The hygienist can have several sets of sterile stones and test rods available to quickly sharpen an instrument prior to seating the patient or during treatment as the instrument becomes noticeably dull. Stones are made of abrasive particles and are supplied in fine, medium, or coarse textures. Stone selection should be based on the dullness of the instrument, with fine to medium stones for routine sharpening and a coarse stone for sharpening extremely dull cutting edges.
A good choice for a sharpening stone is a two-sided abrasive surface with medium on one side and fine on the other. Since sharpening is done on a regular basis, a coarse stone may not be necessary at the first sign of dullness. However, if the hygienist cannot schedule sharpening into the daily routine, a coarse stone becomes necessary for the sharpening to be completed quickly. Also remember that duller instruments require more metal removal to gain a sharp edge.
The most important goal for maintaining instrument sharpness is to preserve the shape and the contour of the original instrument. Before sharpening, a hygienist should ask the following: Are the cutting edges of the instrument straight or curved from the heel to the toe of the instrument? Is the toe of the instrument pointed or rounded? When these two questions are answered, sharpening can begin with the preservation of the original shape and contour.
Technique
The oldest method of instrument sharpening is the handheld moving stone/ stationary instrument technique.5 This method allows the hygienist to see the shape of the blade from heel to toe, thereby maintaining the contour of the instrument while sharpening the cutting edge. The general technique is performed as follows:
 1. Select the appropriate stone for the degree of instrument dullness. Lubricate the stone based on manufacturer’s suggestions. When sharpening is necessary during patient treatment, using an oil lubricant is contraindicated as there is no effective method to sterilize oil.6 Some stones do not require oil lubrication.
2. Hold the instrument firmly against a stable surface such as a countertop. Point the toe of the instrument toward your body and place the face of the blade parallel to the floor. The instrument should be held low enough to look down on the face to visualize the contour (Figure 1).
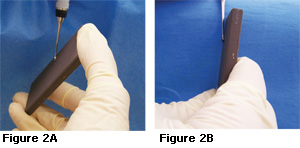
3. Hold the stone in the dominant hand by grasping the stone at either end with the thumb on top and fingers on the bottom or a palm grasp near the bottom (Figures 2A and 2B).
4. Position the stone on the lateral side of the instrument, near the heel of the working end at a 90º angle (12 o’clock) to the face of the blade. (Figure 2B). Move the stone from the 90º position to 110º (1 o’clock) (Figure 2A).
5. Begin the sharpening motion on a downstroke, moving the stone down and up while maintaining the 110º angulation. The downstroke should consist of firm pressure, whereas the upstroke should be lighter.
6. Continue the down/up motion, following the contour of the cutting edge until the toe is reached (Figure 3). Stop the sharpening procedure on a downstroke to reduce the chance of creating a wire edge.

7. Reposition the stone on the lateral side of the opposite cutting edge of the instrument near the heel at a 90º angle (12 o’clock). Move the stone to an 80º degree angle (11 o’clock) and repeat the sharpening technique on the opposite cutting edge.
8. During the sharpening process, observe for a layer of sludge. The appearance of sludge indicates that the correct stone to cutting edge angle is being maintained.7 Wipe the sludge from the instrument using a gauze square.
9. Test the instrument for sharpness using a plastic test stick. Place the cutting edge against the test stick so the face of the blade is leaning into the stick. Press the instrument into the test stick to feel a catch or to listen for a “pinging” sound (Figure 4). The entire procedure should include approximately four to five stroke sequences and the down/up movement of the stone should be 1/2 inch to 1 inch in length.
Sickle Scalers
Sickle scalers have two cutting edges and a pointed tip. Examine the shape and contour of the face of the blade and cutting edges. The majority of sickles have a flameshaped contour, which means the cutting edges are not straight but gently curved from heel to toe. When sickle scalers are flame-shaped, the entire cutting edge cannot be placed against the sharpening stone. The stone should be positioned at the heel portion of the working end and then rotated along the cutting edge until the stone is flat against the side of the tip as seen in Figures 5A and 5B. If the sickle is triangular in design with straight cutting edges, then the entire cutting edge can be sharpened at one time by placing it along the stone.
Gracey Curets
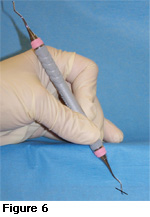
Area-specific curets, such as Gracey curets, have two edges and a rounded toe. However, only one cutting edge is used for instrumentation. When the terminal shank of a Gracey curet is perpendicular to the floor, the face of the blade is angled or “offset” from the shank to create an upper and lower cutting edge (Figure 6). The most important step in sharpening these curets is to determine the correct cutting edge to be sharpened. The cutting edge used in instrumentation is the lower cutting edge. To position the instrument correctly for sharpening, the face of the blade must be placed parallel to the floor (Figure 7). The hygienist should examine the angle of the face when the terminal shank is perpendicular to the floor, then determine whether the handle should be moved to the right or the left to make the face of the blade parallel to the floor. The sharpening stone should be placed at the heel of the blade and rotated along the cutting edge until the stone contacts the line angle of the toe.
Occasional sharpening of the toe maintains the overall shape of the Gracey curet. Instead of stopping on a downstroke at the line angle of the toe, the hygienist should continue the sharpening stroke, increasing the angle of the stone 15º to 25º from the face of the blade as it is moved around the toe. The sharpening process is stopped on a downstroke once the line angle of the opposite side of the toe is reached (Figure 8A, 8B, 8C). Pressure around the toe should be light because only the shape is being maintained; a cutting edge is not being created.
Universal Curets
Universal curets have two useable and parallel cutting edges and a rounded toe. Unlike the Gracey curets, both cutting edges of the universal curets must be sharpened. The cutting edges are straight from heel to toe, therefore, the entire cutting edge can be placed against the sharpening stone. When rounding the toe, the hygienist should begin rotating around the toe, as shown in Figure 8A, 8B, and 8C. The toe of the universal curet must be rounded from both cutting edges. Rounding should stop at the toe line angle opposite the cutting edge being sharpened.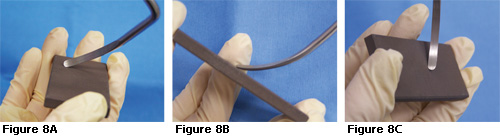
References
- Daniel SJ, Harfst SA, Wilder RS. Mosby’s Dental Hygiene Concepts, Cases and Competencies. 2nd ed. Philadelphia: Mosby Elsevier; 2008.
- Wilkins EM. Clinical Practice of the Dental Hygienist. 10th ed. Philadelphia: Lippincott Williams & Wilkins; 2009.
- Paquette OE, Levin MP. The sharpening of scaling instruments: II. A preferred technique. J Periodontol. 1977;48:169-172.
- Perry DA, Carranza FA, Beemsterboer P. Techniques and Theory of Periodontal Instrumentation. Philadelphia: WB Saunders; 1990.
- Marquam BJ. Strategies to improve instrument sharpening. Dent Hyg (Chic). 1988;62:334-338.
- Nield-Gehrig JS. Fundamentals of Periodontal Instrumentation and Advanced Root Instrumentation. 6th ed. Philadelphia: Lippincott Williams & Wilkins; 2008.
- Parkes RB, Kolstad RA. Effects of sterilization on periodontal instruments. J Periodontol. 1982;53:434-438.
From Dimensions of Dental Hygiene. September 2009; 7(9): 32-35.
