Maximize the Working Stroke
Dental hygienists need to be well versed in the components of the ultrasonic stroke in order to ensure its efficacy.
Ultrasonic instrumentation converts electrical energy to mechanical energy in the form of rapid vibrations at the instrument tip. While this vibration removes plaque biofilm and calculus, meticulous technique is necessary to effectively treat all affected root surfaces and to adequately remove problematic bacterial byproducts. The working stroke created by the clinician vs the instrument accomplishes this root coverage.
The root structure and pocket topography should be mentally visualized by using the periodontal assessment (eg, pocket depths and clinical attachment levels) as guides. Local anesthesia should be considered when instrumenting tenacious calculus or deep pockets with calculus located adjacent to the epithelial attachment.
Although ultrasonic instrumentation is often touted as being faster than hand instrumentation, this is not necessarily the case.1,2 The ultrasonic working stroke is short, approximately 2 mm to 3 mm in length, and employs equally distributed, light to moderate pressure across its full length. The ultrasonic working stroke requires much less pressure than a stroke made with a curet. Applied ultrasonic insert/tip (UIT) pressure is akin to that of an exploratory stroke. The activated UIT needs to remain in continual motion to limit the accumulation of frictional heat and reduce patient discomfort. Fast and erratic movements result in incomplete root debridement, so UIT movement should be slow and methodical to help ensure removal of adherent plaque biofilm and calculus.1,2
WORKING STROKE DIRECTION
The direction of the working stroke during the activation phase of ultrasonic instrumentation (Figure 1) should be different from the orientation used to adapt the UIT to the tooth surface (Figure 1, right). Adaptation involves contacting 4 mm or less of an appropriate UIT to the tooth with the right surface and angle.3 A horizontal orientation is often used for proximal surfaces, while a vertical orientation is implemented for narrow pockets and extension to the epithelial attachment (Figure 1). An oblique orientation is appropriate for all surfaces when not using a horizontal or vertical orientation.3 For instance, the working stroke may be activated in a horizontal direction after adapting the UIT to the root surface in a vertical orientation (Figure 1).
Numerous working stroke movements of UITs are acceptable for debridement; however, adjusting the stroke to meet the root topography (shape) is critical to successful instrumentation. Strokes can be maneuvered in oblique, horizontal, and vertical paths. The direction of the strokes depends on access, root surface anatomy, and sulcus-pocket shape as defined by the epithelial attachment and tissue walls. The distribution and tenacity of deposits on treated tooth surfaces also help guide working stroke direction.
Generally, oblique movements are best for buccal/facial surfaces, as well as proximal areas. This movement seems to be the most common mode of activation. Horizontal strokes are typically reserved for line angles, narrow pockets, and, infrequently, the facial and lingual surfaces. Furthermore, horizontal strokes are sometimes contraindicated because of the potential for iatrogenic damage to the epithelial attachment. When possible, clinicians should consider using horizontal strokes in the shallow aspects of deep pockets in order to avoid the epithelial attachment.
Two studies reported that ultrasonic instrumentation caused a mean immediate post-therapy attachment loss that ranged from 0.68 mm to 0.75 mm.4,5 The nature of the strokes, however, was not reported and treatment was only conducted on anterior teeth.4,5 Another study found no significant differences in healing when four instrumentation modalities were examined after 6 months.6 Nevertheless, damage to the attachment apparatus should be avoided while still ensuring that calculus is fully removed. If available, endoscopic assessment during or post-therapy will help determine treatment endpoints and better evaluate healing. To optimize horizontal strokes, clinicians should consider using this direction in deep pockets but not directly on the epithelial attachment.
Vertical strokes extend from either the gingival margin (GM) toward the epithelial attachment (EA), or from the EA toward the GM. Vertical strokes are implemented on any root surface with a “top down” approach (GM toward EA) to remove large tenacious calculus deposits during initial periodontal therapy.7 The use of vertical strokes from the GM to the EA is not indicated when debridement needs are light to moderate, as it may create unnecessary push strokes that are ineffective and may cause patient discomfort. In most circumstances, vertical strokes are activated from the EA to the GM, depending on pocket depth. Vertical strokes are also useful on mesial and distal surfaces; however, access may hinder their use.
TENACIOUS CALCULUS REMOVAL
One of the most prevalent problems in ultrasonic instrumentation is the use of smooth oblique subgingival working strokes prior to removing the bulk of large deposits, which results in burnished calculus. Endoscopic evaluations have revealed that burnished calculus—ranging from large, smooth, and flat sheets to small, flat pieces located in furcations, developmental depressions, line angles, and adjacent to the cementoenamel junction (CEJ)—often remains after ultrasonic instrumentation is completed.2 If heavy and tenacious calculus is present, a tapping motion with the activated UIT on the crest of the deposit can help fracture away the deposit before oblique strokes from the EA to the GM are initiated. This approach can be used in a variety of vertical directions to efficaciously fracture the dense mass.
CROSSHATCHING
Although endotoxins are not firmly attached to tooth roots, the ultrasonic UIT?needs to contact the area to optimize removal.1,8 It is often difficult to ensure every activation stroke successfully overlaps the previous stroke, but working strokes that fail to overlap will yield an incomplete debridement that typically results in compromised healing. For these reasons, implementing a patterned approach in limited spaces will likely yield the best results.
Patterned debridement (ie, crosshatching or basketweaving strokes) is indicated adjacent to areas that display inflammation, bleeding on probing, and detectable deposits.7 Crosshatching uses a combination of oblique, horizontal, and vertical strokes activated in a pattern to attempt complete deposit removal and root coverage. First, oblique strokes are applied across the root or concavity, then horizontal stokes, and, lastly, vertical strokes. A small area may warrant only bidirectional strokes. Crosshatching is generally reserved for final root surface debridement or for fine, light deposits.
BUCCAL AND LINGUAL SURFACES
One of the most challenging areas for effective debridement on facial/buccal and lingual surfaces is adjacent to the CEJ.2 Starting with the most distal tooth in a quadrant and on the most distal aspect of the buccal or lingual surface, advance forward with an oblique stroke. Depending on pocket depth, the strokes are activated from the EA to the GM. If the pocket is deep (6 mm or greater), activation occurs from the EA to 3 mm above the EA and across the root. Next, oblique strokes are applied from the ending point of the previous strokes to the GM, resulting in another 3 mm zone. Strokes should be overlapping to accomplish adequate coverage. Crosshatching may be employed if needed.
PROXIMAL SURFACES
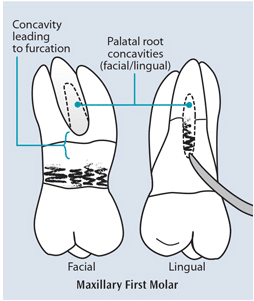
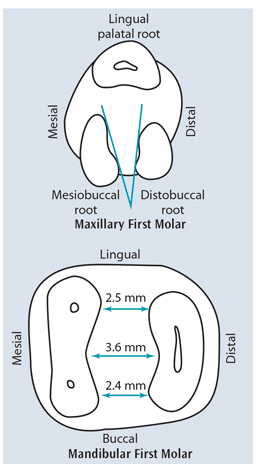
Proximal surfaces require a combination of strokes to extend to the midline and to all aspects of the tooth adjacent to the periodontal pocket. Envisioning the shape of the pocket is critical to performing effective ultrasonic instrumentation, particularly on proximal surfaces. Of particular concern is the distal of second molars, as well as the maxillary premolars (Figure 2).9 These areas are difficult to visualize and challenging to debride effectively because of limited access, as well as complicated and inconsistent root anatomy.9 Root debridement can be assisted by following ultrasonic instrumentation with the Gracey 15/16 or 17/18 designs for the second molars and mini- or micro-bladed curets for the maxillary premolars.
On mesial or distal surfaces, the stroke is often transitioned from oblique at the line angle to an almost vertical stroke on the direct proximal root surfaces (Figure 2, left). An oblique stroke is often needed because proximal contacts usually interfere with a vertical stroke. If an adjacent tooth is missing, however, vertical strokes may be used.
FURCATION INVOLVEMENT
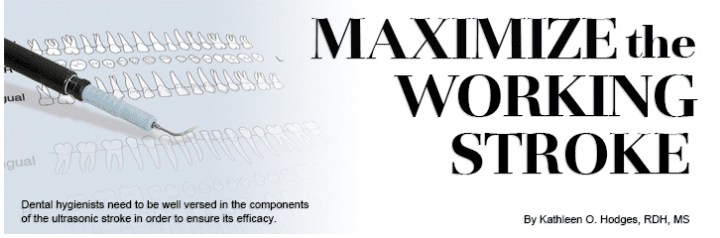
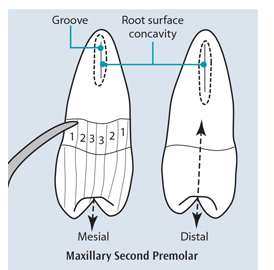
Data from retrospective studies and clinical experience reveal that molars with furcation involvements do not respond well to mechanical debridement.9 The roof of a furcation frequently begins only a few millimeters apical to the CEJ. Therefore, clinicians will often debride the openings to furcations. Crosshatching is indicated in the concavity located above and adjacent to the furcation (Figure 3). Partitioning this concavity from the rest of the root, either with direct vision or mental imagery depending on the location of the gingival margin, helps ensure complete root coverage with multidirectional strokes.
Once a furcation is felt with an explorer or furcation probe, clinicians are charged with instrumenting the summit and furcal walls based on their shape (Figure 3, left). Crosshatching is again indicated. Instrument selection may include a ball-ended or diamond-coated UIT to enhance debridement of the root surface. Endoscopic technology is necessary when using a diamond-coated UIT because damage to the root surface can easily occur. The anatomy inside a furcation should be mentally visualized and treated nonsurgically in the best and most thorough manner possible (Figure 4). Surgical intervention may be indicated. Thoroughness is important because the clinician and patient will have increasing difficulty caring for the furcation should attachment loss advance.
CONCLUSION
The UIT must contact exposed and bacterially contaminated root surfaces in multiple directions to thoroughly debride.1,8 For this reason, ultrasonic periodontal debridement is not always faster than hand instrumentation. The clinician needs to plan a methodical pattern of working strokes for each area treated. The working stroke should be short, equally distributed, constant, overlapping, and often multidirectional to efficaciously perform root surface debridement. Light pressure is used, depending on tenaciousness of the deposit. Should heavier deposits exist, vertical “top down” strokes may be performed prior to activation from the EA to the GM using multidirectional strokes. Technique intelligence3 is important because quality ultrasonic instrumentation is paramount as mechanical debridement remains the gold standard for nonsurgical periodontal therapy. Adequate time, skill, and patience are needed to perform excellent ultrasonic debridement.
REFERENCES
- Kiehl N. The keys to ultrasonic instrumentation. Dimensions of Dental Hygiene. 2012;10(7):42–48.
- Pattison AM, Pattison GL. Periodontal instrumentation transformed. Dimensions of Dental Hygiene. 2003:1(2);18–22.
- Hodges KO. Develop your technique intelligence. Dimensions of Dental Hygiene. 2015;13(4):34–39.
- Dilsiz A, Sevinc S. Trauma from instrumentation after non-surgical periodontal treatment with ultrasonic scalers and Nd:YAG laser. Acta Odontol Scand. 2015;73:144–149.
- Alves RV, Machion L, Casati MZ, Nociti FH Jr, Sallum EA, Sallum AW.Clinical attachment loss produced by curettes and ultrasonic scalers. J Clin Periodontol. 2005;32:691–694.
- Obeid PR, D’Hoore W, Bercy P. Comparative clinical responses related to the use of various periodontal instrumentation. Clin Periodontol. 2004;31:193–199.
- Pattison AM. The right stuff. Dimensions of Dental Hygiene. 2015;13(1):31–37.
- Matsuda SA. Instrumentation of biofilm. Dimensions of Dental Hygiene. 2003;1(1)26–30.
- Stambaugh RV. Perioscopy. Dimensions of Dental Hygiene. 2003;1(2):12–16.
From Dimensions of Dental Hygiene. July 2015;13(7):32,34,36.
