
Getting a Grasp
Effectively using the modified pen grasp in hand instrumentation.
The practice of dental hygiene with its repetitive movements and static postures often leads to a variety of musculoskeletal problems for clinicians. More than 80% of dental hygienists experience some sort of upper body and back pain.1 Common disorders related directly to hand and forearm pain include carpel tunnel syndrome, tendonitis, tenosynovitis, and extensor wad strain.1 These disorders occur over time as a result of repetitive movements—related to improper grasp and hand movements—for long periods of time on a daily basis.
 While students in dental hygiene programs spend a great deal of time learning and practicing ergonomically correct positioning, a pilot research study indicates that the methods taught are often not practiced once the student becomes a licensed clinician.2 Current classroom teaching stresses the importance of maintaining moveable joints such as the wrist, elbow, shoulders, and neck in a neutral position.1-3
A neutral position eliminates strain from flexion and extension. The goal of the neutral forearm position is to keep the forearms parallel to the floor and to not stray beyond 60° in an upward direction from parallel, or beyond 100° in a downward direction (Figure 1). Neutral positioning of the hand includes maintaining the pinkie finger slightly lower than the thumb and keeping the wrist aligned with the forearm (Figure 2). The clinician should avoid rotating the thumb side of the hand down so that the thumb is lower than the pinkie finger; the hand should not be bent in an upward or downward direction.3 The traditional modified pen grasp should then be adapted with these concepts in mind.
Modified Pen Grasp
The modified pen grasp is a variation of the pen grasp. Whereas a pen grasp varies from person to person, the modi?ed pen grasp requires all clinicians to hold the instrument in a similar manner. Figures 3A and 3B show a typical modified pen grasp. The advantages of the modified pen grasp are better control of the instrument, prevention of finger fatigue, and an increase in tactile sensitivity.
Clinicians should notice placement of the thumb, index, and middle fingers as well as the relationship of the instrument handle to the second and third knuckles of the index finger. Maintaining a neutral position with the modified pen grasp requires modification based on wrist and forearm positioning.
In a modified pen grasp, the instrument is held in the dominant hand with the pads of the index finger and thumb opposite each other on the handle closest to the working end. The thumb and index finger are not touching, thereby creating a tripod effect with the middle finger that is placed along the shank of the instrument (Figure 3A). This tripod effect balances the instrument in the clinician’s hand to provide stability and control. By keeping the index finger and thumb separated, the clinician can roll the instrument between these digits with ease and control.
The thumb is slightly curved in a c-shape, whereas the index finger is straight from the fingertip to the second knuckle. The index finger bends at the second knuckle, and the instrument handle rests somewhere between the second and third knuckle (see Figure 3A). If the index finger bends at the ?rst knuckle, it may result in loss of wrist motion and strength for scaling.
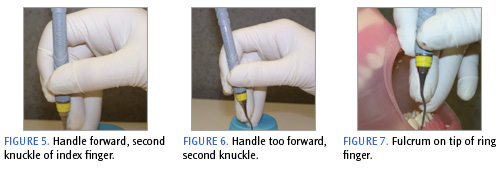
 When the clinician has difficulty maintaining a neutral wrist position, the handle of the instrument should be moved back toward the V in the hand (see Figure 4) or forward slightly in front of the second knuckle of the index finger. This range in positioning will produce a greater amount of flexibility for the operator to maintain a neutral position (Figure 5).3 The side pad near the fingernail of the middle finger is against the shank and serves to guide the instrument. The middle finger may bend at the second knuckle or can remain straight (Figure 3B).
If the pad of the middle finger is placed on the shank, it results in ineffective pressure against the instrument and pulls the instrument too far forward of the second knuckle on the index finger, making it difficult to apply lateral pressure of the cutting edge against the root or tooth surface (Figure 6). The middle and ring finger should always remain in contact somewhere along the length of either finger. This contact ensures proper wrist motion and limits the amount of finger motion to activate the instrument (see Figure 3B).
Fulcrum
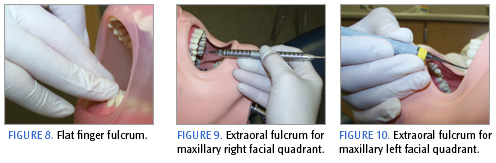
The fulcrum or finger rest serves as a stabilizing point for the instrument, prevents injury to the patient and operator, and enables the hand and instrument to move as a single unit. The pad, speci?cally the lateral (outer) tip of the ring finger of the dominant hand, serves as the fulcrum finger (Figure 7). When activating the instrument, the clinician exerts downward pressure on the fulcrum finger and slightly squeezes the instrument with the index finger and thumb to increase stability and control during scaling while not causing patient discomfort. A flat finger fulcrum (Figure 8) where the clinician uses the middle of the pad can hinder the maneuverability or pivot of the fulcrum finger, thereby limiting the ability to adapt, angle, and activate the instrument properly. General guidelines for an appropriate intraoral fulcrum include the placement of the ring finger on solid tooth surface in the same arch and close to the work area.
However, intraoral fulcrums can sometimes prevent the wrist and hand from maintaining a neutral position. In those situations, the clinician should adapt to an extraoral fulcrum so the hand, in particular the palm, can be slanted downward toward the pinkie finger. Extraoral fulcrums can help the clinician establish the correct instrument to tooth angulation while maintaining neutral positioning of the joints.3
The extraoral fulcrum shown in Figure 9 is ideal in the maxillary posterior region, where instrument angulation may be challenging. When using an extraoral fulcrum on the maxillary right facial quadrant (left facial for the left-handed clinician), the clinician places the back of the hand against the patient’s chin, with the nail side of the middle and ring fingers gently pressing against the face. The clinician’s palm is facing up.
Instrumentation on the left maxillary facial quadrant (right facial for the left-handed operator) requires a modified palm-down approach. This time, the pads of the middle and ring fingers are placed against the chin while light pressure is exerted against the face (Figure 10). Additionally, an extraoral fulcrum below the commissure of the lip can be used when seated at the 12:00 position and instrumenting the mandibular anterior teeth.
The instrument grasp is one of several ergonomic components to consider when practicing dental hygiene. A poor grasp is most likely the cause of instrument problems. Good posture is the key to longevity in the practice of dental hygiene. Paying attention to head, neck, back, shoulder, and elbow positioning is critically important. It is never too late to revisit and learn new ergonomic principles that can lead to a long and successful career in dental hygiene.
Acknowledgement
Special thanks to Trisha Leugers, RDH, for her editorial and photographic assistance.
References
- Nield JS. Fundamentals of Periodontal Instrumentation: Advanced Root Instrumentation. 6th ed. Baltimore: Lippincott Williams & Wilkins; 2008.
- Daniel SJ, SA Harfst, RS Wilder. Mosby’s Dental Hygiene: Concepts, Cases and Competencies. 2nd ed. Philadelphia: Elsevier; 2008.
- Meador HL. The biocentric technique: a guide to avoiding occupational pain. J Dent Hyg. 1993;67:38-51.
From Dimensions of Dental Hygiene. May;6(5): 24-26.
