Digital Dental Imaging
Here are helpful techniques for incorporating digital photography into the dental operatory.
 The basics of intraoral photography are important because the addition of digital equipment does not replace basic skills or the techniques necessary to create quality oral photographs. The use of mirrors and retractors determines the quality of the dental photograph. Most intraoral photos consist of a relaxed lip shot, the anterior 12 teeth, a buccal mirror shot of each side with the teeth closed together and slightly separated, and occlusal shots of the maxilla and mandible. Many clinicians also want full face portrait and profile views of the patient. The positioning of mirrors and retractors is critical to photo quality. A good dental photography textbook or basic dental photography hands-on course is helpful for learning these critical positions.
Retractors are often overused and stretch lips and cheeks tightly to try to remove them from the photographic field. However, gentle retraction in a lateral direction and lifting the lips and cheeks forward and away from the teeth are more effective for providing a clear image. To start, have the patient move his or her head to the left or right to improve access and allow the photographer to position him or herself easily without leaning over the patient’s lap. For buccal photos, the retractors are placed and gentle retraction is obtained. The buccal mirror is slipped as far posterior as possible while using it as a retractor itself. The distal end should not touch the jaw or teeth, and ideally should be about 6 to 10mm from the buccal surface of the most posterior area in the field. The mirror is pulled laterally in the anterior as far as the relaxed lips and cheeks will allow. The camera is positioned as close to perpendicular to the mirror’s surface as possible while still being able to capture the entire field. Once the field is in view, the focus is concentrated in the premolar area and the exposure is taken. Be careful to keep the occlusal plane level with the top and bottom of the photograph. Other photos of different tooth positions should be made without removing the instruments, so it is a good idea to practice these positions with the patient before starting.
FOCUS VIA CAMERA POSITIONING
The contra-lateral buccal photographs are made without changing the focus on the camera. Focus is obtained by moving the camera closer and farther from the teeth on the second buccal series. This will ensure the relative size of the teeth on both sides of the arch remain constant. These mirror photos will be backward and should be flipped horizontally when manipulating the photographs with a software package.
Occlusal photographs are the most difficult for beginners and require a great deal of patience to master. For the maxillary arch, lower the chair with the patient slightly reclined. Have the patient turn toward the photographer and slightly drop the chin. The retractors are placed in the buccal vestibules, almost touching at the midline, and gentle retraction to elevate the tissue away from the front surface of the teeth is obtained. The occlusal mirror itself provides the lateral retraction. The mirror is positioned far enough posterior to include the desired anatomy and pressed against the opposing arch as the patient opens as wide as possible. Try to keep the posterior of the mirror 6 to 10mm from the most posterior anatomy in the photographic field. When the entire arch is visible, focus on the occlusal surfaces and make the exposure. The mandibular arch is essentially the same, but fully recline the patient and lower the chair; have the patient tip his or her head back and turn toward the photographer.
INTRAORAL WAND CAMERAS.
Intraoral wand cameras are usually attached directly to a recording device (PC, laptop, etc.) and can be displayed immediately if a viewing screen is available in the operatory. This type of camera is suited for snapping images of individual teeth to show patients’ treatment needs during treatment planning sessions and if patients have questions concerning the need for treatment. The image can be added to the patient record if the office is using electronic records and that software allows addition of images to the patient record file. Images can be saved using software usually included with the wand camera or using other digital photo software if electronic records are not available.
It is also important to consider how many personnel are required to take dental photos properly. An inexperienced team will usually need three people (retractors and fluid management, mirror placement, and photographer). As the experience level increases, the team can shrink to two and the patient can help manage the retractor placement with help from an experienced photographer.
USER-FRIENDLY EQUIPMENT
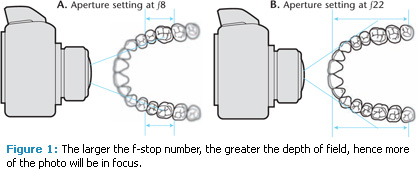
Cameras themselves are user friendly and, once set up, they function properly without the need for constant adjustments. Camera settings for intraoral photography require an understanding of depth of field as it pertains to the aperture setting on the camera. A smaller lens aperture (opening that allows light to pass through the lens) means that more of the picture (from foreground to background) will be in focus. Aperture opening is expressed in f-stop settings. The larger the f-stop number, the smaller the lens opening, with a corresponding increase in depth of field. (In other words, more of the photo will be in focus from “front to back.”)
Digital SLR cameras can function effectively using f-stop settings of 22-32, which is sufficient to keep the focus clear from the canine back to the molars. Once set, the f-stop does not need to be changed for intraoral shots. Because there is very little light entering the lens at these high f-stop settings, a flash is necessary to supplement the light needed for the photo.
Intraoral cameras should be set in either the manual or aperture priority mode where the fstop can be set. Adding the flash to the system with the newer digital SLR cameras is an automatic feature, and the camera will set itself to function properly with the flash. Some slight adjustment to the flash setting may be needed depending on individual cameras and lenses.
Even though all digital SLR cameras have automatic focus settings, they are not recommended for intraoral photography. With the various anatomical structures and use of mirrors, the autofocus systems can easily be confused about where to focus. Manual focusing eliminates the tiresome lens auto-adjusting while the camera analyzes the photo field. The biggest advantage to using the manual-focus mode will be consistent image size of the teeth in the photos. Once the first photo is taken, if the lens is not adjusted and the distance from the subject is used to focus the picture, the teeth will remain the same relative size even when switching sides of the arch.
To use the same camera setup for extraoral portraits or profile photographs, only one change is required. The majority of digital SLR cameras have a selection of “pre-set” commands, and one will be for portrait photography. Simply change the camera from the aperture priority or manual setting to the portrait setting and take the appropriate photos. The camera also has settings for image size and quality levels. To make reasonably sized computer files, try setting the camera for a typical 4×6-inch or 5×7-inch format at the highest possible quality. This setting will be sufficient for most needs and will keep the files at manageable sizes for storage, manipulation and printing. The storage system should reside on the same secure system for all patient data. Office management software or photo software such as Photoshop® (CS5 or Elements 8.0), Paint Shop Pro®, Picasa® or other digital image manipulation and image gallery software should be used to organize the images and assign keywords for future searches.
As with all additions to office procedures, the first attempts at intraoral photography can be frustrating. Only practice and setting routines for this treatment modality will help make digital imaging a simple and useful tool. The potential use for digital images can be extremely beneficial for any dental practice, and the time and effort to become proficient at this aspect of patient care are well spent.
RESOURCES
- Mastering Dental Photography By Wolfgang Bengel Quintessence Publishing
- The Textbook of Digital Photography By Dennis P. Curtin Available at: www.shortcourses.com
From Dimensions of Dental Hygiene. May 2010; 8(5): 60-62.
