
Develop Your Technique Intelligence
Correct adaptation is key to successfully implementing ultrasonic therapy.
Periodontal debridement with ultrasonic instrumentation provides many benefits for both clinicians and patients. The fundamentals of positioning, adaptation, and activation, however, must be examined often to ensure the technology is optimized. Adapting an ultrasonic insert/tip (UIT) correctly is an essential concept because of its relationship to successful dental hygiene care.
Teeth are composed of crowns and roots—a connection of convex and concave surfaces. As such, the mesial and distal line angles of teeth are actually mesial and distal curves that require the UIT’s working end to adapt to the curved surface. Even buccal and lingual surfaces are curved, not linear. The activation of UITs is most effective when achieving the correct adaptation of the tip to the curvatures of a tooth.
COMPREHENSIVE ASSESSMENT IS THE FIRST STEP
Optimal ultrasonic instrumentation is dependent on a comprehensive assessment. Circumferential six-point probing is standard. This approach, vs recording only bleeding points and pocket depths, is necessary to provide an accurate picture of the subgingival environment. In addition, recession and diffuse inflammation should be noted. When pocket depth, recession, and inflammation (at least 1 mm above the cementoenamel junction [CEJ]) are recorded, an accurate road map is created for precise adaptation and activation of the UIT. For example, a proximal surface containing a shallow, wide pocket, as well as a very narrow pocket at the mesial curvature indicates the need for multiple UITs to precisely adapt. In this instance, a thin tip could be used for the proximal area while an ultraslim UIT is more appropriate for the deep pocket depth. When the topography is unknown, inappropriate UIT?selection may occur, which eliminates the clinician’s ability to successfully provide thorough periodontal debridement.
ULTRASONIC INSERT/TIP SELECTION
UIT selection is intimately related to adaptation (suggestions for appropriate profile and diameter selection have been reviewed in previous publications).1–3 While the straight designs of traditional and slim UITs are labeled “universal,” effective instrumentation cannot be accomplished by using only one UIT. Implementing a straight UIT to adapt to the curves of roots and crowns is not logical; thus, multiple UITs are needed to adapt well and to attain the results necessary for healing. The use of only one UIT may also raise the risk of trauma and increase patient discomfort.
Generally, each tray set-up should include at least three UITs—a straight, right curved, and left curved instrument. Additional UITs may be indicated for heavy deposits located next to the gingival margin, isolated deep narrow pockets, or implants.
ACTIVE TIP AREA
The active tip area is the portion of the working end that performs the instrumentation and it is affected by the unit’s frequency. The active area of a magnetostrictive insert in a 25,000 Hz to 30,000 Hz unit is from the point of the tip to about 4.3 mm up the working end toward the handle. The active tip of a piezoelectric unit is slightly less, measuring from 2.2 mm to 3.5 mm, depending on the tip design. The use of more than 5 mm of the UIT?is likely to result in burnishing or incomplete removal of calculus and/or inefficient debridement. On the other hand, the use of only 1 mm on all tooth surfaces may produce undesirable root alterations. As such, adaptation is ensuring the active UIT is placed within the root anatomy for disruption of bacterial plaque biofilm and intersecting the calculus deposit appropriately at different angles to remove it. In order to effectively remove deposits and disrupt plaque biofilm, the UIT must remain in contact with the tooth surface at all times. This makes proper adaptation critical.
ACTIVE SURFACES
The UIT has various active surfaces to consider when adapting. With magnetostrictive technology, the two lateral sides and the back of the UIT?are most often used. The face and point are also active surfaces; however, they are generally avoided because they emit the greatest amounts of energy. The face (concave) surface, however, would be much less detrimental to the root surface than the point. Piezoelectric options are most successful when the lateral sides are adapted to the root.
Using the point or very end of the UIT?is acceptable when removing heavy and/or tenacious calculus during initial therapy. In this instance, the deposit is attacked coronally to the epithelial attachment until the deposit fractures and a thin UIT can be adapted.1 In the next stage of debridement, the UIT is placed near the epithelial attachment to progress coronally, as with curets.
ULTRASONIC INSERT/TIP-TO-ROOT ANGLE
The angle of the active tip to the root should be maintained at 0° to 15°, much like a periodontal probe would be adapted. Because of the curvature of the roots, 0° is nearly impossible. It is important to angulate the tip to the root at 15°, as research demonstrates that overangulation results in root substance loss.4,5 As the tip-to-root angle increases, so does the root substance removal.4,5 Further study has shown that tip cross-section, load, and power also affect iatrogenic root defects.6 This concept is important because clinicians are striving to find the appropriate end-point where deposits are eliminated and root substance is not removed. Achieving this ideal angle is based on concentration, mental imagery, experience, and proper technique, which all contribute to building technique intelligence (Table 1).
Another factor to consider when visualizing the tip-to-root angle is positioning. There are many different positioning strategies, but the tip-to-root angle is dependent on the relationship between the clinician and patient. For right-handed operators, sitting in an 8 o’clock to 9 o’clock position and working on the mandibular right lingual with indirect vision permits the correct adaptation. Sitting at a 12 o’clock position while trying to achieve debridement in the posterior area does not permit correct adaptation.
ULTRASONIC INSERT/TIP ORIENTATION

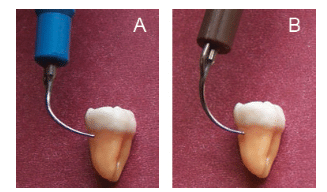
UIT orientation refers to the direction of the active tip area in relation to the long axis of the tooth surface. UIT orientation can be horizontal, vertical, or oblique depending on the needs of the surface (Figure 1A to Figure 1C). Horizontal orientation is perpendicular to the long axis of the surface being instrumented. On the other hand, vertical orientation refers to the active UIT area remaining parallel to the root’s long axis resulting in the point of the UIT being aimed at the epithelial attachment. Horizontal orientation is particularly useful on proximal surfaces and may be the only way to reach the midline of the proximal surface, especially on wide molar teeth. Oblique orientation is another option that closely resembles the horizontal direction of the active tip. It is helpful in some situations and encourages the use of the lateral surfaces.
Frequently, deposits are located on or adjacent to the CEJ. To effectively adapt to this area, consider its curvature in addition to the angle of the active UIT to the tooth. A near 15° angle of the UIT to the tooth below the CEJ will facilitate deposit removal because it enables the active tip area to adapt to the root. Use of a near 0° to tooth angle would probably prevent removal because of the curvature in this area. Additionally, positioning the right-handed operator is critical because an 8 o’clock to 9 o’clock position for the mandibular right with a 10° UIT-to-tooth angle will be effective but a 12 o’clock position will likely encourage a near 0° to root angle, resulting in inadequate debridement.
ADDITIONAL AREAS FOR ADAPTATION
There are multiple suggestions for adapting to mesial and distal curves. One alternative is to use the same strategy that is implemented when using a universal curet. First, insert at the distal line angle, advance across the buccal or lingual surface, and roll around the mesial line angle. Next, reinsert at the distal line angle, overlapping the previous insertion point, and advance toward the distal contact area. Rolling can be achieved by pivoting the wrist, repositioning the active tip area, turning the tip within the magnetostrictive insert, or incorporating an insert with a swivel handle option.
There are two schools of thought on how to adapt curved UITs to the proximal surface (Figure 2A and Figure 2B). One approach is to use the curved slim UIT like a universal curet. This technique allows the UIT to meet the anatomy in the same manner as the curet. Second, the opposite curved UIT can be adapted, although chances of trauma to the gingiva may increase. Regardless of which method is used, the goal is the same—the active tip should touch the deposit to fracture or remove it. In fact, a combination of approaches will provide the best periodontal debridement. It is also important to reexamine the pocket depth and shape to decide if a straight UIT is indicated for deep, narrow areas.
Pockets deeper than 4 mm require the use of a long UIT applied with a vertical orientation. In addition to depth, the width needs to be considered. A wide pocket, no matter its depth, can be approached with a vertical, horizontal, and/or oblique orientation. On the other hand, a very narrow deep pocket can only be debrided with a narrow, round slim or ultraslim UIT and a vertical insertion.
 FIGURE 3. Curved ultrasonic inserts/tips work well in exposed furcations. A buccal view is seen here.

FIGURE 4. In furcations with greater exposure, curved ultrasonic inserts/ tips can be adapted to the contour at the roof or within the furcation.
Because most patients have periodontitis of the early, moderate, or severe form, furcation exposure is common in general and periodontal practices. The curved UITs adapt well to the exposed furcation (Figure 3), assumedly much better than a straight UIT. When approaching a furcation with greater exposure, the curved UITs can be adapted to the contour at the roof and within the furcation (Figure 4).
CONCLUSION
Correct adaptation is essential to successful instrumentation. Periodontal charting is key to improving accuracy when adapting the UIT in pockets or sulcus. In order to achieve efficacy, the UIT must contact the bacterial plaque biofilm or calculus deposit. UITs can be oriented horizontally, vertically, or obliquely. Accurate knowledge of root anatomy, in addition to acute concentration and imagery are critical to the successful adaptation. As such, developing technique intelligence about UIT adaptation is important to providing the best patient care possible.
REFERENCES
- Pattison A. The right stuff. Dimensions of Dental Hygiene. 2015;13(1):31–37.
- Hodges KO. Strategies for selecting ultrasonic inserts/tips. Dimensions of Dental Hygiene. 2014;12(10):26–31.
- Hodges KO. Ultrasonic instrumentation. In: Dental Hygiene Theory and Practice. 4th ed. Darby ML, Walsh M, eds. Philadelphia: Elsevier Saunders; 2015:489-493.
- Flemmig TF, Petersilka GJ, Mehl A, Hickel R, Klaiber B. The effect of working parameters on root substance removal using a piezoelectric ultrasonic scaler in vitro. J Clin Periodontol. 1998;25:158–163.
- Flemmig TF, Petersilka GJ, Mehl A, Hickel R, Klaiber B. Working parameters of a magnetostrictive ultrasonic scaler influencing root substance removal in vitro. J Periodontol. 1998;69:547–553.
- Lea SC, Felver B, Landini G, Walmsley AD. Ultrasonic scaler oscillations and tooth-surface defects. J Dent Res. 2009;88:229–234.
From Dimensions of Dental Hygiene. April 2015;13(4):34,36,38–39.
