 HEDGEHOG94/ISTOCK/GETTY IMAGES PLUS
Negotiating Deep Pockets with Ultrasonics
Understanding the anatomy, topography, and calculus type is essential to effective power instrumentation of deep pockets.
Periodontal pocket depths greater than 5 mm, as measured by a periodontal probe, are considered deep pockets in nonsurgical periodontal therapy. Probing depth is an essential disease parameter for planning a patient’s individualized debridement for initial periodontal therapy.
ASSESSMENT
Although periodontal probing depth is important when planning instrumentation, additional disease indicators should be taken into account. The probing depth must be considered with the clinical attachment level to gain perspective on the patient’s root structure and his or her disease status.
The topography of the periodontal pocket requires analysis. Periodontal pockets can be wide and curved (bathtub shaped) or narrow and long (cylindrical shaped). The pocket shape could also be wide and narrow or complex, such as a spiral pocket curving from one surface to another (Figure 1).
Also, calculus size, tenacity, and location within the pocket are significant. The use of an explorer designed for periodontal instrumentation (eg, extended shank 11/12) is essential to evaluate the type of deposit, such as heavy and tenacious, or moderate and nontenacious. This explorer is used to reassess instrumentation and evaluate the clinical endpoint.
Additionally, the degree of inflammation, bleeding on probing, furcation invasions, tissue tone, and location of restorations should be considered. Accurate assessment findings are necessary to select the appropriate ultrasonic insert/tip (UIT) for quality debridement.

ULTRASONIC INSERT/TIP SELECTION
UIT selection is based on assessment data. Water delivery method and handle design are both the clinician’s choice because these features are independent of assessment findings. The choice of shank shape and width, as well as UIT length, however, are dependent on the assessment data, tissue tone, and use of local anesthesia.
The shank diameter in cross section can be thought of as a rectangle (eg, beavertail), diamond (eg, triple bend) or circle (eg, universal or thin subgingival UITs). The length of the UIT is determined by its name and by manufacturer photographs or samples. Generally, the thinner the UIT, the longer the shank and tip. Also, many thin UITs are tapered near the working end; therefore, the width at the active tip area (ie, up to 4 mm for magnetostrictive; 2 mm to 3.5 mm for piezoelectric) is important in relation to effectiveness. Only the active tip area will be adapted to the root; use of more than 4 mm can create incomplete removal or burnishing of hard deposits.
Many manufacturers recommend that most subgingival UITs be used for light to moderate calculus with low to medium power settings. This recommendation limits the choices for large, tenacious deposit removal. However, a few UITs can be used for this purpose on higher power (eg, beavertail, triple bend). Therefore, the shape and diameter are important elements for choosing an UIT that matches the pocket dynamics.
Initially, traditional UITs with wider and bent shanks are used for larger tenacious calculus. The active tip area needs to reach and touch the subgingival deposit to remove it. Additionally, hand instruments, such as working files (eg, Hirschfeld 3/7 and 5/11) can be used in conjunction with UITs to fracture the hard deposit. Using a long, fine, and round UIT in this situation, no matter the power setting, will likely burnish tenacious calculus. This choice might be tempting if considering only pocket depth instead of type of deposit or other assessment information.
Next, use of thinner UITs, which are round in diameter, are indicated on a lower power setting. For example, in a 7-mm area with light calculus and plaque biofilm, a very thin round tip may be used (eg, After Five Series of straight, left, and right). However, if the area is shallower (5 mm), the same UITs could be used or a shorter round UIT (eg, #10). This choice depends on pocket topography, as well as access to the deposits based on tissue tone and use of local anesthesia. A triple bend design for subgingival debridement with magnetostrictive units (XT Triple Bend ) is available that is thinner than the traditional triple bend design (#3).
Another consideration is root anatomy. The curvature of the UIT’s shank should be such that it can access the pocket and adapt to the root’s concavities and furcation anatomy. Most UIT manufacturers have guides on their websites to aid in selection.
PERIODONTAL DEBRIDEMENT
To begin periodontal debridement, decide if the pocket environment can be instrumented from the epithelial attachment (EA) to gingival margin (GM) or vice versa. Often with deep pockets, the approach will be from the GM to the EA. Conversely, moving from the EA to the GM in deep pockets will only be appropriate if the EA is easily accessed due to inflamed gingiva or the presence of only light to moderate nontenacious calculus. The descriptions below address curved and narrow pocket shapes, however, not all situations or approaches are addressed. For additional recommendations on power settings and technique, refer to other articles in Dimensions of Dental Hygiene and manufacturer instructions.
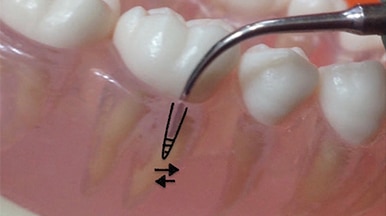
First Stage in Curved Pocket (Buccal/Lingual or Proximal)
Initially, adapt the UIT by touching the deposit with the pointed or blunt end, depending on the UIT chosen (Figure 2). Generally, the active tip area is used to engage hard deposits during instrumentation; however, use of the end is best for calculus removal in this circumstance. Continue fracturing the deposit by “tapping” the end on the top and sides of the calculus. Advance by reaching further subgingivally toward the EA as the deposit is removed. The shank will be vertical and parallel to the long axis of the tooth (Figure 2) or bisecting the long axis. Horizontal strokes are not recommended in this first phase of instrumentation because of the potential for burnishing a deposit by shaving it from the outside to the inside. Use hand instruments intermittently as described above.

margin to epithelial attachment.
Decide if the pocket can be debrided in its entirety from GM to EA (Figure 3) or if it would be advantageous to divide the pocket into sections (Figure 4). Concentrating on activation in these two sections aids in thorough debridement. The coronal most portion can be instrumented, followed by instrumentation of the apical section. This decision depends on the topography of the pocket, type of calcified deposits within the environment, and where the calcified deposits are located on the root.

epithelial attachment.

epithelial attachment.
Second Stage in Curved Pocket (Buccal/Lingual or Proximal)
The second stage of periodontal debridement occurs after the large deposits are removed. For deposits in bathtub-shaped pockets, oblique strokes from the EA to the GM are activated adapting the active tip area (eg, 2 mm to 3 mm) (Figure 5). Horizontal and vertical strokes are also used to thoroughly remove plaque biofilm and calculus.
If the pocket is very deep (7 mm or greater) consider dividing the space in half. In this case, the first set of strokes will proceed from the EA to the middle of the pocket located about 3.5 mm from the EA (Figure 6). The next set of strokes will begin from the middle of the pocket to the GM. The entire root surface must be touched with the active tip at about a 10° angle to remove both fine calculus and plaque biofilm in small 2 mm increments. Therefore, oblique, horizontal, and vertical strokes are applied in an organized sequence. Hand instrumentation must be used to complete scaling and root planing.

to gingival margin.

attachment to gingival margin.
Initial Stage in Narrow Pocket (Buccal/Lingual or Proximal)
Narrow pocket depth can manifest on any surface, often creating challenges. The pocket contour might be narrow on an anterior or premolar tooth surface, such as the facial, or a posterior tooth on the buccal surface of either the distal or mesial root (Figure 7). Even greater challenges occur when the location of the narrow pocket is at the line angle or on proximal surfaces (Figure 8).
As described above, calculus removal will progress from the GM to the EA, initially by engaging the end of the UIT with a tapping motion to fracture calculus from its top edge, moving apically. The narrow nature of the pocket indicates a mostly vertical approach with the tip. An oblique or bisecting approach will not be effective in reaching all sides of the pocket due to the pockets’ restricted width and depth.


Second Stage in Narrow Pocket (Buccal or Lingual or Proximal)
The approach will move from EA to the GM in the second stage of instrumentation. The motions can be across the root from side to side (Figure 9) or in varying directions accomplishing crosshatching, if space permits (Figure 10). Again, pocket depth is considered when determining if debridement will be from the EA to GM in its entirety, or if the depth will be divided into two sections: one at the apical end and one toward the GM. Mini- or micro mini-bladed curets are useful in the narrow pocket for completing scaling and root planing.
There is limited research about specific UITs and their effectiveness. One study reported thin ultrasonic inserts produced a root surface free of plaque, calculus, gouges, and scratches at 4.65 mm compared with 3.13 mm for standard inserts.1 A study comparing #10 and thin inserts found no statistically significant difference between the two in debridement in pockets of varying depths.2 Both inserts, however, reached the apical plaque border of pockets of any depth. A trend was noted in that the thin inserts more easily debrided the apical plaque border in pockets 7 mm or greater.

CONCLUSION
Approaching deep pockets knowing the topography, anatomy, and calculus types is essential. Thorough periodontal assessment data are paramount for proper UIT selection, adaptation, and activation to enhance the efficiency and effectiveness of power instrumentation. Adapting the appropriate active tip area and thorough root coverage are key to success. Planning the approach to ultrasonic instrumentation in deep pockets is essential to achieving a quality clinical endpoint for optimal healing.
REFERENCES
- Dragoo MR. A clinical evaluation of hand and ultrasonic instruments on subgingival debridement with unmodified and modified ultrasonic inserts. Int J Periodontics Restorative Dent. 1992;12:310–323.
- Clifford LR, Needleman Ig. Chan YK. Comparison of periodontal pocket penetration by conventional and microultrasonic inserts. J Clin Perio. 1999;26:124–130.
From Dimensions of Dental Hygiene. January 2019;17(1):16,18,21.
