 EDWARD OLIVE/ ISTOCK/THINKSTOCK
Decision Making in Ultrasonic Instrumentation
Sufficient power, proper adaptation, and appropriate stroke activation are integral to successful use of this modality.
Dental hygiene practitioners face a daunting task in the provision of nonsurgical periodontal therapy. Countless choices must be made in a short timeframe regarding procedure, delivery method, and armamentarium. When coupled with clinical protocol and technique, all facets of care can impact the success of therapy.
For all of the painstaking efforts made to eradicate periodontal breakdown in patients, dental hygienists sometimes get in the way of their own success. The unintentional misuse of ultrasonic instrumentation is often one of these roadblocks. Because ultrasonic instrumentation may appear easier than hand instrumentation, clinicians may implement a less vigilant, casual approach. The three keys to successful ultrasonic therapy are sufficient power, proper adaptation, and appropriate stroke activation.
POWER LEVEL

Power level is a critical consideration in ultrasonic instrumentation.1 The prevailing thought in the 1980s was to use low power for all debridement. This line of thinking suggested that calculus didn’t matter—it was more important to preserve root structure. Thin ultrasonic inserts/tips (UITs) were used at low power settings, which rapidly burnished the outer surface of the calculus without removing it. Partially scaled burnished calculus left on root surfaces becomes a reservoir for periodontal pathogens, as evidenced by endoscopic studies.2 An ulcerated lesion mimicking the shape of the retained calculus persists, as the chronic inflammatory process continues. These areas of burnished deposit are impervious to detection and also removal, jeopardizing periodontal health.3
When results fall short of intended goals at reevaluation, patients may be given local delivery antibiotics as an adjunct to mechanical therapy, which can temporarily reduce inflammation and forestall periodontal destruction. Adjuncts to mechanical therapy, however, cannot eliminate the source of inflammation. The mineralized scaffold of burnished calculus keeping the pathogens in contact with the overlying soft tissue must be removed in order for the tissue to properly heal.4
TECHNIQUE
The nonsurgical solution to removing burnished calculus is a definitive treatment protocol, based on thorough assessment. Burnished calculus typically cannot be felt tactilely, making it difficult to detect. The one reliable clue that burnished calculus is present is bleeding on probing,1,5which is often seen as a faint hairline of blood, sometimes evident after probing is complete. Clinicians should document any areas that exhibit this clinical sign of minor bleeding on probing and treat as follows:
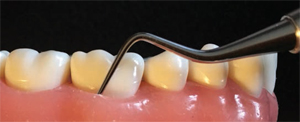
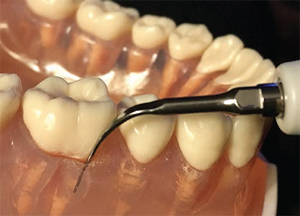
- Begin with a sharp Hirschfeld file (3/7 and/or 5/11) and insert subgingivally in the vicinity of bleeding (Figure 1). As with any periodontal therapy, use local anesthesia to facilitate thorough and comfortable treatment.
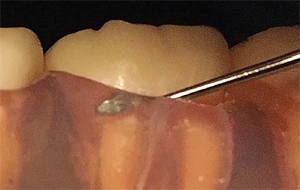
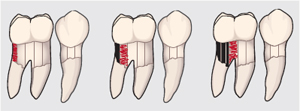
- Confirm contact with the soft tissue attachment with the head of the instrument. Using light to moderate lateral pressure, activate a series of coronal pull strokes in line with the terminal shank and the root surface (Figure 2). The Hirschfeld file will fracture the residual burnished calculus. Use vertical, oblique, and—if possible—horizontal strokes to cross-hatch the root surface with overlapping strokes (Figure 3). Keep the vector of movement parallel to the root surface.
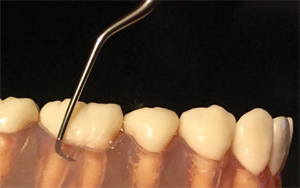
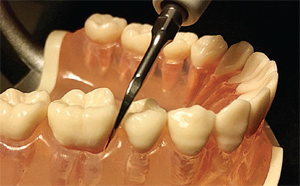
- Switch to sharp, mini-bladed Gracey curets (5/6, 11/12, 13/14) to root plane surfaces that have been treated with the file. This is a necessary step after the use of Hirschfeld files. Use multidirectional overlapping strokes to ensure comprehensive coverage (Figure 4).
- Follow manual root planing with ultrasonic instrumentation—preferably a slender beveled tip on medium-high or high power. Activate the tip with confined, overlapping strokes in slow, methodical channeling (Figure 5). Worn out UITs deliver insufficient power for deposit removal, resulting in burnished calculus.6 Monitor tip wear using a template to ensure adequate power transfer for calculus removal.
- Evaluate the treated area(s) in 6 weeks and compare to previous data. Observe closely for slight bleeding on probing, which should be absent if burnished calculus has been eliminated.
ADAPTATION
Proper adaptation is key to the success of ultrasonic therapy.7 The terminal 2 mm of the UIT must be held in contact with the root surface as it progresses around the dentition (Figure 6). Energy transfer is at its maximum at the terminal 1 mm to 3 mm of the tip. Positioning the UIT so that any part of the shank above 3 mm is in contact with the tooth will not provide adequate energy capable of disrupting mineralized deposits. Clinicians need to visualize root morphology and refer to the radiographs when activating UITs subgingivally. In this way, the terminal 2 mm can be kept adapted with greater confidence.

Piezoelectric technology is most successful when the sides of the tip are used.1 The handpiece should pivot at all line angles (Figure 7 and Figure 8) to keep the lateral edge of the tip adapted to the tooth as the clinician progresses from surface to surface.8
ACTIVATION
Activation—the manner in which the UIT is moved across the root surface—is also important to the success of ultrasonic instrumentation.9 When first introduced to ultrasonic therapy, students are taught the principle of keeping the UIT in constant motion to prevent damage to the tooth—a critical notion for the novice clinician. The emphasis on avoiding thermal and structural damage to the tooth is appropriate. In an introductory laboratory setting, this generally results in fast and furious strokes performed in random scribble patterns, a habit that becomes ingrained in muscle memory. To break this habit, clinicians need to make a conscious effort to form new neural pathways of muscle memory that support the preferred technique.
Several elements are key to performing ultrasonic stroke activation. The first is visualization of the root surface to create small segments of coverage (Figure 5).9 Rather than attempt to cover an entire buccal surface of a molar, the surface should be broken up into vertical channels so that comprehensive coverage can be achieved.10,11
The second element is the speed of movement across the root surface. Mineralized deposits cannot be raced across because the energy transfer must be powerful enough to shatter the calculus and cleave it cleanly away from the surface. Brisk, feathery strokes across the span of deposit, while suitable for biofilm removal, tend to burnish calculus. Use slow, methodical overlapping strokes moving from the coronal-most border of the deposit toward the soft tissue attachment to achieve clean calculus removal millimeter by millimeter.10
Once ultrasonic therapy is complete, follow with mini-bladed and regular Gracey curets to access concavities and deep contours of root surfaces, such as furcations and proximal surfaces. The rationale for this is simple geometry: blade curvatures conform intimately to the curved contours of root structure where the straight surface profiles of UITs have not fully accessed. The last element in stroke activation is performing a final flush with precision thin UITs wherever hand instrumentation occurred.
CONCLUSION
Ultrasonic therapy provides major ergonomic and therapeutic advantages, but it must not be misconstrued as easy or fast.12Integrating these principles into clinical treatment protocols can prevent common but inadvertent errors, while improving treatment outcomes—a win-win situation for both patients and practitioners.
References
- Stach D. Powering the calculus away. Dimensions of Dental Hygiene. 2005;3(3):18–20.
- Stambaugh RV, Myers GC, Watenabe J, Lass C, Stambaugh KA. Clinical response to scaling and root planing aided by the dental endoscope. J Dent Res. 2000;79:2762.
- Stach D. Back to basics. Dimensions of Dental Hygiene. 2007;5(4):26–29.
- Fujikawa K, O’Leary TJ, Kafrawy AH. The effect of retained subgingival calculus on healing after flap surgery. J Periodontol. 1988;59:170–175.
- Checchi L, Montevecchi M, Checchi V, Zappulla F. The relationship between bleeding on probing and subgingival deposits. An endoscopical evaluation. Open Dent J. 2009;3:154–160.
- Lea SC, Landini G, Walmsley AD. The effect of wear on ultrasonic scaler tip displacement amplitude. J Clin Periodontol. 2006;33:37–41.
- Stach D. The five most common errors when using ultrasonic inserts. Dimensions of Dental Hygiene. 2010;8(7):46–50.
- Matsuda SA. Demystifying piezoelectric ultrasonics. Dimensions of Dental Hygiene. 2006;4(6):4–11.
- Matsuda SA. The right moves. Dimensions of Dental Hygiene. 2013;11(4):26–28.
- Pattison AM. Keys to effective calculus removal. Dimensions of Dental Hygiene. 2011;9(10):50–53.
- Flemmig TF. Ultrasonics uncovered. Dimensions of Dental Hygiene. 2008;6(4):26–28.
- Pattison AM. The necessity of hand instrumentation. Dimensions of Dental Hygiene. 2010;8(4):66.
