
Capture High-Quality Images
Tips for improving the efficiency and efficacy of digital dental photography.
Digital photography has become the prevalent format for intraoral and extraoral imaging. Whether documenting existing conditions, pathological areas of interest, anatomical variations, or treatment progress, digital photography can supplement the patient’s record with a very useful visual component. Manipulating digital images to help patients visualize esthetic and functional changes can also be helpful in explaining treatment options.
There are two options for digital imaging in the dental office: the intraoral wand camera and the single lens reflex (SLR) camera with a macro zoom lens and ring or ring/point combination flash.
INTRAORAL DIGITAL WAND CAMERAS
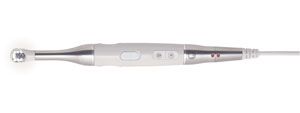
Intraoral wand cameras offer high-quality visualization of the oral cavity and are well suited for use in difficult-to-reach posterior areas and where light is not easily accessed (Figure 1). Intraoral wand cameras are primarily designed to take one shot of one tooth at a time, and they are becoming popular for taking rapid images of tooth-specific information.1,2 Recent models offer a multitude of options, including full-face images, but digital imaging with small sensors and short focal length lenses can affect the end result.
Wand cameras require barrier protection or proper disinfection because the actual wand/lens is placed intraorally. Typical wand cameras have a small square opening at the tip that is directed toward the tooth surface that is to be recorded. The design of most wands has a step in the handle that allows the body of the camera to be placed against adjacent teeth, which positions the lens at the proper distance from the recorded surface. Either a hand or foot switch allows final focus and the shutter release to make the shot. For arch length photos, the patient opens as wide as possible and the back of the wand body is placed against the opposing arch. The focus and shutter release switch completes the shot. For full face or anterior smile width shots, the instruction manual should be consulted because requirements vary between models.

Intraoral digital wand cameras attach directly to a computer via a USB cable and require manufacturer-specific software to process the digital images.
GUIDELINES FOR SINGLE LENS REFLEX CAMERAS
Obtaining high quality intraoral photographs with SLR cameras is a skill that requires practice and patience (Table 1 provides a list of necessary camera equipment).1,2 Proper utilization of mirrors and retractors will dramatically increase the quality of the digital images. The photographer must be able to maintain a dry field, focus on the intended object, and sustain proper image orientation. Cheeks, lips, tongue, saliva, limitations in opening, and patient comfort are among the variables that can affect the ability to obtain the required views.
In general, manual focusing of the camera is preferred because it allows the photographer to better control the frame and view orientation. Moving the camera toward or away from the area of interest after obtaining a rough focus offers the ability to fine tune the focus. The goal is to obtain a photograph with the entire area in view with little extraneous structures showing. Even though cropping digital images is relatively easy, the image will be better quality if the frame captures the correct object in the initial shot.
Patient midlines should coincide with the middle of the frame. Occlusal planes should be parallel with upper or lower edges of the frame. Most manufacturers offer grid line focusing screens to aid in proper orientation. The aperture should be set to f22 to f32 and rarely needs altering. The majority of digital SLR cameras should be operated in the manual or aperture priority mode. The shutter speed will be synchronized with the external flash and the aperture can then be set in the proper range. The high aperture setting will insure a long depth of field, which means the entire frame will be in focus.
Utilizing a mirror greatly aids in obtaining the view of noteworthy anatomical landmarks. Fogging of mirrors is a common problem. Warming mirrors in water can resolve this issue. Instructing patients to breathe through their nose and using the air/water syringe to blow air on the mirror during the exposure will also resolve fogging issues. A variety of shapes, sizes, and quality of mirrors are available. High-quality mirrors may be sterilized if wrapped properly to avoid scratching before being placed in the sterilization bag. Keeping mirrors free from damage is important because every defect will show up in the final image.
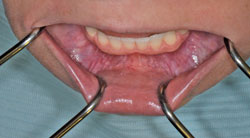
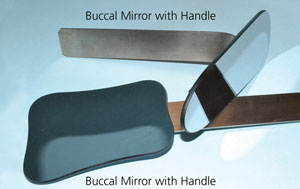
Mirrors are available with handles to facilitate the positioning without having to worry about fingers becoming part of the frame. The added expense of the handles is worth it as they truly make the imaging process much easier (Figure 2). Cheek retractors are a required tool in obtaining ideal images as they prevent lips, cheeks, or other soft tissue from interfering with the view (Figure 3). They come in a variety of shapes and materials. Experimenting with different types will help clinicians determine which retractors work best for their style of photography.
SUMMARY
Although some trial-and-error must prevail in becoming proficient at dental imaging, a properly made and informative image’s ability to enhance the patient record makes the process worth the time and effort. All dental team members should try their hand at being the photographer, mirror and retractor handler, and the patient in order to understand the skills needed for each role in the process.
ACKNOWLEDGEMENT
The authors would like to thank Sarah Everett and Lauren Lewis for their help in preparing this manuscript.
REFERENCES
- Plummer K. Digital dental imaging, part 1.Dimensions of Dental Hygiene. 2009;7(9):24–26.
- Plummer K. Digital dental imaging, part 2.Dimensions of Dental Hygiene. 2009;7(9):24–26.
From Dimensions of Dental Hygiene. June 2013; 11(6): 20–22.
