A Whiter, Brighter, Smile
Nightguard vital bleaching is an effective and noninvasive technique for improving the esthetics of discolored teeth.
In 1989, Haywood and Heymann3 introduced nightguard vital bleaching (NGVB) or “dentist-prescribed at-home bleaching,” using 10% carbamide peroxide as an alternative to the in-office technique. Carbamide peroxide is a more stable compound than hydrogen peroxide; however, since a 10% solution of carbamide peroxide breaks down to 3% hydrogen peroxide and 7% urea, its mechanism of action is essentially the same as that of hydrogen peroxide. In recent years, many studies have demonstrated NGVB’s effectiveness and safety,4-14 and it has become one of the most frequently requested15 cosmetic dental procedures available in the United States.
Treatment Planning
NGVB is effective for a wide range of discolorations, including mild to moderate fluorosis, age-related yellowing, tobacco staining, and darkening caused by medications such as tetracycline and minocycline. In general, lighter (yellow, orange, and brown) discolorations tend to respond more readily than darker (gray, blue-gray, and black) ones. White spots, eg, enamel hypocalcifications and very mild or severe fluorosis, do not respond favorably and may become whiter following bleaching. However, because bleaching lightens the overall color of the entire tooth, mild to moderate white spots may blend in better with the remainder of the tooth surface and become less noticeable.16
The time required for treatment is typically 1 to 6 weeks for teeth with mild age- or fluoride-related discolorations, 1 to 3 months for nicotine-stained teeth, and 2 to 6 months or longer for tetracycline-stained teeth.5,6,12 Color stability is very good, with several studies reporting minimal relapse at up to 4 years.16 Lighter discolorations tend to maintain their new color more predictably than darker ones. However, Leonard and colleagues have reported remarkable success and color stability with tetracycline-stained teeth at up to 12 years.10-12,15
While NGVB is a viable treatment option for many patients, there are a few contraindications. They include patients with sensitive teeth, who may be unable to tolerate the slight transient increase in sensitivity that frequently accompanies bleaching procedures; patients with known sensitivity or allergy to any of the ingredients contained in the bleaching products; pregnant or nursing women; patients with extensive anterior esthetic restorations that are otherwise serviceable but would require replacement following bleaching;17 patients with a history of temporomandibular disorder;18 and others who may be unable or unwilling to tolerate bleaching trays or find the gel distasteful. See Table 1 for treatment planning steps for NGVB.
| Table 1. Treatment planning for NGVB should begin with a comprehensive oral consultation that includes the following six steps: |
| 1. Listen to the patient’s expectations and concerns regarding cosmetic treatment. Are the expectations realistic? Even though NGVB is reasonably predictable and effective in most cases, it is prudent not to promise extraordinary results. |
| 2. Evaluate the suitability of the case. What are the origin and extent of the discoloration? Will bleaching alone provide an adequate outcome or will it serve as the foundation for subsequent esthetic treatment? Will existing restorations require replacement following bleaching? Is other therapy (endodontics, periodontics, orthodontics) indicated prior to beginning the aesthetic phase? |
| 3. Inform the patient of the possible risks, limitations, and longevity of bleaching. In particular, discuss the likelihood of transient thermal sensitivity, as well as its management. |
| 4. Take radiographs and test the vitality of the teeth to be bleached. |
| 5. Restore caries lesions, evaluate and, if necessary, replace or seal any defective restorations in the teeth to be bleached. This will minimize thermal sensitivity during the bleaching procedures. |
| 6. Record the initial shade and take color photographs to document the patient’s pre-operative esthetic condition. As treatment proceeds, patients and practitioners alike often forget the patient’s initial status. Pre-operative photographs provide a reference to gauge progress. |
Tray Fabrication
Begin by making an accurate, bubble-free alginate impression of each arch, including the vestibular areas. Even if the patient plans to treat only the maxillary teeth, making a lower impression now will save time later if the patient decides to proceed with treatment. Moreover, having both maxillary and mandibular casts aids in overall treatment planning, particularly if more extensive esthetic treatment is anticipated.
Pour the impressions in dental plaster or stone. If possible, double pour each impression to provide two sets of casts. The first set will be used to fabricate the bleaching trays. The second set may be set aside for later reference or other treatment needs.
Using a model trimmer, trim the base of each cast to create a horseshoe, leaving the dental arch and approximately 10 mm to 20 mm of the supporting soft tissue. Removal of the palatal and lingual areas facilitates adaptation of the tray material during vacuum-forming.
If desired, create reservoirs on the facial surfaces of the teeth to be bleached. Place a thin layer of block-out resin over the facial surface of each tooth (Figure 1). Leave the resin 1 mm-1.5 mm short of the free gingival margin, mesial and distal embrasure spaces, and incisal/occlusal surface. This enables the tray to adapt tightly around each tooth, minimizing leakage of the bleaching gel onto the soft tissues.19 Cure the block-out resin with a hand-held curing light for 20 seconds at each reservoir (Figures 2 and 3). Reservoir spaces are not mandatory for effective bleaching. Previous studies have reported no differences in bleaching efficacy with or without the use of reservoirs.20,21 However, trays with reservoirs may contain the bleaching gel better and permit less leakage than trays without reservoirs.22 Although they do add thickness to the bleaching tray, which may irritate the lips or create occlusal interferences in some patients, reservoirs should be considered, especially when a highly viscous bleaching gel is chosen. In these cases, reservoirs facilitate adequate seating of the tray and relieve pressure from the teeth, which may reduce sensitivity.16,23
Create the bleaching tray by vacuum forming a sheet of thin, soft plastic tray material over the cast. To minimize distortion, allow the tray to cool gradually to room temperature before removing from the cast. Cooling may be accelerated by placing the tray/cast in cool tap water for several minutes. However, sudden, extreme temperature changes should be avoided. In addition, prolonged water immersion will dissolve dental plaster, making tray clean-up more difficult.
Trim the tray so that it extends 0.5 mm to 1 mm over the gingival crest (Figure 4). The tray may be scalloped to minimize gingival contact, thus reducing the likelihood of gingival irritation (Figures 5 and 6). Scalloped trays, however, may permit leakage or salivary dilution of the bleaching material. Therefore, if the tray is to be scalloped, incorporation of reservoirs should be considered. Alternatively, when a very thin, flexible tray material is used, scalloping may not be necessary for many patients. A nonscalloped tray that extends onto the gingival tissue may provide a better seal than a scalloped tray, particularly for less viscous, water-soluble bleaching products.16,23
If necessary, polish rough edges lightly using a felt wheel in a slow-speed handpiece. Finally with the tray on the cast, the tray borders can be polished using a uniform flame or alcohol torch. Quick brush strokes are recommended. Readapt the warmed margins by holding a dampened finger firmly along the cervical area for a few seconds until the tray has cooled.19 Prior to delivery, clean and disinfect the tray following the same disinfection protocol used for any removable orthodontic or prosthetic appliance.
Treatment Procedure
All home-use bleaching agents with the American Dental Association Seal of Acceptance are dentist-prescribed and contain 10% carbamide peroxide as the active bleaching ingredient.26 Recently, some manufacturers have introduced carbamide peroxide gels containing fluoride and/or potassium nitrate to reduce thermal sensitivity. Although only a few studies have been reported, results are promising. Leonard and colleagues reported significantly reduced thermal sensitivity among patients who applied a desensitizing gel containing 3% potassium nitrate and 0.11% fluoride ion for 30 minutes daily prior to NGVB with 10% carbamide peroxide.27 Haywood and colleagues reported that application of a gel containing 5% potassium nitrate and 0.2% sodium fluoride, as needed, for 10 to 30 minutes before or after NGVB significantly reduced the thermal sensitivity associated with NGVB.28 Tam reported that the addition of 3% potassium nitrate and 0.11% fluoride ion directly to a 10% carbamide peroxide bleaching gel resulted in significantly decreased thermal sensitivity, with no change in bleaching efficacy.29
The NGVB regimen consists of wearing the loaded bleaching tray for 6 to 8 hours overnight or for intervals of 2 to 4 hours during the day, until the desired outcome is achieved. Overnight wear is less intrusive to the patient’s daily routine, especially during extended treatment. As a result, patient compliance may be better than with daytime wear. In addition, with diminished salivary flow during sleep, the bleaching agent may remain active for a longer period of time. For some patients, however, extended wear may disrupt sleep or create intolerable thermal sensitivity or jaw soreness. In these cases, shorter exposure times (2 to 4 hours each day or on alternating days) may alleviate such symptoms.20 Patients should be reevaluated 1 to 2 weeks following initial bleaching tray delivery to monitor tooth color change, tissue response, and compliance. Subsequent reevaluations should be scheduled at 1- to 4-week intervals, depending on the expected duration of treatment. Although patients may desire to bleach both maxillary and mandibular arches simultaneously, treating one arch at a time (usually the maxillary first) offers certain potential advantages. Most importantly, the untreated arch serves as a reference point, providing a continuous reminder of treatment progress. In addition, Haywood suggests that wearing a single tray may lessen the potential for thermal sensitivity, since fewer teeth are treated at one time, as well as occlusal or temporomandibular discomfort, particularly for patients with a history of temporomandibular disorder, since only a single thickness of tray material is worn.20
Disclaimer: The opinions expressed in this article are the private views of the author and should not be construed as reflecting official policies of the US Navy, Department of Defense, or US Government.
 |
Figure 1. Reservoirs are created by applying block-out resin to facial surfaces of the dental cast. |
 |
Figure 2. Block-out resin is cured using a hand-held curing unit for 20 seconds per reservoir. |
.gif) |
Figure 3. Block-out resin applied to mandibular cast. Note that resin is applied only to within 1 mm to 1.5 mm of gingival margins, proximal embrasures, and incisal edges. |
 |
Figure 4. Bleaching tray is trimmed following the contours of the gingival margins. |
 |
Figure 5. Trimmed and polished tray seated on cast. |
 |
Figure 6. Completed tray tried in. Note slight extension over free gingival margins. |
Case Studies
Case 1. A 22-year-old woman sought treatment for the brown and white discolorations on her maxillary central incisors (Figure 7). Her clinical presentation suggested generalized mild to moderate fluorosis, with Teeth #8 and #9 more severely affected. A scalloped bleaching tray incorporating facial reservoirs was fabricated and 10% carbamide peroxide dispensed. After 6 weeks of overnight wear, the brown discolorations on #8 and #9 were nearly completely removed, and the white discolorations were much less prominent (Figure 8). An additional 2 weeks of NGVB, followed by orthodontic consultation and replacement of the incisal resin composite on #9, was recommended. However, the patient was satisfied with the results achieved and elected no further treatment.
 |
Figure 7. 22-year-old patient with generalized mild fluorosis and moderate fluorosis #8 and #9. |
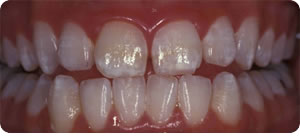 |
Figure 8. 22-year-old patient following 6 weeks of NGVB with 10% carbamide peroxide. |
Case 2. A 29-year-old woman presented for treatment of Tooth #8 that had a stained developmental line (Figure 9). The stain had been present for as long as she could remember. Initial shade of the anterior teeth was Vita A-2/A-3. After 4 weeks NGVB (overnight wear), the stain was eliminated and the teeth were lightened to shade A-1 (Figure 10). At 6 months following therapy, no relapse was evident (Figure 11). The patient subsequently relocated to a new assignment and has been unavailable for follow-up evaluation. However, via recent communication, she reported no relapse in either staining or overall shade at 6 years post-treatment.
 |
Figure 9. 29-year-old patient with stained developmental line #8. |
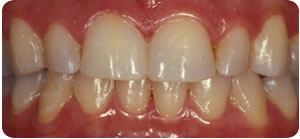 |
Figure 10. 29-year-old patient following 4 weeks of NGVB with 10% carbamide peroxide. |
 |
Figure 11. 29-year-old patient 6 months following completion of NGVB. |
References
-
- Goldstein RE, Lancaster JS. Survey of patient attitudes toward current aesthetic procedures. J Prosthet Dent. 1984;52:775-780.
- Christensen GJ. Bleaching teeth: practitioner trends. J Am Dent Assoc. 1997;128 (Suppl):16S-18S.
- Haywood VB, Heymann HO. Nightguard vital bleaching. Quintessence Int. 1989;20:173-176.
- Reinhardt JW, Eivins SE, Swift EJ Jr, Denehy GE. A clinical study of nightguard vital bleaching. Quintessence Int. 1993;24:379-384.
- Haywood VB, Leonard RH Jr, Nelson CF, Brunson WD. Effectiveness, side effects, and long-term status of nightguard vital bleaching. J Am Dent Assoc. 1994;125:1219-1226.
- Haywood VB, Leonard RH Jr, Dickinson GL. Efficacy of six months of nightguard vital bleaching of tetracycline-stained teeth. J Esthet Dent. 1997;9: 13-19.
- Li Y. Toxicological considerations of tooth bleaching using peroxide-containing agents. J Am Dent Assoc. 1997;128(Suppl):31S-36S.
- Nathanson D. Vital tooth bleaching: sensitivity and pulpal considerations. J Am Dent Assoc. 1997;128(Suppl):41S-44S.
- Swift EJ Jr, Perdigão J. Effects of bleaching on teeth and restorations. Compend Contin Educ Dent. 1998;19:815-820.
- Leonard RH Jr, Bentley C, Eagle JC, Garland GE, Knight MC, Phillips C. Nightguard vital bleaching: a long-term study on efficacy, shade retention, side effects, and patients’ perceptions. J Esthet Restor Dent. 2001;13:357-369.
- Ritter AV, Leonard RH Jr, St Georges AJ, Caplan DJ, Haywood VB. Safety and stability of nightguard vital bleaching: 9 to 12 years post-treatment. J Esthet Restor Dent. 2002;14:275-285.
- Leonard RH Jr, Haywood VB, Caplan DJ, Tart ND. Nightguard vital bleaching of tetracycline-stained teeth: 90 months post treatment. J Esthet Restor Dent. 2003;15:142-152.
- Fugaro JO, Nordahl I, Fugaro OJ, Matis BA, Mjör IA. Pulp reaction to vital bleaching. Oper Dent. 2004;29:363-368.
- McCracken MS, Haywood VB. Demineralization effects of 10% carbamide peroxide. J Dent. 1996;24:395-398.
- Leonard RH Jr. Long-term treatment results with nightguard vital bleaching. Compend Contin Educ Dent. 2003;24:364-374.
- Haywood VB. Nightguard vital bleaching: current concepts and research. J Am Dent Assoc. 1997;128(Suppl):19S-25S.
- Farah JW, Powers JM. In-office and home bleaching. The Dental Advisor. 1996;13(4): 2-6.
- >Haywood VB, Berry TG. Natural tooth bleaching. In: Summit JB, Robbins JW, Schwartz RS, eds. Fundamentals of Operative Dentistry: A Contemporary Approach. 2nd ed. Chicago: Quintessence Publishing Co; 2001:401-426.
- Fischer D, Bailey JH. Vital bleaching for aesthetic improvement. Pract Periodontics Aesthet Dent. 1995;7: 61-64.
- Haywood VB, Leonard RH Jr, Nelson CF. Efficacy of foam liner in 10% carbamide peroxide bleaching technique. Quintessence Int. 1993;24:663-666.
- Matis BA, Hamdan YS, Cochran MA, Eckert GJ. A clinical evaluation of a bleaching agent used with and without reservoirs. Oper Dent. 2002;27:5-11.
- Matis BA, Yousef M, Cochran MA, Eckert GJ. Degradation of bleaching gels in vivo as a function of tray design and carbamide peroxide concentration. Oper Dent. 2002;27:12-18.
- Haywood VB. Frequently asked questions about bleaching. Compend Contin Educ Dent. 2003;24:324-338.
From Dimensions of Dental Hygiene. October 2004;2(10):28, 30.
