Ultrasonic Instrumentation Strategies for Stage II and III Periodontitis
Effective ultrasonic instrumentation in stage II and III periodontitis requires a strategic blend of technique, anatomy awareness, and complementary manual scaling.
Ultrasonic instrumentation is part of initial nonsurgical periodontal therapy for Stages II and III periodontitis cases (to learn about it’s role in Stage 1 periodontitis, read Part 1 of this article series).1 Subgingival instrumentation is performed with hand or powered instruments and that choice is based on experience, skills, and preferences of the clinician and patient.2
The stages of periodontitis are subdivided into severity and complexity. Severity is determined by interdental clinical attachment loss (CAL), radiographic bone loss, and tooth loss. Complexity is based on maximum periodontal probing depth and horizontal or vertical bone loss. Grades A to C are the progression rates and associated risk factors.2-4
The periodontal diagnosis is determined after analyzing full-mouth CAL and periodontal probing depth along with bleeding on probing. Periodontal charting provides a roadmap for scaling and root planing for Stage II and III cases and should be referred to often during instrumentation. Root anatomy, biofilm distribution, and calculus type also are evaluated to determine instrumentation needs.
Biofilm is the main pathology for periodontitis, however, calculus plays a direct role in periodontal inflammation and destruction.5 Research shows that 70% of inflammation in deep periodontal probing depth is associated with calculus covered by biofilm and less than 20% of inflammation is related to biofilm alone.6 Inadequate calculus removal aids in failed periodontal therapy.5
Stage II Periodontitis
Stage II periodontitis is characterized by 3 to 4 mm of interdental CAL, radiographic bone loss at the coronal third (15% to 33%), maximum probing depth of 5 mm, and horizontal bone loss.2 For initial therapy, multiple ultrasonic inserts/tips (UITs) will be needed to thoroughly provide nonsurgical instrumentation. Multiple designs are required to adapt to various locations in the mouth, pocket depth, root anatomy, biofilm, and calculus. Calculus size and tenacity are important as calculus of any size can be tenacious.
 Standard (ie, traditional, robust) UITs, such as a beavertail, triple bend, or universal design, are utilized first for heavier and tenacious calculus. The beavertail design has a flat surface on the end that is adapted. A triple bend is thought to enhance removal of tenacious deposits because of the concentration of energy around the beveled surfaces. The universal design is most effective for moderate or heavier deposits where access is challenging such as posterior areas and extending slightly subgingival when inflammation permits. Some universal designs are longer and wider than others; therefore, evaluate manufacturers’ options to meet clinician and patient needs. After the larger and tenacious calculus is removed, proceed to remove the lighter deposits in the quadrant, sextant, or half mouth depending on care planning.
For light to moderate subgingival deposits, implement curved right, curved left, and straight designs to meet the needs of deposit removal on line-angle convexities and proximal concavities. These designs, identified as slim, thin, or precision, are usually round in cross section and vary in diameter and length. Refer to the manufacturer’s instructions for recommendations on power settings for UITs; however, strive to use at the lowest power setting possible to enhance comfort and deposit removal, keeping in mind that low power settings may cause burnished calculus.
Early grade furcation involvement (Grade I or II) might be encountered, requiring right and left curved designs ideal for adapting to these defects. The use of only one thin straight tip to save time and effort from changing UITs may negatively impact calculus removal. The narrow and straight design does not adapt well to root anatomy, and a low power setting could result in burnished calculus. Instead, straight thin design should be employed to finalize instrumentation in areas with pocket depth and no furcation involvement.
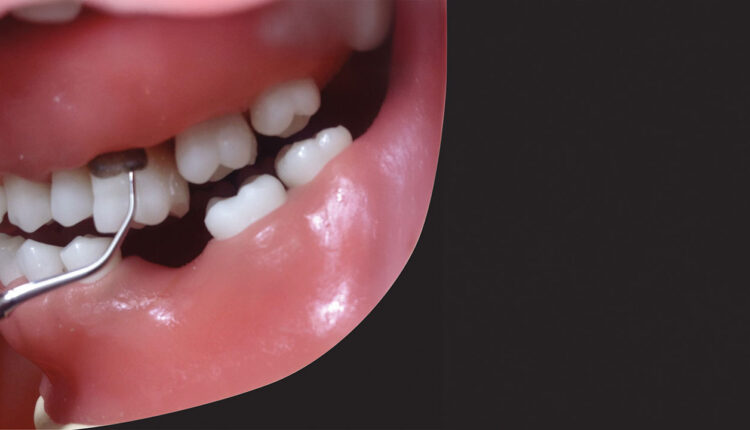
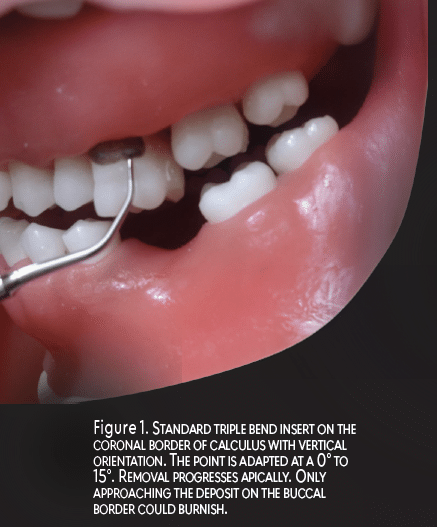
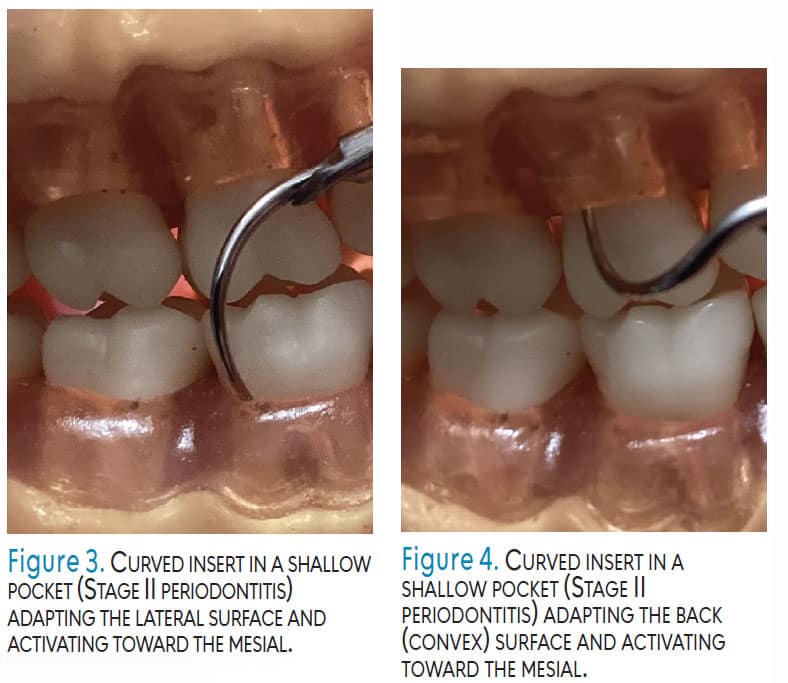
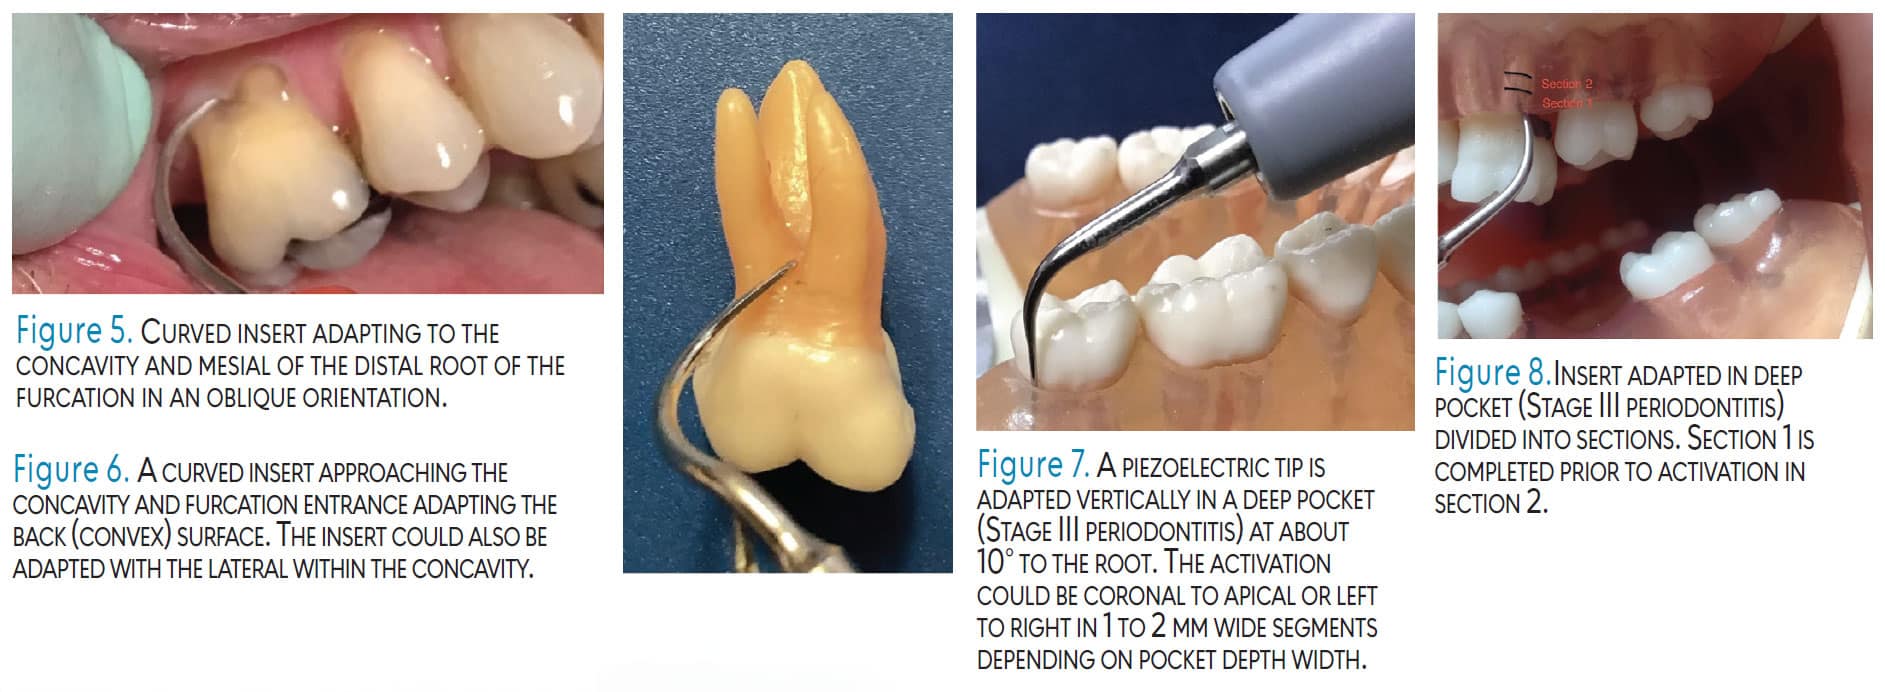
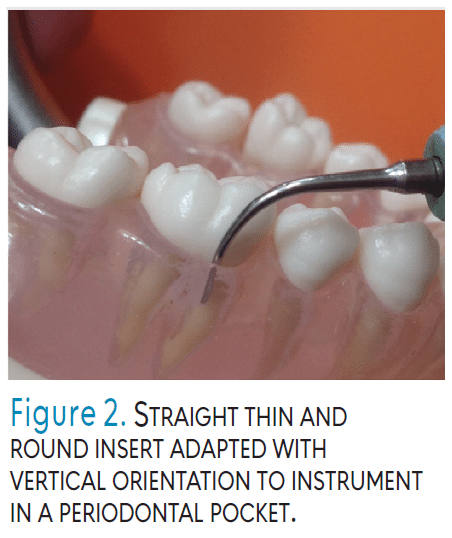 Adapting the UIT with a vertical orientation (ie, parallel to the long axis and directed toward the pocket base or coronal border of calculus) is used to fracture tenacious, heavy calculus and to reach the base of narrow periodontal pockets (Figure 1 and Figure 2). Tips used for this orientation should be the standard beveled or universal designs for tenacious calculus and thin UITs for narrow pocket depth. Horizontal orientation, which is perpendicular to the tooth, is used most often on proximal surfaces with curved UITs. Oblique orientation positions the UIT on the lateral surface; curved UITs may be used. Implement right and left UITs by either adapting the end that curves toward the mesial surface, adapting the lateral surface of a UIT (Figure 3) or apply the convex back of a magnetostrictive insert tip on the buccal, lingual, and proximal surfaces (Figure 4).
Use mostly light pressure as the tip is always moving in an elliptical motion and should remove deposits without pressure from the grasp and fulcrum. Moderate pressure might be indicated for heavier tenacious deposits. Some ultrasonic units have a boost option to increase the power to enhance removal without adding pressure from the operator. Clinicians should move methodically within the periodontal pocket to completely remove deposit and avoid leaving residual or burnished calculus. Take time to deliberately contact deposits and the root structure in an organized and relaxed manner. Deposits are not removed without contacting the tip; therefore, overlapping, short strokes are paramount.
 Furcation involvement exists most likely on the mandibular first molar where the furcation entrance is about 3 mm from the cementoenamel junction (CEJ) on the buccal surface and 4 mm on the lingual. The second mandibular molar furcation entrance can be located 3 mm from the CEJ on the buccal and 5 mm on the lingual. The maxillary first molars could also have a defect located 3 mm from the CEJ on the mesial, 4 mm on the buccal and 5 mm on the lingual (Figure 5). Furcation involvement on maxillary second molar buccal, mesial, and/or distal surfaces is less likely with Stage II cases.
An inactivated, curved, thin UIT may be used to explore the roof (entrance) and the sides (walls) of the furcation. If gingival tissue is present, use a closed angle to avoid unnecessary tissue distention and discomfort. The curvature of the right or left UIT should adapt to the defect; both sides of the tip can be used. Thin ultrasonic tips are optimal for furcation areas because curets are wider in diameter than UITs. Curets are about 1 mm wide, hindering instrumentation within a furcation. The maxillary first molar furcation entrance diameter is only 0.5 mm on the buccal, 0.75 mm on the mesial, and 0.5 mm to 0.75 mm on the distal. The mandibular first molar entrance diameter is 0.75 mm on the buccal and 1 mm on the lingual surface.
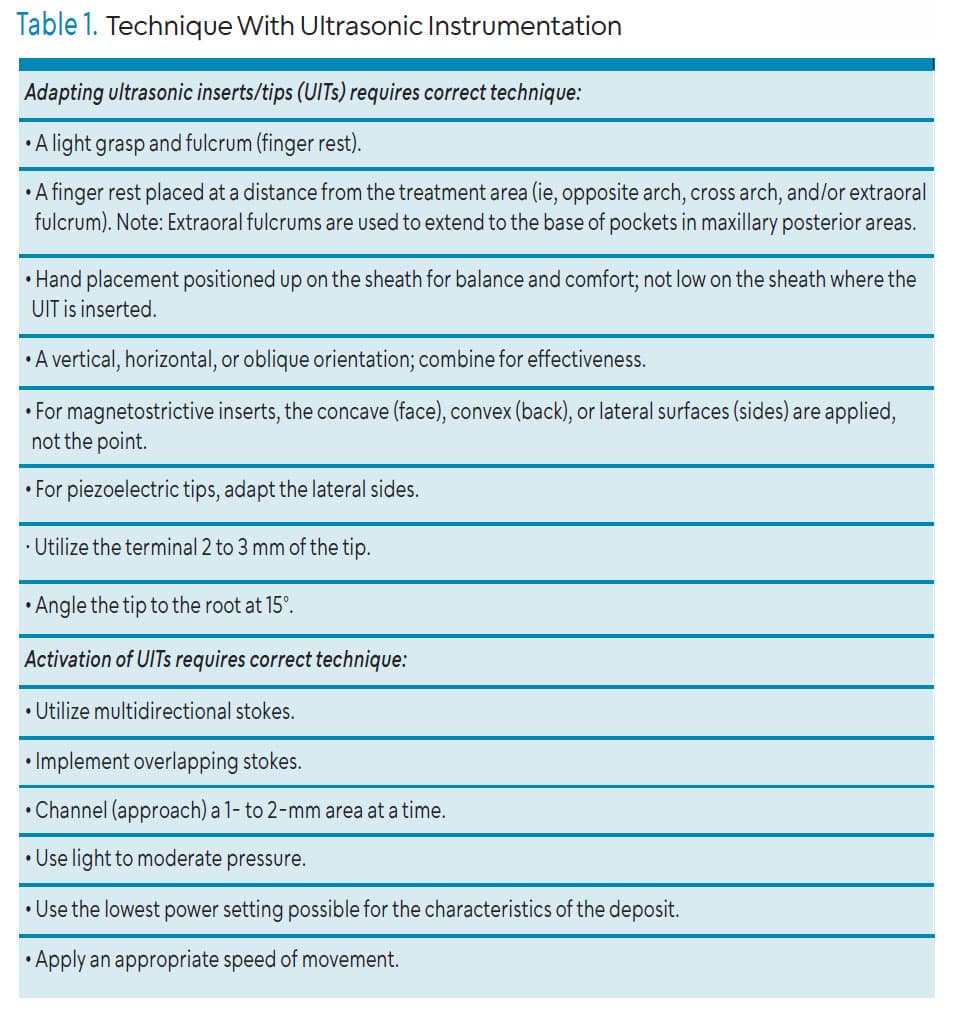
Periodontal pocket depth is 5 mm or less and generally will be wide, although localized areas of narrow depth could occur. In these cases, vertical and oblique orientations with fine thin tips are used to negotiate the pocket configurations (Figure 3 and 4). Table 1 reviews adaptation and activation principles.
![]() Stage III Periodontitis
Stage III Periodontitis
Stage III periodontitis is summarized by 5 mm or greater interdental CAL, radiographic bone loss extending to the middle third of the tooth and beyond, probing depths of 6 mm or greater, and horizontal and vertical bone loss of 3mm or greater.2 Tooth loss due to periodontitis can be present (four teeth or less) as well as Class II and III furcation involvement.
For initial instrumentation, multiple UITs will be needed to thoroughly remove tenacious calculus indicating standard larger UITs as described previously. Instrument choice for furcation involvement and deep probing pocket depth could change to thinner and longer right, left and straight UITs as compared to Stage II. The same principles apply for adaptation and activation as with Stage II periodontitis; however, the extent of conditions and instrumentation are greater.
Furcation involvement of Grade II or III is common. Furcation involvement is likely to be on all molars (Figure 6). Also, the maxillary first premolar could have a defect within 7 mm of pocket depth. Ball-ended inserts are designed to adapt to furcation anatomy; however, effective calculus removal should be evaluated. The rounded end is designed to enhance adaptation; although activation might produce burnished calculus. Also, diamond-tipped UITs are indicated for furcations; however, caution is advised due to abrasiveness. They are best used with endoscopic evaluation or surgical procedures. Endoscopy should be incorporated to aid in visualizing the anatomy within the furcation area and deep pocket depth, particularly with Stage III cases.
 A systematic review evaluated the efficacy of endoscopy in managing residual periodontal pockets. Randomized controlled trials (RCTs) compared periodontal endoscope-assisted subgingival debridement (EASD) with repeated root surface debridement (RSD). Results showed that EASD demonstrated superior clinical outcomes in managing residual periodontal pockets; however, further high-quality research is necessary to validate findings and assess the long-term benefits of EASD.7
Another systematic review and meta-analysis found endoscopy was associated with significantly less residual calculus, longer treatment time, and greater probing depth reduction. Endoscopy use surpassed conventional scaling and root planing alone in calculus removal. Additional RCTs are needed to evaluate clinical outcomes. Periodontal endoscopy is minimally invasive and enhances subgingival visualization, potentially improving the outcomes of periodontal therapy.8 Another review concluded scaling and root planing with endoscopy demonstrates superior short-term clinical outcomes compared to conventional scaling and root planing, particularly for subgingival calculus removal and probing depth reduction. However, its long-term efficacy in maintaining periodontal stability and preventing disease progression needs further validation.9
Periodontal pocket depth requires long thin UITs implemented with a vertical orientation when reaching the pocket depth (Figure 7). Measuring the length of a UIT with a probe and comparing this measurement to the pocket depth might aid in correct selection and effectiveness of instrumentation, particularly with unfamiliar UIT designs. Every millimeter of the root anatomy should be contacted with overlapping and short strokes (Figure 8). Research comparing ultrasonic and manual subgingival scaling at different probing pocket depths concluded that with 4- to 6-mm periodontal probing depths, the reduction with manual subgingival scaling was superior. CAL results, however, showed no statistical differences between the two means. When the periodontal probing depth was ≥ 6 mm, reductions in probing depths and CAL suggested that manual subgingival scaling was superior.10
Success of ultrasonic instrumentation depends on patient tolerance, incorporation of local anesthesia, and use of endoscopic technology as well as effective UIT selection, adaptation, and activation. Therefore, clinicians should approach Stage II and III cases with a blended approach of ultrasonic and manual instrumentation. Reassessing instrumentation often with ultrasonic tips and explorers is critical for success.
In summary, initial instrumentation for Stage II periodontitis might resemble Stage I or Stage III instrumentation based on the extent of periodontal conditions. Standard UITs are incorporated first for larger tenacious calculus and then long and thin UITs are used for moderate to light deposits. Stage III periodontitis is complex and demands enhanced knowledge of root anatomy in deep pockets as well as furcation involvement. Varied UIT designs are implemented during Stage II and III ultrasonic instrumentation, particularly as compared to Stage I periodontitis.
References
- Hodges KO. Mastering ultrasonic instrumentation for stage I periodontitis. Dimensions of Dental Hygiene. 2025;23(2):14-17.
- Sanz M, Herrera D , Kebschull M, et al . Treatment of stage I-III periodontitis-The EFP S3 level clinical practice guideline, J Clin Periodontol. 2020;47(Suppl 22):4-60.
- Tonetti MS, Greenwell H, Kornman K. Staging and grading of periodontitis: Framework and proposal of new classification and case definitions. J Periodondtol. 2018;89(suppl 1):S159-S172.
- Alkhafaji N, Patel TJ. 2023. Implementing the 2017 periodontal classification system. Dimensions of Dental Hygiene. 2023;21(9):16-19.
- Harrel SK, Cobb C, Sheldon LN, et al. Calculus as a risk factor for periodontal disease: Narrative review on treatment indications when the response to scaling and root planing is inadequate. Dent J (Basel). 2022;10:195.
- Wilson TG, Harrel SK, Nunn ME, et al. The relationship between the presence of tooth-borne deposits and inflammation found with a dental endoscope. J Periodontol. 2008;79:2029-2035.
- King-Lun DH , Fok MR , Li KY, Pelekos G , Leung WK. Effectiveness of endoscope-assisted subgingival debridement versus repeated root surface debridement or access flap periodontal surgery in step 3 periodontal therapy: a systematic review and meta-analysis. Clin Exp Dent Res. 2025;11:70196.
- Alsharif SB, Hobani N. The efficiency of periodontal endoscopy in non-surgical periodontal therapy: a systematic review and meta-analysis. Front Dent Med. 2025;6:1681020.
- Zhou D, Lu C. Efficacy of periodontal endoscopy-guided scaling for subgingival calculus removal: A meta-analysis. Current Problems in Surgery. 2025;69:101830.
- Zhang X, Hu Z, Zhu X, Li W, Chen J. Treating periodontitis-a systematic review and meta-analysis comparing ultrasonic and manual subgingival scaling at different probing pocket depths. BMC Oral Health. 2020;20:176.
From Dimensions of Dental Hygiene. March/April 2026;24(2):16-21
