
The Versatility of the Universal Curet
A review of a hand instrumentation staple.
Universal curets are designed for use in all areas of the mouth and on all tooth surfaces—making them some of the most versatile instruments in the dental hygienist’s armamentarium. They are ideal for routine maintenance patients who require biofilm removal and some calculus debridement. Universal curets with shorter shanks and smaller blades are indicated for subgingival biofilm removal in relatively shallow pockets. Universal curets with longer shanks and larger blades are more suitable for scaling of moderate to heavy calculus in deeper pockets.

DESIGN FEATURES
The working end of a universal curet consists of two straight parallel cutting edges that join to form a rounded toe. The face of the blade is at a 90° angle to the shank, and both cutting edges are used to remove calculus and debride the root surface.1,2 The adaptation of universal curets is not accomplished as precisely as with Gracey curets since universal curets do not have a 70° offset blade like Gracey curets have (Figure 1A and Figure 1B). Universal curets require precise adaptation to ensure the other cutting edge does not engage the soft tissue of the pocket wall when inserting the instrument subgingivally and activating the scaling stroke, which would cause tissue trauma. The 70° offset that is automatically provided with the Graceys is therefore dependent on the operator when activating the blade of the universal curet.
TYPES OF UNIVERSAL CURETS
![]()

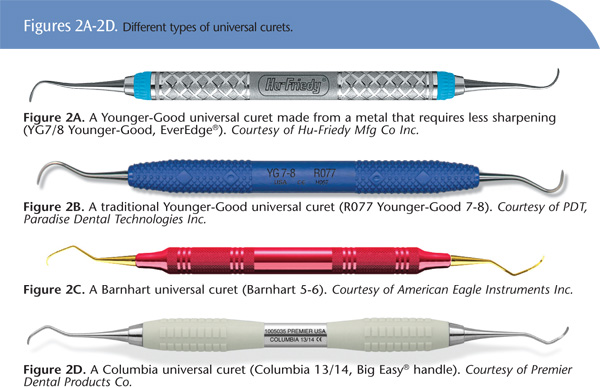
Standard universal curets typically have a curved working end with an additional bend in the shank for dual adaptation in the posterior and anterior teeth. Common names for standard universal curets include Younger-Good, Barnhart, and Columbia (Figures 2A, 2B, 2C, and 2D).3 The nuances of each instrument are in the design of the blade and the degree of the bend in the shank. Differences include a shorter working end, a longer curve to the working end, and a variation in the bend of the shank. Most universal curets can be designed with rigid shanks as well.
THE LANGER CURET
The Langer universal curet is designed with a universal blade but with the shank of a Gracey. This combination provides the operator with easy adaptation to difficult areas through the shank and two cutting edges for a more universal use around a tooth (Figure 3). Langer curets are useful in deeper pockets. The Langer series consists of a 1/2, 3/4, 5/6, and 17/18 (Table 1). While Langer curets are not technically universal throughout the entire oral cavity, they can be used throughout the sextants in the mouth, thus reducing the need to use multiple instruments to complete a sextant. Langers are also designed with longer or rigid shanks and mini working ends.4
| Table 1. Langer curets and their usage. | |
| L 1/2 | Mandibular posterior |
| L 3/4 | Maxillary posterior |
| L 5/6 | Maxillary and mandibular anterior |
| L 17/18 | Maxillary and mandibular posterior |
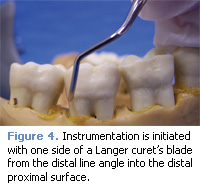
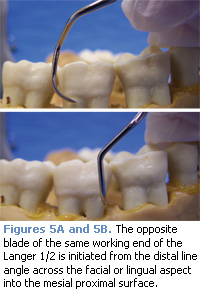 The Langer 1/2, 3/4, and 17/18 are used in the posterior region of the oral cavity. The shank angulation increases as the instrument number increases. The 1/2 is used for the mandibular arch, while the 3/4 is specific to the maxillary arch. However, the 17/18 can be adapted to all posterior teeth in both arches. Debridement should be initiated from the distal line angle for the posterior teeth. Instrumentation is initiated with one side of the blade from the distal line angle into the distal proximal surface (Figure 4). The opposite blade of the same working end is initiated from the distal line angle across the facial or lingual aspect into the mesial proximal surface (Figures 5A and 5B). The operator needs to maintain the 70° to 80° working angulation by tilting the terminal shank toward the tooth surface.
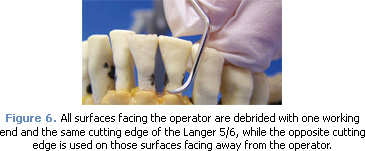
The 5/6 is designed for the anterior teeth. When using the instrument in the anterior region, teeth are divided in half at the midline and the long axis becomes the starting point. All surfaces facing the operator are debrided with one working end and the same cutting edge, while the opposite cutting edge is used on those surfaces facing away from the operator (Figure 6). A useful feature is to have the Langer 5/6 curet on one end and a sickle, such as the H5, on the other end. This instrument combination provides the operator with a sickle and curet available in one instrument, which increases efficiency.
Keeping in mind that all bacterial biofilm should be removed from the root surface at the routine maintenance appointment, Langer curets can accomplish this task in an expeditious manner in deeper pocket depths. Careful adaptation needs to be at the forefront due to the design feature of two cutting edges.
REFERENCES
- Wilkins EM. Clinical Practice of the Dental Hygienist. 10th ed. Philadelphia: Lippincott Williams and Wilkins; 2009:614.
- Pattison AM, Pattison GL. Periodontal Instrumentation. 2nd ed. Upper Saddle River, NJ: Prentice Hall; 1991.
- Nield-Gehrig JS. Fundamentals of Periodontal Instrumentation and Advanced Root Instrumentation. 6th ed. Philadelphia: Lippincott Williams and Wilkins; 2008:311-325.
- Daniel SJ, Harfst SA, Wilder RS. Mosby’s Dental Hygiene, Concepts, Cases and Competencies. 2nd ed. St. Louis: Mosby Elsevier; 2008:179-180.
From Dimensions of Dental Hygiene. February 2010; 8(2): 32, 36, 38.
