
The Power of the Probe
Using the periodontal probe to detect periodontal destruction is essential to assessment.
 Periodontal assessment is the cornerstone for all nonsurgical therapy. Areas of alveolar bone loss are identified through alert, meticulous probing. These data provide the basis for each patient’s diagnosis and treatment plan. Because the periodontal pocket is a soft tissue change, radiographic examination cannot be relied on as evidence of periodontal health. While radiographs provide evidence of past destruction and can be useful in correlating increased probing depths, the only accurate means of detecting pockets is a periodontal probe used with careful exploration.1 The periodontal probing chart also serves as a topographical road map, providing a visual, spatial guide to the location and depth of pockets. The chart also reveals the overall pattern of the soft tissue attachment, termed attachment topography, providing critical information in the selection and activation of instruments.2 Analysis of attachment topography provides insight on whether bone loss is horizontal or vertical.
Coverage
Avoid robotic spot probing in preset locations. This method only serves as a cursory screening of those minute portions of the tooth where the probe has been inserted. This approach is tempting when the tissue appears healthy or when previous readings are within normal limits. Each tooth presents a 360° circumference of surface area housing a subgingival environment with a vulnerable attachment, along which any portion can exhibit breakdown. Because periodontal diseases are generally episodic in nature and covert in expression, we cannot rely on instinct or clinical judgment to signal disease activity and must maintain a degree of suspicion at all times.3 Unless you are performing a preliminary screening such as Periodontal Screening and Recording® (PSR), the standard of care for documenting a baseline periodontal probing calls for small-step circumferential measurements around each tooth.4
The line angles of a tooth delineate the transition from one surface or portion of the tooth to the next, such as distofacial, midfacial, mesiofacial. Record the deepest reading within each portion. To perform this procedure correctly, adopt an exploratory approach, advancing the instrument in small microsteps around the tooth. The tip of the probe is kept submerged subgingivally as it advances. Assume there is something to find until you can rule out the existence of pockets with measurements that fall within normal limits.
Technique
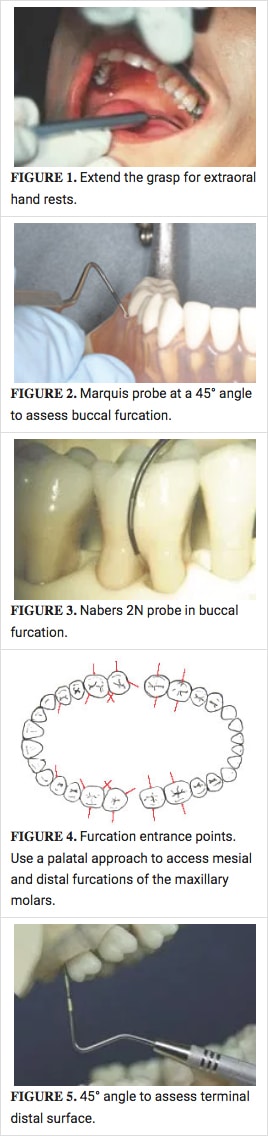
The grasp of the probe should be secure but relatively light for a responsive tactile sense in detecting the resilient soft tissue attachment. Activation of the probe is often initially taught using intraoral tooth-borne finger rests. While this method can be used, it requires far more effort to maintain correct adaptation of the probe—especially in the maxillary posterior region. An easier and more efficient approach is to extend the grasp and use an extraoral hand rest (Figure 1). Movement for activation of strokes is initiated from the upper arm. The arm-wristhand-fingers move as a single unit. Confined vertical movement, up and down, activates the probe in a walking motion.
With minimal or no finger flexing, the clinician can concentrate more fully on the tactile sensations of the soft tissue attachment. This allows for a more comfortable procedure for both the patient and the clinician. The hand rest adjusts throughout the procedure, allowing the wrist to rotate freely and smoothly as the probe moves from one tooth to the next. Adaptation around line angles can be maintained comfortably and with less effort. Contrast this to maintaining intraoral fulcrum points that require awkward and painful positions in the fingers, hand, and wrist.5
Maintaining proper adaptation to the tooth is the next component of skill.
Guidelines for positioning the probe are:
- Keep the probe parallel with the rootsurface.
- Visualize the axial alignment of thetooth at the insertion point, from the heightof contour to the root apex. Remember thaton multirooted teeth, an adjustment is necessaryfrom one root to the next. The probe iskept as parallel as possible to these imaginarylines as you proceed around the contours ofeach tooth.
- The angle of insertion is approximately15°. This entrance angulation accommodateshe height of contour at the crown. Once thetip is inserted, keep the probe as flat againstthe tooth as possible as you proceed apically.
- Increase the angle of insertion to 45°where roots diverge in order to detect furcations(Figure 2).6 This exploratory techniquepermits the probe to follow the root structureof the furcation, preventing a false shallowreading.
Speaking of Furcations
The complexity of the root architecture and attachment topography in furcations can be challenging. However, nowhere is early detection of periodontal breakdown more crucial.7 Nabers probes are best for assessing the horizontal component of a furcation invasion(Figure 3). In the absence of this specialized instrument, a straight probe used at an oblique angle permits entrance into the pocket. This open-angled approach should be used at the point of root divergence on all multirooted teeth to screen for furcation involvement(Figure 4).
Apical migration of the attachment can occur in numerous directions—not just vertically. This is especially true in multirooted teeth. Remain vigilant for spiral and oblique pockets in this area.8 The best way to detect complex pockets in a furcation is to use the probe in an exploratory manner with a lightgrasp to maximize tactile sensitivity. Direct the tip of the probe toward the center of the tooth rather than the apex, using a 45° angle. Be flexible with exploratory strokes in different directions. Do not let the intricacy of multiple root form deter you from this important task.
Morphology Guides Positioning
Maintain awareness and visualization of tooth morphology while probing. Anticipate developmental depressions and pronounced concavities that become exposed in areas of periodontal destruction.9 Increased angulation of the probe is necessary to maintain tip adaptation to these concave surfaces, similar to that of furcations.
One area often overlooked is the terminal distal surface in each quadrant. Molars have pronounced distal convexity at the cervical third of the crown. When a probe is inserted at 15° here, the tip often stops short on the inside wall of the gingiva, unable to proceed further down the root. Clinicians may assume they have reached the attachment when elastic resistance is felt. To correct this error, openyour insertion angle to 45° as if exploring a furcation (Figure 5). Rotate the handle laterally to clear anterior teeth in the opposing arch. This technique adjustment will insure you are able to detect apical migration of the attachment on these broad terminal distal molar surfaces.
Proximal readings are especially crucial in determining evidence of periodontal destruction. Once the probe reaches the contact point,the tip will continue stepping on to the proximal surface until it has covered the area apical to the contact. To confirm this, look directlyover the occlusal and visualize the terminal extent of the probe tip. A mouth mirror can be positioned to allow for this above-the-contact perspective in the posterior region.
Radiographs
A full-mouth set of periapical radiographs prominently displayed throughout the probing procedure guides insertion and angulation in the case of lost and/or missing teeth that may leave adjacent teeth tipped off axis. Periapical radiographs also reveal atypical root forms that may possibly interfere with accurate measurements. Rotate the wrist as you proceed from distal to mid-facial (or mid-lingual)to mesial in order to maintain correct axial alignment and adaptation of the probe to the tooth as you progress around the dentition. Keep a mental picture of the conical tapered root features of each tooth, referring to the radiographs for visual guidance.
To sum up, precision and skill in probing are worthy investments of effort, the reward for which reaches far beyond the oral cavity. In an era of emerging evidence linking chronic inflammation to systemic conditions, skillful monitoring of the periodontium may ultimately safeguard a patient’s overall health.
REFERENCES
- Carranza FA. Clinical diagnosis. In: Newman MG, Takei HH, Carranza FA, eds. Carranza’s Clinical Periodontology. 9th ed. Philadelphia: WB Saunders Co; 2002:445.
- Pattison A, Matsuda S. Making the right choice. Dimensions of Dental Hygiene. 2003; 7 ?
- McHenry KR, Hausman E, Genco RJ et al. 1251 absorptiometry: Alveolar bone mass measurements in untreated periodontal disease. Abstract. J Dent Res. 1981;60(suppl A):387.
- Armitage GC. Periodontal diseases: diagnosis. Ann Peridontol. 1996; 1:37.
- Pattison AM, Matsuda S, Pattison GL. Technique focus—extaoral fulcrums. Dimensions of Dental Hygiene. 2004;2(10):20-23.
- Matsuda S. Instrumentation of biofilm. Dimensions of Dental Hygiene. 2003;1(1):26-30.
- Svardstrom G, Wennstrom JL. Prevalence of furcation involvements in patients referred for periodontal treatment. J Clin Periodontol. 1966;23:1093.
- Waerhaug J. The Furcation problem: etiology, pathogenesis, diagnosis, therapy and prognosis. J Clin Periodontol. 1980;7:73.
- Gher MG, Vernino AR. Root morphology: clinical significance in pathogenesis and treatment of periodontal disease. J Amer Dent Assoc. 1980;101-627.
From Dimensions of Dental Hygiene. May 2005;3(5):24, 26.
