
The Keys to Successful Power Instrumentation
The dental endoscope sheds important light on the tenets of safe and effective ultrasonic instrumentation technique.
Today, almost every dental hygiene operatory includes a power scaler, and ultrasonic instrumentation provides many benefits for both practitioners and patients—when it is used effectively and safely. Ultrasonic instrumentation is an important technique in the removal of subgingival calculus and biofilm, which is key to lowering bacterial counts and improving tissue health.
While ultrasonic instrumentation is a welcome advancement in the field of debridement, it is not a panacea. Biofilm and calculus removal depends on the clinician’s skill and technique, regardless of the modality used. The use of the dental endoscope has allowed dental professionals to observe what is actually happening during subgingival ultrasonicins trumentation. Conventional ultra sonic scaling techniques can be improved by applying these new findings.
THE DENTAL ENDOSCOPE
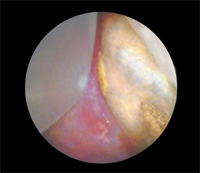
The dental endoscope has revolutionized what we know about the efficacy of instrumentation—both hand and power—by allowing clinicians to actually see what is happening during subgingival ultrasonic debridement. Through the use of a miniaturized camera attached to a small probe, the dental endoscope provides magnification up to 48 times and displays the images on a chairside screen (Figure 1). With the ability to see inside the pocket (Figure 2), clinicians are better able to maximize the benefits of ultrasonic instrumentation.
PROXIMITY
The first key to effective power instrumentation technique is that the ultrasonic insert/tip (UIT) must touch the adherent biofilm and/or calculus mass in order to dislodge it. Dental biofilms adhere tightly to the tooth surface, so very close proximity—at least 0.5mm—is necessary to disrupt them.1 The tenacity of dental biofilm is clearly demonstrated when viewing the action of the UIT with the dental endoscope. Continual stroking across the adherent biofilm deposit is necessary to dislodge it bit by bit. This process takes time. Quick, light sweeping strokes are not as effective as a slow, steady prodding motion with moderate pressure to loosen the sticky attached biofilm.
While ultrasonic lavage provides additional benefits, it does not dislodge all the layers of the biofilm. A common misconception is that a UIT used on low power and passed inside the pocket will deplaque the root surface. Lavage provides a water flush that helps remove biofilm remnants, but the strength of the water stream is not forceful enough to remove underlying attached biofilm or calculus deposits.2 Bacteria levels in the pocket are reduced first by physically disrupting the calculus and biofilm with the action of the UIT and then by the water flow generated by lavage (acoustic microstreaming).3,4
ROOT COVERAGE
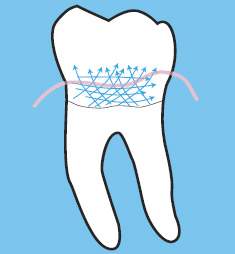
Effective ultrasonic instrumentation cannot be achieved without using horizontal, oblique, and/or vertical stroking over the entire subgingival root surface.5 Through magnification supplied by the endoscope, it is clear that the UIT must be kept in continual motion with overlapping strokes that are close together to be effective (Figure 3).6 Ultrasonic instrumentation is often viewed as faster and easier than hand instrumentation, but the fact is, covering the entire root surface with an UIT is no less time consuming than using a hand instrument. Envision the slower-paced, precise motion necessary to loosen sticky biofilm from the root surface. Now replace the biofilm with a tenacious calculus deposit.
Ultrasonic removal of calculus requires a slow methodical motion with increased power and more pressure against the tooth, depending on the UIT size and shape. The prodding motion necessary to loosen sticky plaque biofilm from the root surface requires patience and operator skill. Clinicians who use an endoscope are able to see that slower, steady repeating strokes are significantly more effective than quick, erratic ones. Some patients will need local anesthesia in order to comfortably undergo ultrasonic instrumentation.
Subgingival instrumentation with the dental endoscope almost always requires pain management. After a closed instrumentation procedure is completed, an explorer should be used to ascertain whether all deposits have been removed. The tactile evaluation of the procedure with an explorer is unreliable, but it remains the only technique available for nonendoscopic root debridement.
INSTRUMENT SELECTION
One size UIT does not fit all. Clinicians who use one or two UITs for every patient are not using this modality most effectively. UIT selection should be based on the type of deposit, how the deposit is attached, extent of attachment, and evaluation of the patient’s periodontal health, including factors, such as gingival inflammation and pocket depth.5,6 UITs must have enough metal mass to transmit sufficient vibration to dislodge deposits. UIT configuration should also be considered.4 UITs with beveled or straight edges with a corner typically produce the best results.4,7 Also, several new thin UITs that can be used on higher power settings are now available. See Table 1 (page 44) for more information on UIT selection.2,7–11
A CONSCIENTIOUS APPROACH
Some dental hygienists assume that ultrasonic scaling removes all calculus very quickly, however, endoscopy clinicians know that slower, meticulous measures are needed when debriding with a UIT. Thorough debridement with an ultrasonic scaler takes just as much time as when hand instruments are used. The type of ultrasonic unit, UIT, and power setting influences the amount of calculus that is removed with each stroke.
Unlike bladed hand instruments, in which pressure is most often applied on the pull stroke, UITs are used in a back-and-forth motion, using equal pressure throughout the stroke. It is often assumed that the UIT is removing calculus the entire time it is contacting the tooth surface. Viewing the action of a UIT with the endoscope reveals that repeated strokes over the same surface are necessary because the calculus is removed layer by layer until it is completely gone. In the same vein, hand instrument strokes must be repeated and overlapped to thoroughly remove the calculus. There is the occasional thrill of cracking a chunk of calculus off, in what is hoped to be one piece, with both UITs and hand instruments. This is infrequent at best, and the embedded underlayer that created the attachment to the cementum must then be instrumented clean. In the end, it is the clinician’s skill with his or her instrument of choice that dictates the amount of calculus removed.
SAFETY
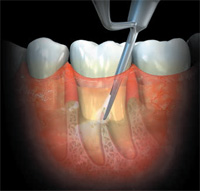
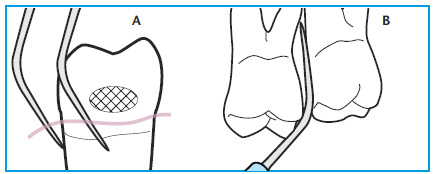
Improper adaptation of the tip of an ultrasonic scaler can cause significant damage to the root surface. I have seen many patients who have been instrumented only with an ultrasonic scaler for many years with notches in their roots that mark the exact location where the UIT reached at every maintenance appointment. Ultrasonic scalers are capable of removing cementum and dentin, as well as calculusan d biofilm.13 The skill of the clinician plays an important role in how much of the root surface is removed during instrumentation. The point of the UIT is the most powerful part of the instrument and must be used carefully. The tip must always be kept parallel to the root surface to avoid gouging (Figure 4).4,6,7,12
Clinicians who depend only on tactile sensitivity to determine when the calculus is removed rely on the smoothness of the root surface for this evaluation. This is a poor indicator of when calculus removal is complete. Dental endoscopy makes it possible to see just how much calculus remains after both ultrasonic and hand instrumentation. Dental endoscopy directly reduces unnecessary root removal when compared to closed procedure instrumentation.
PROTECT YOUR MUSCULOSKELETAL HEALTH
Ultrasonic instrumentation may be easier on the neuromusculature of the hands, but it does not reduce the time needed to complete periodontal debridement.2 Seeing what happens during root debridement makes the procedure more precise but not necessarily faster or less taxing on the clinician. Endoscopy clinicians remain in the working position while grasping a vibrating instrument for an average of 1 hour to 3 hours per appointment.
The fulcrums used, the pressure exerted, the time required for completion, and the body position assumed during thorough ultrasonic scaling are very similar to those used in hand instrumentation and they can cause comparable musculoskeletal problems. Endoscopy shows that effective hand and ultrasonic instrumentation techniques are more alike than was previously thought, so clinicians should employ the same ergonomic principles to prevent musculoskeletal injuries as they use when performing hand instrumentation.
CONCLUSION
The dental endoscope has provided invaluable information about what is really happening in the pocket during periodontal instrumentation. Power instrumentation continues to serve an important function in the dental hygiene process of care and with the proper equipment and technique, it can be a significant benefit to the clinicians’ armamentarium.
References
- Khambay BS, Walmsley AD. Acoustic microstreaming: detection and measurement around ultrasonic scalers. J Periodontol. 1999;70:626–631.
- Matsuda SA. A practical look at ultrasonic instrumentation. Dimensions of Dental Hygiene. 2009;7(7):32–34.
- O’Leary R, Sved AM, Davies EH, Leighton TG, Wilson M, Kieser JB. The bactericidal effects of dental ultrasound on Actinobacillus actinomycetemcomitans and Porphyromonas gingivalis. An in vitro investigation. J Clin Periodontol. 1997;24:432–439.
- Pattison AM. Ultrasonics unveiled. Dimensions of Dental Hygiene. 2010; 8(4):36–45.
- Hodges KA, Calley KH. Optimizing ultrasonic instrumentation. Dimensions of Dental Hygiene. 2010;8(1):30–35.
- Stach D. The five most common errors when using ultrasonic inserts. Dimensions of Dental Hygiene. 2010;8(7):46–50.
- Pattison AM, Pattison G. Ultrasonics: a new perspective. Dimensions of Dental Hygiene. 2003;1(3):32–35.
- Sefo D. Instrumenting the dental implant. Dimensions of Dental Hygiene. 2009;7(4):32–33.
- Speelman JA, Collaert B, Klinge B. Evaluation of different of methods to clean titanium abutments. A scanning electron microscopic study. Clin Oral Impl Res. 1992;3:120–127.
- Sato S, Kishida M, Ito K. The comparative effect of ultrasonic scalers on titanium surfaces: an in vitro study. J Periodontol. 2004;75:1269–1273.
- Lampe Bless K, Sener B, Dual J, Attin T, Schmidlin PR. Cleaning ability and induced dentin loss of a magnetostrictive ultrasonic instrument at different power settings. Clin Oral Investig. 2011;15:241–248.
- Pattison AM, Matsuda S. Making the right choice. Dimensions of Dental Hygiene. 2003;1(8)(Suppl):4–10.
From Dimensions of Dental Hygiene. July 2012; 10(7): 42, 44, 46-48.
