 ANTONIOGUILLEM/ISTOCK/GETTY IMAGES PLUS
Improve Your Explorer Technique
Detecting subgingival calculus deposits is key to ensuring periodontal health.
Successful dental hygienists rely on their ability to detect and remove calculus deposits through the use of tactile sensitivity. The challenge lies in effectively detecting and removing calculus from root surfaces. While analyzing radiographs, finding supragingival deposits, and noting changes in gingival conditions are helpful in detecting subgingival calculus, these methods may still be insufficient. The use of a dental explorer reveals hidden deposits that—left undetected—will lead to both gingivitis and periodontitis.
PART OF THE CALCULUS REMOVAL ARMAMENTARIUM
Explorers have been part of the dental armamentarium for decades, and they are one of the first instruments introduced in dental hygiene education. However, learning to use the explorer proficiently is a complex process. Sherman et al1 noted that after scaling and exploring, 57% of the surfaces examined had residual microscopic calculus remaining, while 77.4% of these surfaces had been clinically scored as calculus free with the aid of an explorer. Even with thoughtful exploring technique, calculus detection is unpredictable. As there are few alternatives for root surface examination, continued use of the explorer for calculus detection is necessary to improve technique. This article will focus on supporting clinicians in the improvement of their exploring skills.
EXPLORER SELECTION
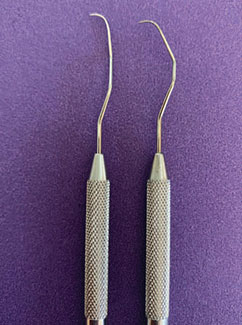
For efficient calculus detection, selecting the proper explorer based on location and pocket depth—which is established via thorough probing, analysis of radiographs, and knowledge of dental anatomy—is paramount. Dental explorers are available in a variety of designs such as straight, curved, or extended shank length. Tip length and curve may also vary between types of explorers. Some explorer designs are better for subgingival detection. Flexible metals conduct vibrations from the working end to clinicians’ fingers as they rest on the shank and handle of the explorer. The 3A explorer has a straight shank and a 2-mm working end that fits in deep narrow pockets with tight tissue.2 It is designed for use with a vertical or horizontal stroke. The 11/12 explorer is area specific with a complex, curved shank and tightly curved tip that allows adaptation to root contours. The 11/12 extended has a longer shank and slightly more opened curved tip than the 11/12 explorer. These design differences may enable the 11/12 extended better access into pockets deeper than 5 mm, especially in molars and furcations, than the 11/12.3,4 Selection of the correct explorer is as important as using the correct technique for deposit detection (Figure 1) .
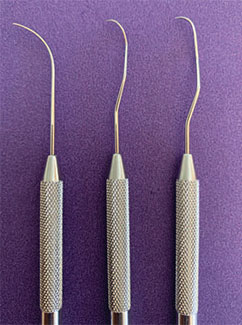
11/12 explorer, and ODU 11/12AF explorer.
TIPS ON TECHNIQUE
At the beginning of the appointment, clinicians explore to map out calculus deposits. At the end of the appointment, they explore again to determine their success in deposit removal. With the explorer, light to moderate pressure is used to detect calcified deposits on the root surface. When the deposit is slight and the tissue tone is fibral, a lighter stroke may be necessary. If the deposit is burnished or hiding under tighter fibrotic tissue, increasing pressure may be necessary to accurately assess the root surface and reach the bottom of the periodontal pocket.3,4 Move the explorer in a series of short and overlapping strokes that stay in contact with the root surface to ensure the entire root area is evaluated. Strokes should be 2 mm to 3 mm in length and multidirectional over the entire root surface. It is important to adapt 1 mm to 2 mm of the tip of the explorer to the tooth surface to accurately detect calculus deposits.3,4 Use care to keep the tip of the explorer in contact with the root surface at all times and do not drag the tip along the soft tissue of the pocket wall. Also, avoid using the point of the explorer to detect calculus, as this may damage the root surface.

horizontal, vertical, and oblique strokes.
Overlapping strokes may be horizontal, vertical, or oblique. The vertical or probing exploring stroke (ie, feeling the root in an up-and-down motion) is critical when assessing for burnished deposits. If calculus is burnished, it may be undetectable on the up stroke of the explorer; however, there may be a coronal ledge on a piece of burnished calculus that is detectable on the insertion stroke. Clinicians should use caution with the vertical stroke so as not to damage the epithelial attachment with forceful insertion.
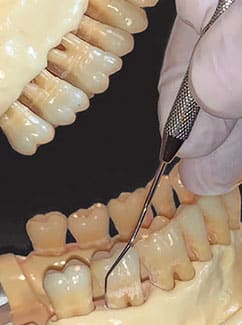
Oblique strokes around line angles and depressions are important because they allow the explorer to feel into the anatomy of root surfaces. Calculus may hide in depressions, so the explorer should be moved in a different direction than the direction used during scaling to aid in detection of these overlooked pieces. If the scaling stroke was vertical, then the exploring stroke should be oblique, so it will not run parallel to the remaining deposit. By moving in an alternating direction, the explorer is more likely to detect residual deposits (Figure 2).4
The terminal shank of the explorer should be held in the long axis of the root to allow the instrument to be guided to the base of the pocket (Figure 3). This is accomplished with a same-arch fulcrum, however, if the tissue is tight or the pocket is deep, then an opposite-arch or extraoral fulcrum is used. An opposite-arch fulcrum will aid in keeping the terminal shank of the explorer in the long axis of the root to allow it to drop to the base of the pocket (Figure 4). When exploring under the contact area, clinicians should avoid backing into the proximal surfaces but, instead, should reach under the contact area to the base of the pocket.
Due to the complexity of root anatomy, there are many areas where calculus is likely to be overlooked.5,6 Dental hygienists should be familiar with the unique root anatomy of each tooth surface, along with common root malformations and anomalies. Calculus deposits settle in depressions, line angles, and furcations. Careful examination of the root requires knowledge of the root anatomy and the ability to interpret what the fingers are feeling. Clinicians should determine if the root irregularities are due to excessive elevation as with a calculus deposit or if they are feeling a depression due to erosion or root resorption.
The explorer is used to assess the entire root to the base of the pocket. Knowing the pocket depth in each area will aid clinicians in confirming they have truly reached the base and have not explored to the top of a piece of calculus. When the tissue is firm, more pressure is needed to ensure that the explorer has been guided to the bottom of the pocket area. Equally important is for clinicians to recognize if the epithelial lining has been removed during scaling.
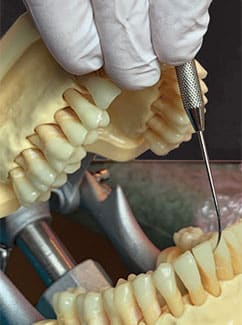
allow access to deeper pockets.
Bone can be detected at the base of the pocket if all of the lining epithelium has been removed. There are several signs that roughness at the base of the pocket is not calculus but is the top of the osseous crest. The pocket will become deeper, with more bleeding and roughness at the base. To confirm that bone has been revealed, clinicians should use the 3A explorer in a downward motion, sliding along the root surface. At the base of the pocket, the tip of the explorer will stick into the periodontal ligament space, with the root on one side and bone on the other side of the explorer tip. Clinicians should then gently roll the explorer in their fingers in a buccal and lingual movement to see if the tip of the explorer is lodged into the periodontal ligament space. The explorer will not freely move with this rolling motion, confirming that bone has been reached in that area of the pocket. Explore above the bone to confirm that all remaining deposits have been removed, but avoid continuing to scale the base of the pocket to prevent damage to the osseous crest. Dental hygienists may forget to explore the cementoenamel junction (CEJ) area of the tooth by not extending the stroke from the base all the way to the CEJ. The CEJ may hide burnished calculus, as blade angulation tends to close down as the instrument moves into the tighter interproximal space. Gauze can be pressed into the interproximal area to visually look for burnished calculus at the CEJ.
EXPLORER MAINTENANCE
Explorers must be properly maintained to ensure they can accurately detect calculus. The shank of the explorer should be carefully examined to verify that it is not bent or damaged. An explorer should have a balanced design similar to a curet. An explorer may become dull with use and multiple sterilizations. To test for sharpness, lightly move the explorer over a plastic testing stick. If the explorer easily glides over the testing stick, it is dull and should be replaced.3,4 A sharp explorer will catch when used on a plastic testing stick. A damaged or dull explorer may lead to misinformation when assessing the root surface, therefore periodic examination of this instrument is recommended (Figure 5).
bent shank of a damaged ODU 11/12 AF.
CONCLUSION
In conclusion, the dental explorer and tactile examination of the subgingival tooth surfaces enable the discovery and subsequent removal of calculus. During instrumentation, clinicians rely on their sense of touch to locate calculus deposits beneath the gingival margin. If subgingival deposits go undetected, residual calculus may cause periodontal abscess or unresolved chronic periodontitis. In the future, the use of the dental endoscope, or perioscopy, to visually examine the root surface may aid clinicians in complete deposit removal.7 However—as perioscopy is not yet widely used—dental hygienists must rely on tactile sensitivity to discover subgingival deposits, the removal of which is critical to the success of nonsurgical periodontal therapy and patients’ oral health.
REFERENCES
- Sherman PR, Hutchens LH Jr, Jewson LG, Moriarty JM, Greco GW, McFall WT Jr. The effectiveness of subgingival scaling and root planing. I. Clinical detection of residual calculus. J Periodontol. 1990;61:3–8.
- Hodges K. Reconsidering the explorer. Dimensions of Dental Hygiene. 2005;3(4):26–28.
- Boyd L., Wilkins E. Periodontal examination. In: Wilkins E, ed. Clinical Practice of the Dental Hygienist. 12th ed. Philadelphia: Wolters Kluwer; 2017.
- Sumi J, Nguyen M, Hand-activated Instrumentation. In: Darby M, Walsh M, eds. Dental Hygiene: Theory and Practice. 5th ed. St. Louis: Elsevier; 2019.
- Stambaugh RV, Dragoo M, Smith DM, Carasali L. The limits of subgingival scaling. Int J Periodontics Restorative Dent. 1981;1:30–41.
- Kepic TJ, O’Leary TJ, Kafrawy AH. Total calculus removal: an attainable objective? J Periodontol. 1990;61:16–20.
- Blue CM, Osborn J, Lenton P, Lunos S, Poppe K. A pilot study comparing the outcome of scali/g/root planing with and without Perioscope™ technology. J Dent Hyg. 2013;87:152–157.
From Dimensions of Dental Hygiene. February 2020;18(2):22,24–25.
