Reconsidering the Explorer
Proper explorer selection and technique are requisite to successful nonsurgical periodontal therapy.
Click here to view an Exploring Assessment Form.
Click here for a table comparing explorer designs.
Exploring is a critical aspect of everyday clinical practice due to its role in effective instrumentation and patient healing. Literature is void of evidence on the effectiveness of explorer designs, technique, and sequencing in periodontal therapy. With the advent of the endoscope, clinicians have a visual aid for detecting and evaluating the removal of deposits and plaque biofilm.1-3 However, the explorer is still a required instrument for efficacious debridement therapy.
EXPLORER SELECTION
Multiple explorers are used in debridement therapy. For example, an area-specific type explorer (#11/12) and a curved explorer are used for wide, deep pockets and maxillary molar furcation involvement. The area-specific explorer is indicated for deep pockets. A curved explorer with a long working end is used to extend to proximal surfaces and furcations on maxillary first molars, ie, 10 mm to 11mm, in the labio or buccolingual diameter.4 A single explorer might be adequate for prophylaxis appointments because of the presence of healthy sulci or shallow and wide pockets. However for nonsurgical periodontal therapy (NSPT), different explorers are beneficial for the clinician and patient in order to effectively and comfortably reach complex anatomy, deep pockets, furcations, and areas of mobility.
When selecting and implementing different explorers for NSPT consider: patient conditions; daily self-assessment of exploring technique periodic peer discussions about designs, ordering, and incorporating new explorers into practice; and recurrent peer assessment of your exploring technique.
Explorer selection depends on design features. The four types are: curved explorers that are shaped like universal curets (Figures 1, 2, and 4), area-specific explorers shaped like the Gracey 11/12 area-specific curet (Figure 3), pocket feelers or right-angled designs that are straight and narrow with a short 2 mm working end, and long and slightly curved designs (#3A, Figure 1). See the web version of this article for a review of the advantages and limitations of each design.
Other types of explorers include the Shepherd’s hook design (#23) for caries detection and a curved “pigtail” design indicated for healthy sulcus areas. Although explorers do not have the cutting edge or blade width and depth of curets, the design of the working end and shank affects adaptation to the root surface. Schoen found a difference in smoothness between two explorers that were tested; the #3A explorer detected smoothness correctly more often than the #17 explorer.5


GETTING THE GRASP

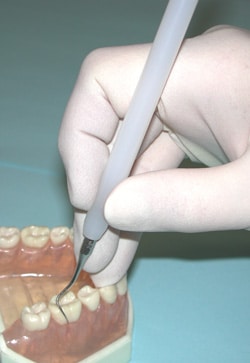
The grasp is the first step to self-assessment of exploring technique. A correct modified pen grasp is critical in accurate detection of calculus, anatomy, and restorative margins. The thumb and index finger are placed across from one another on the handle and they should not touch throughout the activation phase. Finger placement is typically near the shank and handle but must be moved further up the handle for alternate fulcrums, ie, opposite or cross arch. The thumb and index finger hold the instrument and the index finger rests on the middle and ring fingers. Also, the fingers will be relaxed and curved in an inverted “C” shape (Figure 4). The force with the modified pen grasp is less than other grasps.6 The modified pen grasp used with curets has significant positive outcomes on scaling and root planing. This finding can also be applied to exploration.
The choice of fulcrum depends on the explorer design and area of the mouth being explored. Conventional and cross arch fulcrums are used with curved explorers. Conventional fulcrum placement is possible everywhere in the normally aligned dentition. Cross arch fulcruming with the curved explorer often occurs on the mandibular lingual to assure extension to the midline (Figure 5). Another modification of a fulcrum is the maxillary posterior areas and lingual of the maxillary anterior teeth. A palm up orientation is ideal to negotiate the root surface topography in these areas (Figure 6). Opposite arch fulcrums, in addition to conventional fulcrums, are necessary for periodontal conditions, especially deep pockets in the maxillary posterior areas (Figure 7). Extraoral fulcrums are used for deep pockets on maxillary teeth to achieve parallelism of the lower shank of instruments such as the area-specific designed explorer.
ADAPT AND ACTIVATE
To adapt the explorer, use only the terminal 1 mm to 2 mm of the working end. Care must be taken to prevent the point from entering the epithelial attachment causing discomfort and inaccurate assessment. Rolling the handle is critical to maintain adaptation, especially at mesial line angles and root concavities. The pivoting movement of the hand, wrist, and forearm to keep the tip adapted helps in reaching the proximal midline. Also, pivoting advances the strokes on proximal surfaces until the tip crosses the midline. Results of controlled studies evaluating scaling and root planing efficacy reveal that deposits most frequently remain on proximal surfaces and that deposits remain on proximal surfaces more often than on facial and lingual surfaces and equally as often in furcations.7,8
Activation includes the rocking motion to extend the tip from the epithelial attachment to the gingival margin. The strokes should be short, about 1 mm, and advance around the tooth in a vertical or oblique fashion close enough together that small, fine deposits will not be missed. Once around the line angle, the clinician continues to perform the rock, roll, and pivot motions to stay adapted and activate.
Because the area from the contact to the buccal or lingual surface is broad, it is divided, vertically, into three sections. Section one is explored first before advancing to sections two and three. The contact area has a unique dimension and, therefore, calculus accumulation is often present, especially in anterior teeth. Calculus located in the contact area can be deceiving because the explorer sends back a vibration simulating what is felt when the contact area is reached. Extend exploratory strokes about 1 mm past the contact in order to effectively detect deposits.
THE GENERAL PRINCIPLES OF EXPLORING
- Insert to the epithelial attachment on all surfaces to ensure complete coverage of the entire root surface. This depth is estimated by placing a probe next to the explorer shank to approximate the depth of penetration subgingivally.
- Visualize the normal anatomical features of the tooth in combination with the radiographic appearance of the root. The radiograph might indicate alterations in the root structure on proximal surfaces.
- Use vertical and oblique strokes that overlap one another to reduce the chance of missing a deposit.
- Apply horizontal strokes where appropriate such as line angles; areas with erosion, abrasion, or abfractions; restorative margins; furcations; narrow pockets and facials; or linguals of anterior teeth.
- Use methodical and slow coverage of the root surface. Quick strokes seem faster but are less effective.
- Employ an extremely light grasp and finger rest (fulcrum) at all times. The explorer should be held so lightly that a tap on its handle would move the instrument. A moderate or heavy grasp decreases tactile vibrations, accurate interpretation, and comfort for the patient and operator.
Posterior insertion is slightly distal to the distal line angle and anterior insertion is slightly to the side of the midline (buccal or lingual) insuring overlapping of strokes at line angles to enhance thorough root coverage. Because of the narrow distal-mesial dimension of anterior teeth (3.5 mm to 7 mm), rolling and pivoting must occur rapidly. Only a few strokes are needed to rock to the line angle located 2 mm from the midline where pronounced rolling occurs to maintain adaptation on the convex surface. The proximal surface of anterior teeth from the line angle to the contact is again divided into sections. Even though the faciolingual dimension of the anterior teeth is less than the posterior teeth, three sections are still advised to cover the surface adequately and thoroughly.


EXPLORING IN DEEP POCKETS
Pockets over 5 mm in depth provide a unique challenge in NSPT. The area-specific, slightly curved (#3A) and pocket feeler explorers are designed to negotiate these situations. The area-specific design is easily adapted in deep pockets that are wide and bathtub like in shape. In a narrow, deep pocket access is achieved by using a pocket feeler, a 3A design, or a curved explorer with the tip aimed apically, taking care to not injure the epithelial attachment. To evaluate the best fulcrum placement, place the tip at the deepest portion of the pocket and then move the grasp to the point on the handle necessary to maintain a fulcrum on hard tooth structure. For maxillary teeth with deep pockets, the fulcrum will be an intraoral or extraoral opposite arch. A great explorer for deep pockets is the extended shank area-specific design that has a 3 mm longer shank when compared to the traditional #11/12 design.
To explore a furcation, the location, relationship of the gingiva, and the adjacent pocket depth are considered. The best approach for an exposed furcation is to treat each root as a separate tooth and with a combination of strokes. The distal surfaces of each root are assessed, and then the buccal/lingual and mesial surfaces of each root are assessed, ensuring overlapping strokes on the surface where the roots meet. Next, concentrate on the concavity coronal to the furcation entrance by employing horizontal and oblique strokes.
If the gingiva occludes the furcation, the periodontal pocket is shallow, or the furcation entrance is barely detectable, this approach may not be feasible. Instead, the area is treated with a combination of strokes including horizontal strokes to assess the concavity coronal to the furcation and the limited furcation opening. A combination of explorer designs is effective depending on anatomy, deposit size, and location.
Maxillary molar mesial and distal furcations present a unique instrumentation challenge. Access to the mesial furcations is best from the lingual surface because the furcation entrance is located lingually and not directly in the midline. An area-specific 11/12 explorer and a curved design with a long terminal shank and working end might be needed to access the mesial entrance. The distal furcation entrance is located near the midline of the tooth, therefore, approaching it with an area-specific like design (11/12) and a curved explorer from both the lingual and buccal provide equal access. The 3A explorer is useful in these situations.
Immediately after instrumentation, the reassessment of the subgingival environment with an explorer is a clinical endpoint that only measures the tooth surface’s readiness for healing to occur. Clinically detectable smoothness is used to evaluate this endpoint. Regardless if a prophylaxis, NSPT, or periodontal maintenance procedures have been performed, the clinical endpoint is to remove all detectable plaque biofilm retentive factors. In contrast, the therapeutic endpoint of NSPT is the reevaluation visit that includes the measurement of clinical criteria such as probing depth, clinical attachment level, and gingival inflammation accompanied by bleeding. If sites of inflammation persist, further exploration and instrumentation are employed to achieve a therapeutic endpoint.
In conclusion, the primary function of explorers is to detect location and configuration of calculus deposits and other plaque biofilm retentive factors, as well as to assess restorative problems such as contour and marginal integrity. The explorer, in the absence of a periodontal endoscope, is the best and most reliable method to evaluate the subgingival environment during NSPT because of the fine and curved ends and shanks. Selection of explorers is often related to clinician preference. However, anatomical conditions should be considered such as the width of the proximal surface, periodontal probing depths, and root topography including concavities and furcations. Although detecting moderate to large deposits is possible with periodontal probes and a sharp curet during instrumentation, there is no substitute for the explorer in periodontal therapy.
REFERENCES
- Stambaugh RV, Myers G, Ebling W, Beckman B, Stambaugh K. Endoscopic visualization of the submarginal gingival dental sulcus and tooth root surfaces. J Pe r i o d o n t o l. 2002;73:374-382.
- Stambaugh RV. Perioscopy—The new paradigm.2003;1(2):12-16.
- Pattison AM, Pattison GL. Periodontal instrumentation transformed. Dimensions of Dental Hygiene. 2003;1(2):18-22.
- Ash MM. Wheeler’s Dental Anatomy, Physiology, and Occlusion. 7th ed. Philadelphia: WB Saunders Co; 1993.
- Schoen DH. Instrument effects on smoothness discrimination. J Dent Educ. 1992;56;741-745.
- Canakci V, Orbak R, Tezel A, Canakci CF. Influence of different periodontal curette grips on the outcome of mechanical non-surgical therapy. Int Dent J. 2003;53:153-158.
- Kepic TJ, O’Leary TJ, Kafrawy, AH. To t a l Calculus Removal: An Attainable Objective? J Periodontol. 1990;61;16-20.
- Sherman PR, Hutchens LH Jr, Jewson LG, Moriarity JM, Greco GW, McFall WT Jr. The effectiveness of subgingival scaling and root planing. I. clinical detection of residual calculus. J Clin Periodontol. 1990;61:3-8.
