
Mastering Ultrasonic Instrumentation for Stage I Periodontitis
Optimizing ultrasonic instrumentation requires understanding periodontitis staging, selecting the right inserts/tips, and applying proper techniques.
Clinical practice guidelines state that subgingival instrumentation for Stages I-III periodontitis be performed with hand or powered instruments, alone or in combination, and choice is based on experience, skills, and preferences of the provider and patient.1 In regard to staging periodontitis, a multidimensional view with case definition is used reflecting stage (severity and complexity) and grade (progression rate and risk factors).2-4 Severity is determined by staging interdental clinical attachment loss (CAL), radiographic bone loss, and tooth loss. Complexity is based on maximum probing depth and presence of horizontal or vertical bone loss.
During oral assessment, the periodontal diagnosis is determined after analyzing data. CAL, probing depth, root anatomy, biofilm distribution, and calculus type are all important in application of ultrasonic instrumentation for the treatment of stage I periodontitis. Biofilm is accepted as the main pathology for periodontitis; however, the pathologic risk of calculus may be a pathway for periodontal diseases separate from biofilm.5 Inadequate removal of deposits leads to failed periodontal therapy.5 Indications, contraindications, and precautions for ultrasonic instrumentation should be evaluated prior to care planning.
Preparation for Stage I Periodontitis
Consider high-volume evacuation (HVE) or extraoral vacuum aspirators (EOVAs) prior to ultrasonic instrumentation. COVID‐19 raised concerns about aerosols, particularly the distance traveled and time airborne. Particles carrying infectious agents have been detected up to 8 feet from the oral cavity during ultrasonic instrumentation with a saliva ejector.6 The use of HVE and EOVA reduces aerosols and droplets better than the saliva ejector alone or the saliva ejector and HVE.7 Using HVE with dental simulator units demonstrated a 99% reduction in particles and 50% reduction in the range of particles.8 Also, particles take 30 to 60 minutes post-treatment to settle.8
Another consideration is a preprocedural mouthrinse. Chlorhexidine, essential oils, and cetylpyridinium chloride reduce bacterial load in dental aerosols by 68.4%.9 Molecular iodine is an advanced preprocedural mouthrinse that reduces SARS-CoV-2 infectivity in vitro and was the most effective oral rinse tested both with and without human saliva.10 A systematic review reported povidone-iodine was the most studied mouthrinse that frequently showed significant reductions in viral load in vitro.11 Also, cetylpyridinium chloride showed good results, and chlorhexidine gluconate and hydrogen peroxide showed conflicting results on SARS-CoV-2 load reduction in both in-vitro and in-vivo studies.11
Effective ultrasonic instrumentation requires attention to the water flow in order to minimize frictional heat, produce lavage, and positively affect cavitation and acoustic microstreaming. Bleed the unit via the purge feature or the foot pedal for 2 minutes prior to use. Purging allows air bubbles to escape, a reduction of bacterial load, and adequate flow to begin before inserting an insert or connecting a tip (UIT). Water spray is adjusted depending on deposits encountered, UIT design, and patient sensitivity. The ideal water spray is either a wide light spray or a wide light spray with drips. For magnetostrictive inserts only, lubricate the o-ring with water to enhance insertion, removal, and maintain the placement of the insert during use.
Use the lowest power setting suitable for the procedure and the UIT to increase patient comfort and efficacy. The higher the power setting, the more distance the UIT travels in one single vibration, termed tip displacement, making the stroke longer and more powerful. Also, higher power has been shown to enhance root surface roughness.12,13 However in some cases, deposits with heavy ledges should first be addressed on a higher power setting to avoid burnishing.14
With magnetostrictive technology, lower power settings create a more favorable relationship between cleaning, dentin loss, and surface roughness.13 During instrumentation, the power should be modulated based on calculus tenacity/size, insert used, and patient acceptance via sound and sensitivity. If gingival sensitivity is encountered re-assess correct technique and pain management.
Adaptation for Stage I Periodontitis
Stage 1 periodontitis is summarized by 1 to 2 mm of interdental CAL, radiographic bone loss at the coronal one-third, maximum probing depth of 4 mm or less, and horizontal bone loss without tooth loss.2 For initial therapy, practitioners often use only one UIT; however, multiple designs should be utilized for efficacy (Table 1). If tenacious calculus exists, a larger UIT is selected such as a triple bend (Figure 1). If deposits are light or moderate and mostly supragingival, perhaps a universal #10 is indicated.
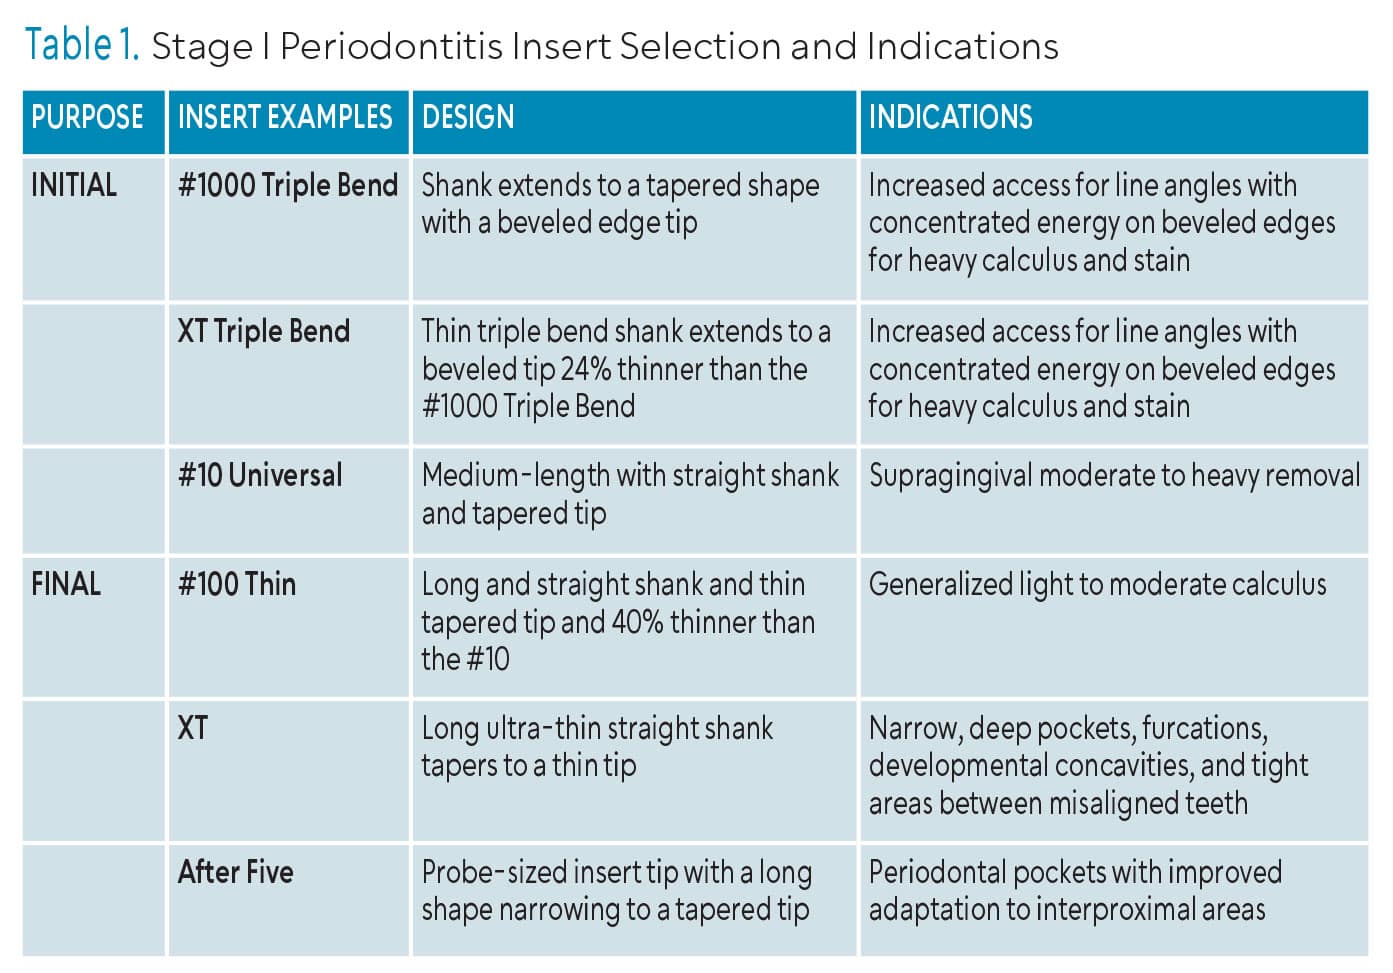 For light to moderate subgingival deposits, standard curved right, left, and straight designs are ideal to meet the needs of all calculus and subgingival root anatomy such as line angle convexities and proximal concavities (Figure 2). A thinner tip might also be utilized, such as a #100 or XT, particularly in 4 mm pockets (Figure 3). The use of only one thin straight tip (#100 Thin) may save time and effort; however, calculus removal could be compromised because of the narrow tip, straight design, and use at low power. Both magnetostrictive and piezoelectric UITs have similar designs that follow these principles of selection.
 When adapting UITs, the grasp and fulcrum should be light and at a distance from the treatment area such as with an opposite arch, cross arch, or extraoral fulcrum. Extraoral fulcrums are necessary to reach maxillary posteriors in order to extend the tip of the UIT into the base of the pocket. Position the hand up on the sheath for balance and comfort, not at the junction of the sheath and the UIT.
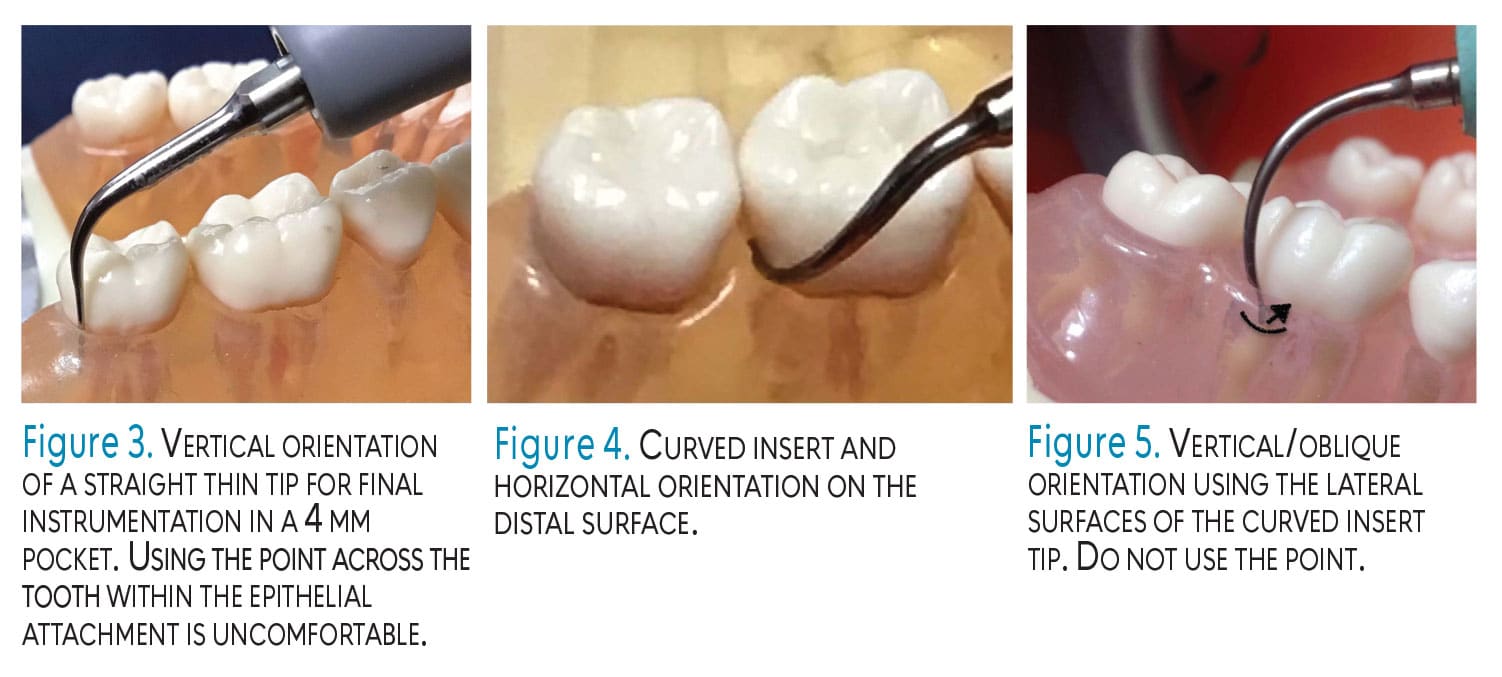
Orientation of the UIT is vertical, horizontal, or oblique. Vertical orientation is parallel to the tooth’s long axis and directed toward the pocket base or coronal border of calculus (Figure 3). Vertical orientation is used when 0° is appropriate to fracture tenacious, heavy calculus and for narrow periodontal pockets. Horizontal orientation is perpendicular to the tooth and is used on all surfaces; however, most often on proximal surfaces (Figure 4). Oblique orientation positions the UIT on the lateral surfaces of the tip (Figure 5).
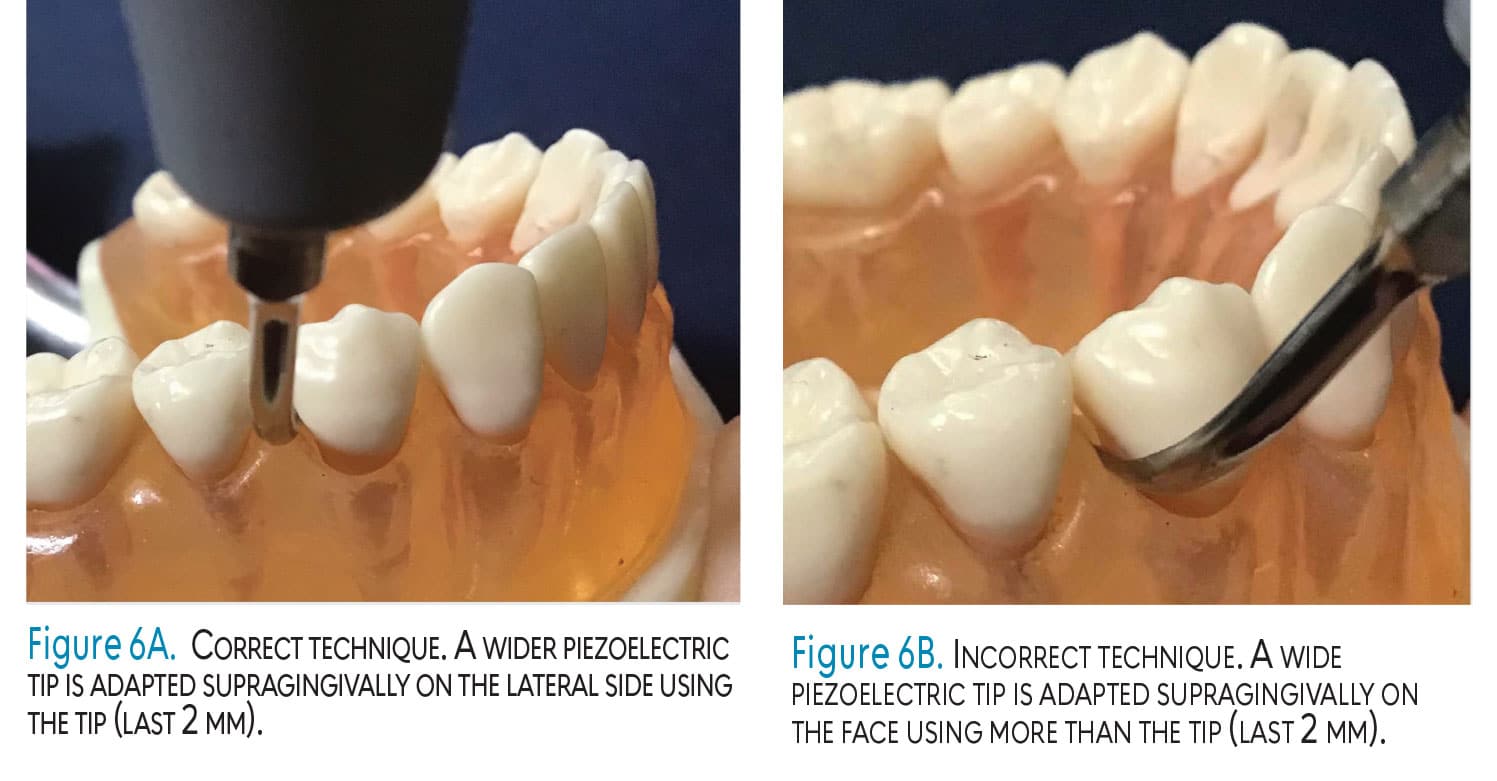
 The side of the UIT that is adapted is also significant; the point emits the greatest energy and is never adapted to the cementum (Figure 2). For inserts, the concave surface emits the second greatest energy and, next, the convex surface (Figure 2). The lateral surfaces emit the least energy, albeit they are used (Figure 2). For piezoelectric units, tips are adapted on the lateral sides according to many manufacturers (Figure 6). However, research indicates that piezoelectric tips move in an elliptical pattern as magnetostrictive insert tips do; therefore, oscillation patterns depend on probe shape and generator power, not the generator itself.15 Angulation to the tooth of the terminal 2 mm should be 0° to 15° for both technologies.
 Adapt the terminal 2 mm of the UIT or the tip for final instrumentation (Figure 2). If adapting less of the tip, sensitivity could occur due to the point engaging in the cementum, enamel, or epithelial attachment. The latter is uncomfortable for the patient as the point is against or in the epithelial attachment (Figure 3). If adapting more of the tip, the deposit may not be removed, leaving residual calculus and burnishing.
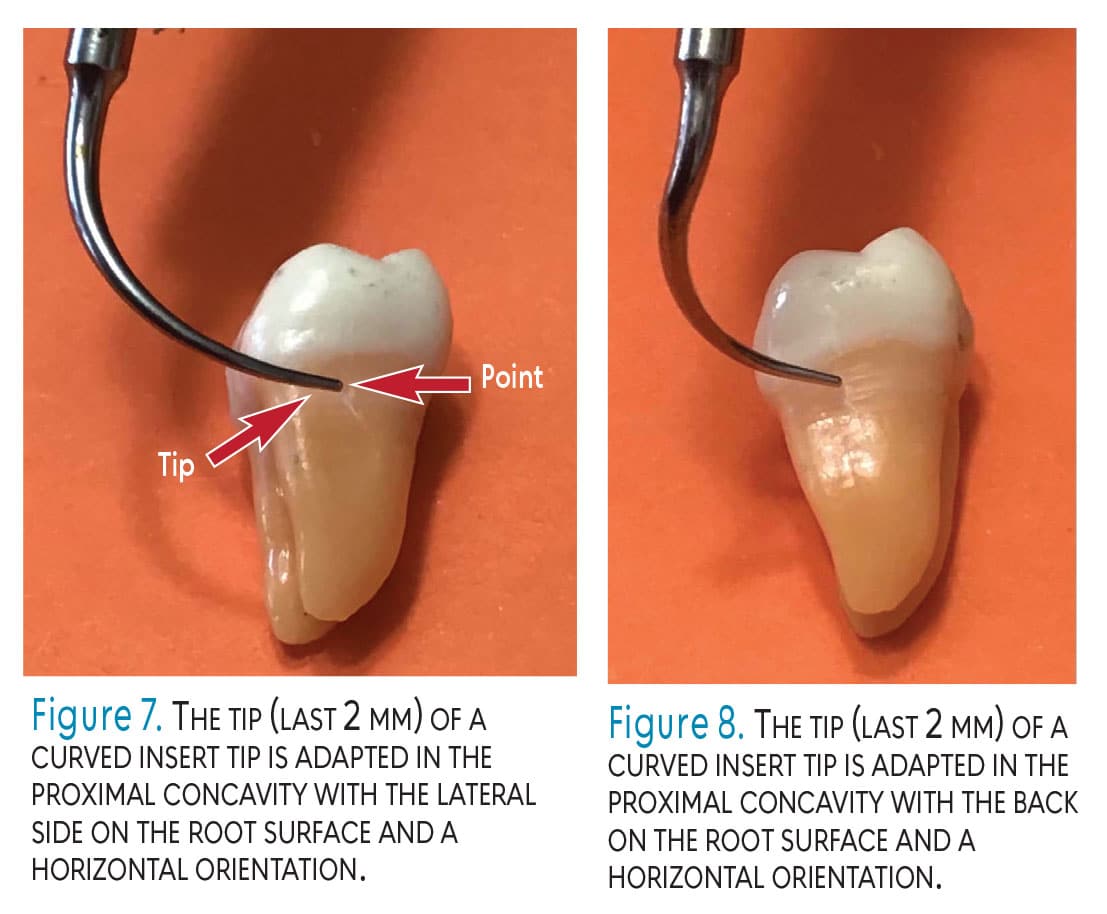
Consider implementing curved right, left, and straight UITs because straight designs alone do not conform to all anatomy and deposits. An easy method to apply the right and left UIT is to adapt the end that curves toward the mesial surface, similar to hand instrumentation with a universal curet. The lateral sides are adapted to the buccal, lingual, and proximal surfaces. The buccal and lingual are approached with a vertical/oblique orientation and the proximal with a horizontal orientation (Figure 7). Another approach is to adapt in the opposite manner; the back is used on the buccal, lingual, and proximal (Figure 8). This approach applies the opposite right or left UIT from the first method.
![]() Activation for Stage I Periodontitis
Activation for Stage I Periodontitis
Utilize multidirectional stokes that overlap, channeling (1- to 2-mm increments), light pressure, and appropriate speed of movement to activate. Stroke direction refers to oblique, horizontal, or vertical movements that are small and incremental. A combination of directions is used to cover all root surface anatomy and remove calculus. Overlapping strokes are necessary to prevent missing deposits. Channeling, referring to the length of the stroke in 1- to 2-mm increments, is essential for all root coverage, particularly in periodontal pockets.
Only light pressure is needed because the tip is always moving in an elliptical motion and will remove deposits without pressure from the grasp and fulcrum. If moving quickly across a tooth, calculus might not be completely removed, resulting in residual calculus or burnishing. Take time to deliberately contact deposits and the root structure in an organized and relaxed manner.
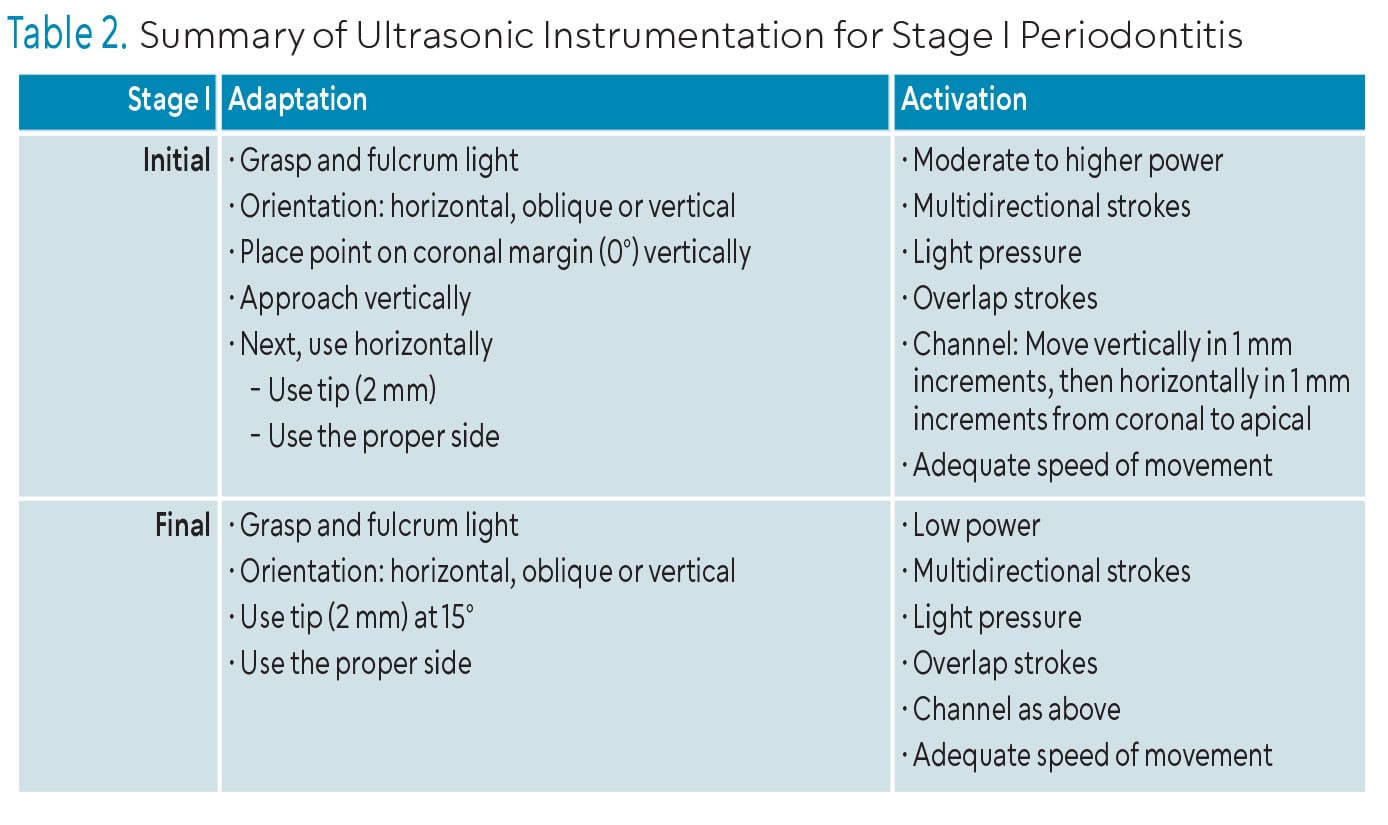 Sensitivity can occur when too much or too little of the UIT is adapted to the tooth, tip angle to tooth is not at 0° to 15°, or the adapted sides are emitting too much energy for the patient. Also, sensitivity can occur if activation is in only one direction, the tip is not constantly in motion, and if excessive pressure is applied. Use a soft tissue fulcrum when possible, especially on exposed cementum, as it is more comfortable for patients. If sensitivity persists, decrease the power setting, change to a less active side of the insert, or move from the sensitive tooth to another and then return (Table 2). Manual instrumentation should follow ultrasonic technology to achieve the endpoint of therapy.
In summary, decisions will be made about HVE, preprocedural rinses, water flow, and power setting. For stage I periodontitis with heavier tenacious calculus, use a larger, traditional/standard UIT design first. Second, follow with a thinner appropriate UIT such as the standard curved right, left, and straight designs. Adaptation and activation of UITs should follow sound principles of instrumentation for each of the two technologies, ensuring adequate root coverage with no gingival or root sensitivity.
References
- Sanz M, Herrera D , Kebschull M, et al. Treatment of stage I-III periodontitis-The EFP S3 level clinical practice guidelineJ J Clin Periodontol. 2020;47 (Suppl 22):4-60.
- Tonetti MS, Greenwell H, Kornman K. Staging and grading of periodontitis: Framework and proposal of new classification and case definitions. J Periodontol. 2018;89(suppl 1):S159-S172.
- Alkhafaji N, Patel TJ. Implementing the 2017 periodontal classification system. Dimensions of Dental Hygiene. 2023; 21(9):16-19.
- Harrel SK, Rethman MP, Cobb C, et al. Clinical decision points as guidelines for periodontal therapy. Dimensions of Dental hygiene 2022;20(6):28-33.
- Harrel SK, Cobb C, Sheldon LN, et al. Calculus as a risk factor for periodontal disease: Narrative review on treatment indications when the response to scaling and root planing is inadequate. Dent J (Basel). 2022;10:195.
- Pierre-Bez AC, Agostini-Walesch GM, Smith PB., et al. Ultrasonic scaling in COVID-era dentistry: A quantitative assessment of aerosol spread during simulated and clinical ultrasonic scaling procedures. Int J Dent Hyg. 2021;19:474-480.
- Suwandi T, Nursolihate V, Sundjojo M, Sari Wadyarman A. The efficacy of high-volume evacuators and extraoral vacuum aspirators in reducing aerosol and droplet in ultrasonic scaling procedures during the covid-19 pandemic. Eur J Dent. 2022;16:803-808.
- Walesch GM, Pierre-Bez AC, Marcelli-Munk G, et al. Aerosols in ultrasonic instrumentation: comparison of particle spread utilizing saliva ejectors versus high-volume evacuation. Journal of Dental Hygiene. 2021;95(3):18-24.
- Marui VC, Souto ML, Rovai ES, Romito GA, Chambrone L, Pannuti CM. Efficacy of preprocedural mouthrinses in the reduction of microorganisms in aerosol: a systematic review. J Am Dent Assoc. 2019;150:1015–1026.
- Teagle V, Clem DS, Yoon T. Virucidal Properties of molecular iodine oral rinse against SARS-CoV-2. Compend Contin Educ Dent. 2022;43:e13-e16.
- Silva A, Azevedo M, Sampaio-Maia B, Sousa-Pinto B. The effect of mouthrinses on severe acute respiratory syndrome coronavirus 2 viral load: A systematic review. J Am Dent Assoc. 2022;153:635-648.
- Casarin R, Pinto RF, Nocitl FH, Sallum EA, Sallum AW, Casati MZ. Assessment of ultrasonic root surface scaling with different power settings. Roughness evaluation. Braz J Oral Sci. 2006;5:996-1000.
- Bless KL, Sener B, Dual J, Attin T, Schmidlin PR. Cleaning ability and induced dentin loss of a magnetostrictive ultrasonic instrument at different power settings. Clin Oral Investig. 2011; 15:241–248.
- Brookman L, Smith D. The bane of burnished calculus. Dimensions of Dental Hygiene. 2017;15(2):28-31.
- Lea SC, Felver B, Landini G, Walmsley AD Three-dimensional analysis of ultrasonic scaler oscillations. J Clin Periodontol. 2009; 36:44–50.
From Dimensions of Dental Hygiene. March/April 2025; 23(2):14-17.
