Maintain the Cutting Edge of Dental Instruments
Instrument sharpness is key to achieving successful periodontal treatment.

Sharp dental instruments are critical to the success of periodontal instrumentation. The ability to evaluate and achieve instrument sharpness is a skill that takes time to acquire. Clinicians need to understand the design of the instrument and develop a method for testing sharpness. Instrument sharpness is determined by assessing the cutting edge of the blade. This edge is the fine line where the lateral surface of the instrument meets the face of the blade. When an instrument dulls, this fine line becomes rounded and reflects light. The use of dull instruments can increase operator fatigue and hinder the success of patient outcomes.
Sharp instruments will lead to less burnishing of calculus deposits and reduce the risk of clinician slippage and hand fatigue.1 Sharp instruments also increase tactile sensitivity during instrumentation. As few as 15 scaling strokes to 45 scaling strokes can lead to dulling of the instrument.2–4 The objective of sharpening is to re-establish the fine line of the cutting edge and to maintain the original shape of the blade. Developing a proper sharpening technique, however, can be challenging.


INSTRUMENT DESIGN
Before sharpening an instrument, clinicians should understand the design of the instrument to be sharpened. Maintaining the original blade shape and internal angle of each instrument is integral to success. Universal curets have a cutting edge on each side of the blade and a rounded toe and back. The internal angle between the face and the side of the blade is 70° to 80°.1 Clinicians must sharpen both sides of the blade at the proper angle and keep the toe and back rounded to correctly maintain the universal curet. Area-specific curets have a blade that is offset by 70° in relation to the terminal shank.1 The internal angle of the area specific curet is still 70° to 80° and the toe and back are rounded, so clinicians may use a similar sharpening technique as the one used for the universal curet. However, clinicians must be mindful of the offset shank design when establishing the correct stone and instrument blade relationship. In addition, only the working side of the area-specific curet will be sharpened.
Sickle scalers are like curets in design because they have an internal angle of 70° to 80°. At this point, the similarity ends because the sickle scaler has a pointed tip and back. Clinicians should hold the sharpening stone at a similar angle relationship to the sickle blade as they did with the curet, but they may now intentionally keep the tip of the instrument pointed (Figure 1).


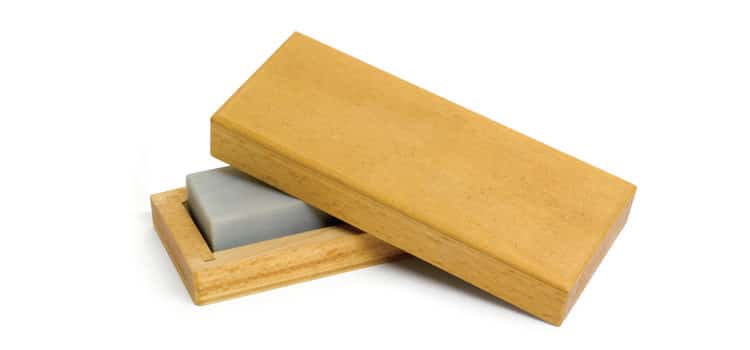
SELECT A SHARPENING IMPLEMENT
The next step in effective sharpening is to select a sharpening implement (Figure 2). Sharpening devices come in natural materials, such as Arkansas and India stones, and artificial materials. The Arkansas stone has a fine grit that produces a delicate cutting edge. The India stone has a courser grit and may be best indicated when clinicians need to modify an instrument or correct an error made by past sharpening techniques. All natural stones should be lubricated with oil during use and then cleaned with oil prior to sterilization. Keeping the stone lubricated during sharpening will prevent glazing—clogging of the stones pores with metal flecks.1 Placing the cleaned, oiled stone in an ultrasonic bath prior to sterilization may help to prevent the oil from damaging the inside of the sterilizer.
Artificial sharpening devices are made from a variety of substances, such as ceramic aluminum oxide stones or diamond-coated stainless steel sharpening cards. Ceramic stones may be used without lubrication but they should be cleaned with water prior to sterilization to remove metal particles from the stone surface. Sharpening cards may be used dry and sterilized without cleaning the surface. Sharpening cards come in three grits (extra fine, fine, and medium) so clinicians may select the one that works best for them.

INSTRUMENT EXAMINATION
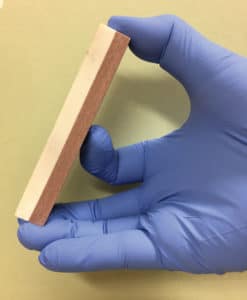
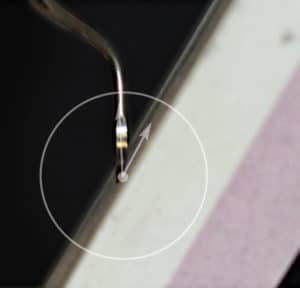
Once the sharpening device has been selected, the instrument should be examined to see if sharpening is warranted and if the instrument still has enough metal to allow for continued use. The operator may find that loupes with a light source are valuable when examining each instrument. Look at the blade of the instrument to ensure that it is not extremely pointed and that enough metal remains to safely sharpen and use the instrument without fear of breakage (Figure 3). Evaluate the side of the blade to see if light is reflecting off of the dulled rounded edge (Figure 4). The use of a plastic testing stick may be helpful. Clinicians should hold the testing stick in their nondominant hands and the instrument at proper working angle in relationship to the stick. Test the entire length of the blade and not just the toe 1⁄3. With gentle pressure, the instrument should “bite” into the stick. The amount of pressure needed to bite into the stick is similar to the amount used when removing calculus deposits. Less lateral pressure is needed with a sharp instrument (Figure 5). Clinicians must resharpen an instrument at the first sign of dullness. Determining how often to sharpen is based on the amount and type of calculus present in each working appointment. The testing stick and any selected sharpening implement should be sterilized and ready to use with sterilized instruments. Clinicians should wear personal protective equipment, including protective eye wear, gown, mask, and gloves while sharpening instruments.
SHARPENING TECHNIQUES
Several sharpening techniques are available. Moving the sharpening device and holding the instrument stable are recommended for curets.3 Sharpening the lateral sides of the curet instead of the face of the blade is recommended to maintain the strength of the instrument.4Hold the stone in the dominant hand by placing the thumb on the top of the short edge of the stone and the middle and ring finger under the bottom short edge of the stone. Place the index finger behind the stone for stabilization. Hold the instrument in the nondominant hand with a palm grasp and press the elbows against the body for additional support (Figure 6 and Figure 7).

Locate the face of the blade. Position the face parallel to the ground. Place the stone at a 90° angle in relationship to the face at the side of the blade where it attaches to the terminal shank. Open the stone angle to 110° in relationship to the face of the blade. Don’t use the handle or the terminal shank to determine the blade-stone relationship. Focus on the face of the blade and its angle to the stone. The proper angle will look like the 1:00 o’clock position (11:00 o’clock for left-handed clinicians; Figure 8 and Figure 9). Move the stone up and down with light to moderate pressure. Maintain the same angle throughout the stroke. Slowly work toward the toe of the instrument, repeating the up and down stroke and maintaining the same angle. This is where many clinicians start to close up the stone-blade-face relationship and create the wrong working angle at the toe 1⁄3 of the instrument. Remember to keep the same stone-blade angle for the entire sharpening process. Be sure to sharpen the entire blade length, not just the toe 1⁄3. Repeat the gentle up and down strokes until the blade is sharpened. Ending on a down stroke will help to prevent small metal burs from forming on the blade edge.4

If sharpening a universal curet, repeat this step on the other cutting edge. Rotate the instrument so the toe is facing away from the clinician and position the stone at the 1:00 o’clock position (11:00 o’clock for left-handed clinicians) and repeat the up and down strokes until this second blade is sharpened. Examine the toe of the instrument and use the stone to round the toe if needed. To do this, hold the stone at a 15° to 25° angle to the face and gently walk the stone around the underside of the entire toe of the instrument.5
When sharpening an area-specific curet, the same technique can be used on the working edge of the blade. Position the face of the blade parallel to the floor and establish the 110° angle between the stone and the instrument face. Avoid using the terminal shank to determine the correct sharpening angle. Sickles may be sharpened by placing the stone on a firm working surface and moving the instrument over the stationary stone. Hold the instrument in the dominant hand and stabilize the stone with the nondominant hand. The blade face must be positioned so the clinician can look into the face to ensure that the entire blade is touching the stone. The blade/stone relationship should be a 110° angle. Pull the instrument forward over the stone. Continue the strokes until the sickle is sharpened. When one edge of the sickle is sharpened, repeat the process with the other cutting edge(s) (Figure 10).
Clinicians are responsible for assessing instrument sharpness and maintaining the original blade design. Careful evaluation of each instrument will help clinicians identify possible sharpening errors. When looking at the edge of the blade, the sharpening scar should be even and smooth. If the toe 1⁄3 of the blade reflects light at a different angle than the rest of the blade, the blade-stone angle may not have been maintained during the entire sharpening process. To correct this problem, clinicians will have to reshape the instrument blade by opening the stone-blade relationship to 110° and sharpen the toe 1⁄3 of the blade again.

The curet blade must not become pointed during this reshaping process. Another common error occurs when clinicians hold the stone at a 90° angle during the entire sharpening process, instead of the correct 110°. This will cause the internal angle of the blade to move from 70° to 90°. Changing the working angle may lead to burnished calculus and possible instrument slippage. A third common error occurs with the area-specific curet. Careful examination of the instrument design will reveal that the blade is essentially straight. The blade curves away from the shank but as one approaches the toe the blade straighten out. Clinicians should not move the stone in a curve as they sharpen the length of the blade. Moving the sharpening stone in a “curved” arc around the area specific blade will lead to a pointed toe (Figure 11).
CONCLUSION
Proper sharpening technique requires practice and patience. Careful evaluation of all scaling instruments is recommended prior to use on a patient. Ensuring that instruments are adequately sharpened will help to prevent operator fatigue and encourage better clinical outcomes.
REFERENCES
- Wilkins E. Clinical Practice of the Dental Hygienist. 12th ed. Philadelphia: Lippincott, Williams & Wilkins; 2017.
- Scaramucci MK. Hone your sharpening technique. Dimensions of Dental Hygiene. 2014;12(2):32–33.
- Darby M, Walsh M. Dental Hygiene Theory and Practice. 4th ed. St Louis: Saunders; 2015.
- Balevi B. Engineering specifics of the periodontal curet’s cutting edge. J Periodontol. 1996;67:374–378.
- Scaramucci, MK. A primer on instrument sharpening. Dimensions of Dental Hygiene. 2009;7(9):32–35.
From Dimensions of Dental Hygiene. February 2018;16(2):24, 26-28.
